
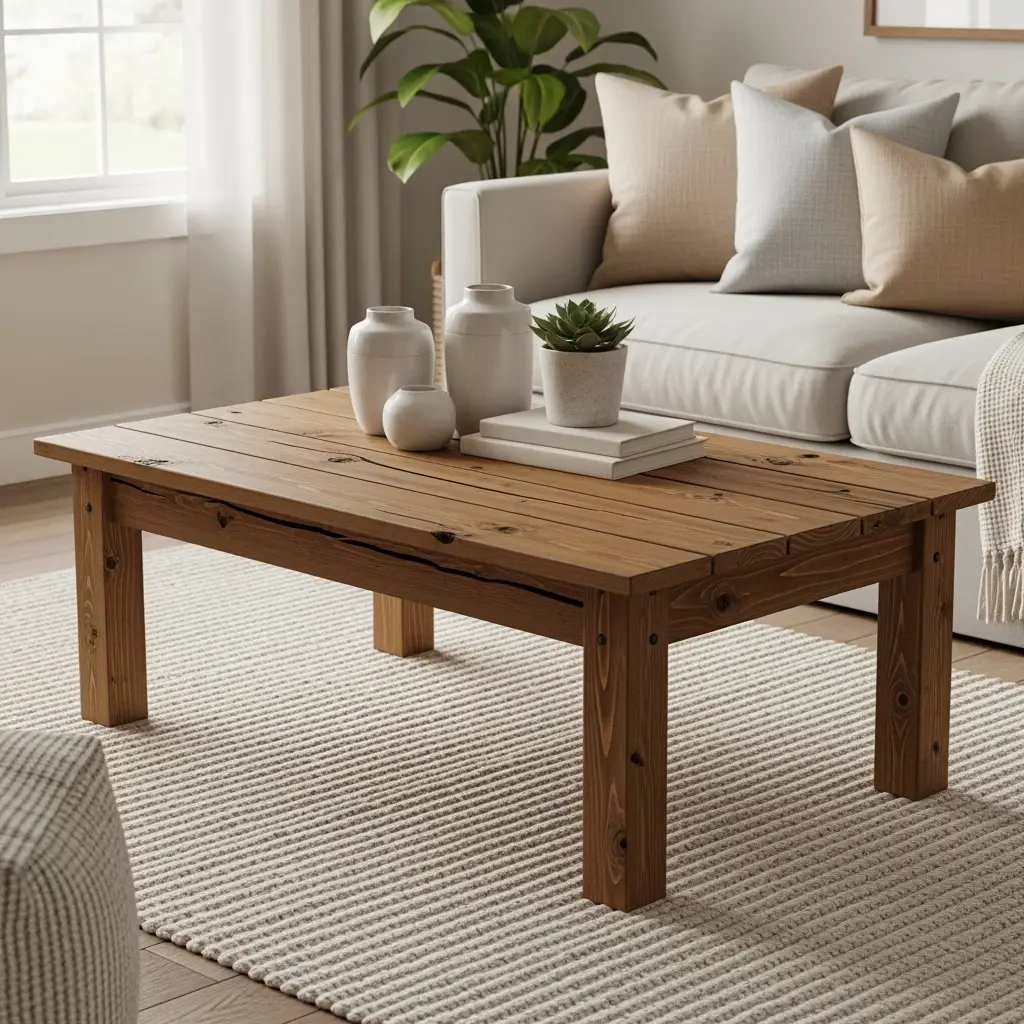
So you’ve got the itch for a new centerpiece in your living room, huh? You keep scrolling through Instagram or Pinterest and those killer rustic coffee table builds keep showing up in your feed. It’s like they’re calling your name. And let’s be honest, lo-fi wood vibes just hit different—the scratches, dings, and swirls only make it look more legendary. Today, we’re diving deep into the world of a rustic coffee table build, walking you through everything—from dream concept to the epic sawdust finish. If you’re pumped to flex those DIY muscles (or even just wanna survive the build), let’s get started.

Why a Rustic Coffee Table Build Totally Rocks
- Timeless Charm: Rustic designs legit never go outta style. The worn wood, chunky frames, and classic lines are evergreen.
- Creature Comforts: This ain’t fancy museum stuff. These tables are built for propping up your feet, dropping your keys, or even taking a late-night pizza box hit.
- Budget-Friendly: A rustic coffee table build doesn’t drain the wallet. You can often use reclaimed wood or leftovers from other projects (save those bucks, man!).
- Custom Vibes: Building your own means picking the exact finish, size, and features that slap for your pad.
Planning Your Rustic Coffee Table Build
Before you dive straight into the sawdust, chill a moment and plan the heck out of this rustic coffee table build. Solid prep helps dodge classic rookie mistakes, keeps your nerves calm, and ensures the final piece isn’t wobbly AF. Here’s what you gotta think about:
- Size: How big is your space? A typical coffee table is about 48” x 24” x 18” (but make it fit your couch, not just some random dimensions online).
- Wood Selection: For a legit rustic coffee table build, you want woods like pine, oak, maple, or even old pallets—think gnarly, knotty, and not quite perfect.
- Tools Needed: Don’t go MacGyver. You’ll need a saw (hand or miter), a drill, sander, wood glue, clamps, and measuring tape at minimum.
- Hardware: Rustic means visible screws/bolts can work but plan if you want a cleaner or even grungier look.
- Budget: Set a limit. Reclaimed wood can mean cheap, but buying fancy legs and fancy finishes might not.
Mistakes to Avoid in Your Rustic Coffee Table Build
Nobody’s perfect, but some mistakes are straight-up avoidable. This ain’t your grandparent’s project, so make it your own but heed these classic oops moments:

- Skipping the dry fit: Assemble without glue first. Trust me, you don’t wanna rip everything apart when a leg’s weirdly off center.
- Ignoring wood movement: Wood swells and shrinks. Leave a tiny gap when joining big boards, or you’ll be mad when things split next winter.
- Bad sanding jobs: Leave it rough, but not splinter-city. Hit a sweet spot where it’s touchable but not polished like a kitchen counter.
- Cheap fasteners fail: Don’t save twenty cents on screws that’ll snap. Quality hardware means no wobbles down the road.
- No finish plan: A rustic coffee table build with no sealant sucks up every spill. At least slap on a coat of oil or wax—future you will thank you.
What You’ll Need for a Rustic Coffee Table Build
- Wood: 2x4s for framework, 2x6s or noggins for the top, and some 4x4s for the chunky legs (if you dig the farmhouse vibe).
- Fasteners: Wood screws, brackets, wood glue. Maybe even some industrial bolts if you’re feeling extra.
- Finishes: Stain, oil, or wax—keep it rustic. Matte or satin over gloss for that laid-back farmhouse finish.
- Tools: Saw, sander, drill, tape measure, clamps, a square, and a pencil.
- Optional bling: Metal straps, castors (if mobile is your thing), or a concealed shelf for extra storage.
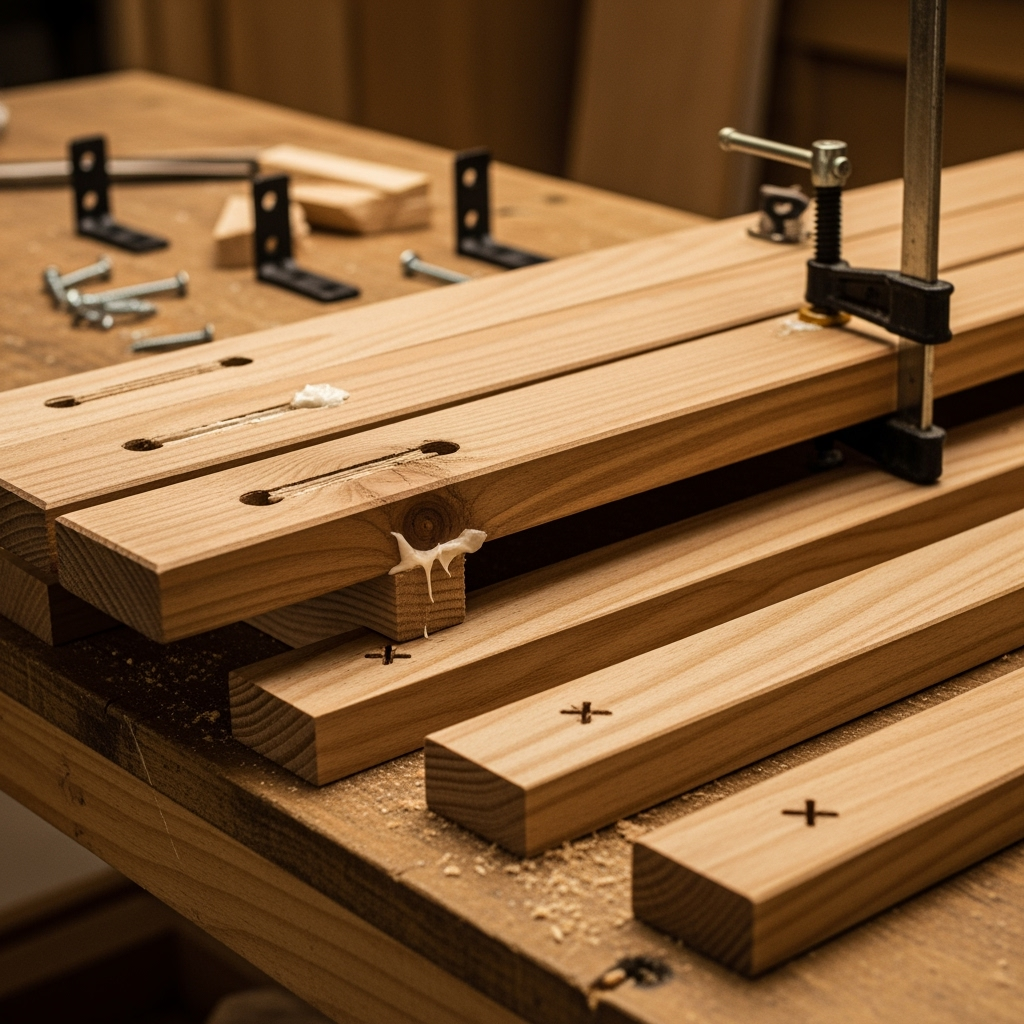
Step-by-Step: Building Your Rustic Coffee Table
This is where the fun goes down. Let’s break the rustic coffee table build into bite-sized parts, so you’re never lost or overwhelmed.
Step 1: Source Your Wood
The best part of a rustic coffee table build? Hunting for the right wood! Check salvage yards, Craigslist, or leftover planks. Each scar or nail hole means more character for your table. Don’t get too pretty—imperfections are the rustic signature.

Step 2: Measure Twice, Cut Once
This ain’t the time for guesswork, folks. Triple-check every measurement, especially since an off-cut leg will haunt you later. Lay out your boards for the tabletop—you want that grain and those knots looking like a hardware store commercial.
Step 3: Prep Boards
- Sand ’em down just enough so you won’t snag a shirt. Keep those sawmill marks if you love vintage vibes.
- Bust out a wire brush to further rough up the wood if it feels *too* clean. Trust—adds that weathered look.
- If you want a true barn find finish, lightly burn the surface with a torch and brush it off (don’t go wild and burn the house down please!).
Step 4: Assemble the Tabletop
Align the top boards, making sure the prettiest pieces are where you’ll see ‘em most. Use pocket holes, biscuits, or just go straight with wood glue and clamps. The rustic coffee table build vibe means small gaps aren’t a crisis—embrace ’em.
Step 5: Frame It Up
Attach 2×4 apron boards underneath the top. It adds rigidity and somewhere to screw into for your legs. Countersink those screws for a less obvious look, or leave them out if you’re into the industrial thing.
Step 6: Install Legs
- If you’re using 4×4 posts, they’ll look beefy and farmhouse-y. Clamp and screw them into the corners underneath—it’ll get real sturdy real quick.
- For a sleeker look, use metal hairpin legs (they’re trendy, quick to install, and save you a ton of sweat).
Step 7: Bonus Features (Optional)
Add a lower shelf—just grab extra boards and install ‘em about 6”-8” from the bottom. Great for stashing blankets or hiding your game controller mountain. Or, for even more swagger, add decorative corner brackets or metal straps for a reclaimed barn look.
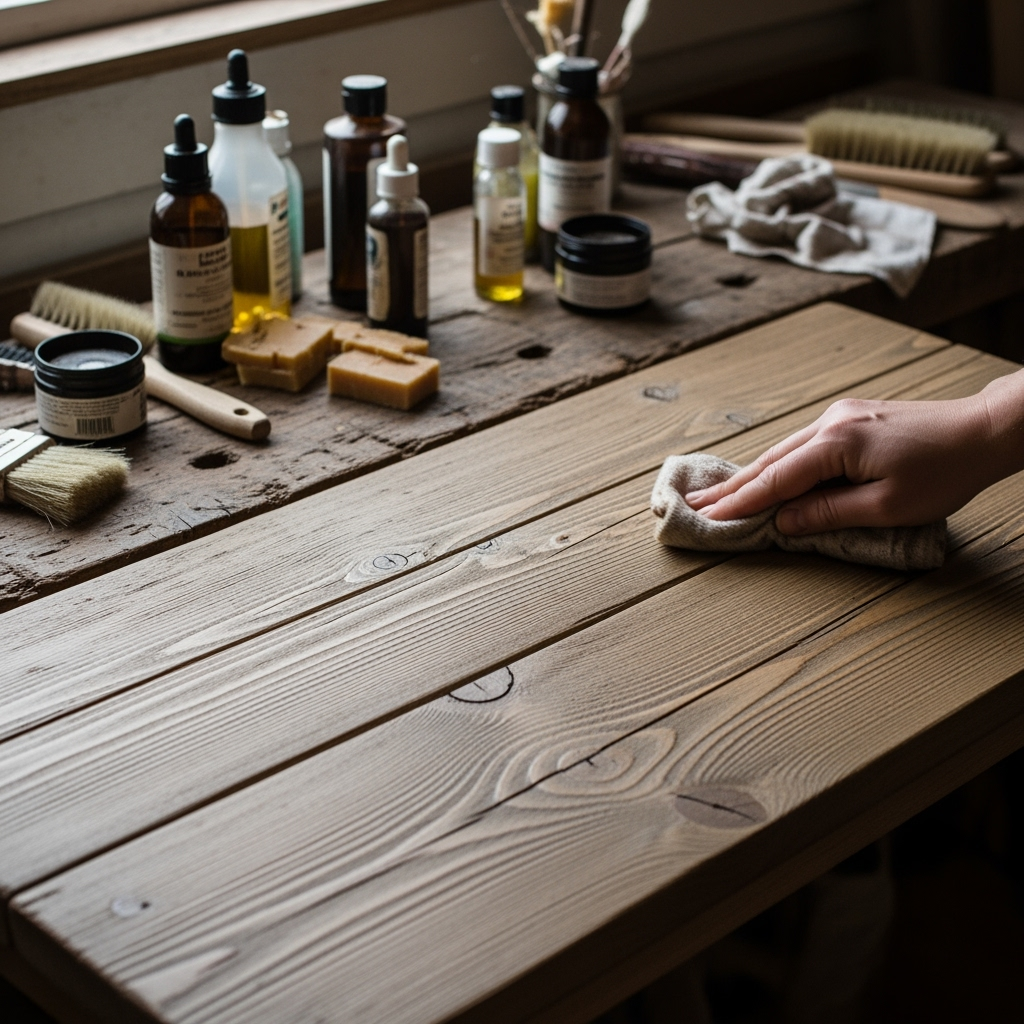
Step 8: Finishing Your Masterpiece
- Pick a stain or oil that pops those grains but fits the rest of your space. Provincial, walnut, even blackened oak are killer choices for a rustic coffee table build.
- Brush or rag it on, let it sit, and wipe off excess for an uneven, authentic (aka perfectly-imperfect) look.
- Finish with a couple coats of furniture wax or polyurethane (low-gloss, please) to protect coffee spills and pizza grease.
Top Rustic Coffee Table Build Styles
- Farmhouse X Style: Sturdy cross supports on the ends. Super classic and always grabs attention. If Joanna Gaines loves it, you’re probably crushing it.
- Industrial Mash-Up: Mix chunky wood with metal legs or thick bolts. Looks both tough and artsy. Your guests will ask where you bought it.
- Pallet Perfection: Upcycle old pallets for max rustic. Sand ‘em, stain ‘em, and stack for instant cool. Caution: prep that wood, pallets can be gnarly.
- Chunky Slab: One big-thicc slab for the top, no planks. Minimal finish. Just raw, bold vibes.
- Vintage Crate: Attach old apple crates under a plank top for storage and maximum old-school feels.
Tips for Nailing the Rustic Coffee Table Build Finish
- Stain in Thin Layers: It’s tempting to go heavy for darker colors, but you’ll get a richer look building up stain bit by bit.
- Distress it: Whack it with chains, drop some heavy screws, or poke nail holes. Go full mad scientist!
- Layer Finishes: Brushing a different color into knots for extra pop creates one-of-a-kind patina.
- Matte Finishes: Always look more rustic than shiny, keep it soft and worn in.
Common Problems and How Not to Panic
- It’s Wobbly: Tighten all screws. Check that legs are flush against the apron. Shim with cardboard til’ it sits right, then glue a wood chip in if needed.
- Stain is Uneven: No worries—it’s rustic! Touch-up with some sandpaper or add a second stain wash to blend it all together.
- Gaps Showing: Fill with sawdust and glue, or just roll with it. Gaps add character in a rustic coffee table build.
- Finishing Smudges: Buff out sticky spots with fine steel wool when fully dry, then re-wax.
Who Should Try a Rustic Coffee Table Build?
- DIY first timers: The rustic look means “mistakes” just make it cooler, so relax and have fun learning.
- Budget decorators: Skip the furniture store markup and make legit, lasting furniture for pennies on the dollar.
- Skill builders: Perfect for learning basic woodworking skills you’ll need for bigger projects (and you’ll use these forever).
- Creative souls: If you want something unique, you literally can’t mess up a rustic coffee table build—as long as it stands!
Customizing Your Rustic Coffee Table Build
This is where you can really flex on your friends. The beauty of a rustic coffee table build is how you can spin it to hit your own style target. Check these customization ideas:

- Painted Touches: White-washed or distressed paint looks epic. Leave streaks and brush-marks for extra chill vibes.
- Hidden Storage: Hinged tops or secret drawers for remotes, mags, whatever you want out of sight.
- Wheels: Add some vintage-style casters if you want to move it around all the time.
- Inlays: Drop in some tile, barn metal, or even river rock for a killer custom twist.
Care and Maintenance for Your Rustic Coffee Table Build
- Dust with a soft cloth: Weekly if you wanna keep it fresh.
- Re-wax or oil every 3-6 months: Especially if you’ve got rowdy kids or pets.
- Don’t stress every ding: The more it gets “lived-in”, the better a rustic coffee table build looks!
- Touch-Up Tips: Small scratches? Rub a walnut across the grain to hide minor stuff.
Conclusion: Why Your Next Project Should Be a Rustic Coffee Table Build
If you want a DIY project that’s equal parts easy, rewarding, and serious living room eye candy, you can’t beat a rustic coffee table build. The flexibility, the cost savings, and the custom options blow anything you’ll get off the shelf away. Best part? You’ll get all the flex points with your friends, and every scratch and dent will be a story from your own hands, not some boring showroom copy.
If you’re itching to get started, gather your tools, sketch out your dream size, and scour your area for the wood with the most soul. With a little patience (and maybe a couple of curse words), you’ll soon have a rustic coffee table that’s as unique as you are—one that’ll only get better with time, spills, and stories. Go make it happen!


