
Alright y’all, let’s dive right in! If you’ve ever chopped veggies on a wobbly piece of plastic and thought, “There’s gotta be a better way,” boy, have I got news for you. Making your own DIY wooden cutting board isn’t just a fun weekend project — it’s a total game changer for your kitchen vibes and your skills as a woodworker. Whether you’ve got a trusty set of power tools or you’re just starting with a basic saw and some sandpaper, a DIY wooden cutting board is the perfect blend of useful, beautiful, and hella satisfying to make.
Why Choose a DIY Wooden Cutting Board?
The very idea of a DIY wooden cutting board gets me buzzin’! Not only is it practical, but you can totally customize it to fit your style and kitchen aesthetic. Still not convinced? Here’s why you should jump on this epic project:
- Personalization: Create a one-of-a-kind piece that matches your kitchen and makes your chef heart proud.
- Natural Beauty: That classic wood grain? It’s a stunner AND it’s good for your knives.
- Eco-Friendly: Use upcycled or sustainably sourced wood for that “I-care-about-the-planet” badge.
- Cost-Effective: Forget those overpriced store boards — making your own DIY wooden cutting board saves the cheddar.
- Skill Builder: It’s the ultimate beginner’s woodworking project, and you’ll flex new creative muscles for sure!
The Basics: What Makes a DIY Wooden Cutting Board So Awesome?
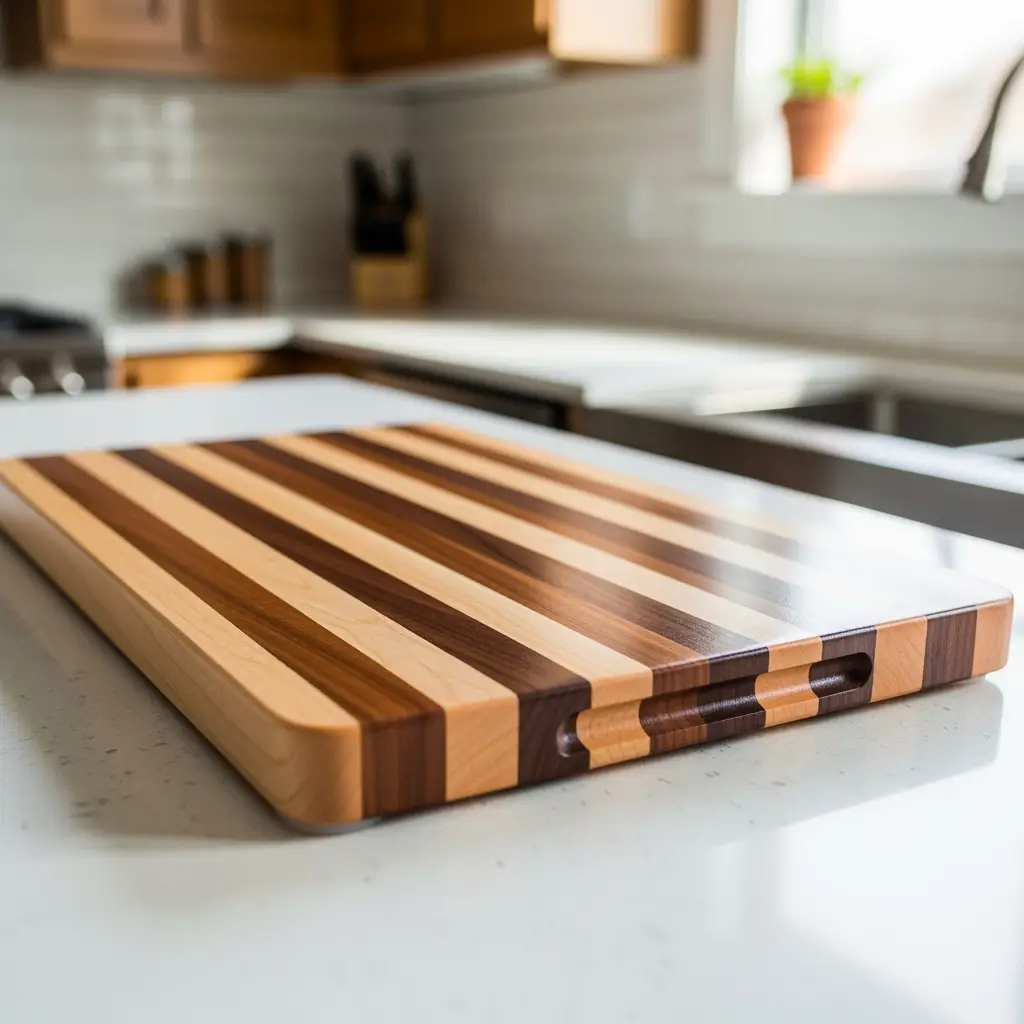
Okay, let’s break it down. A DIY wooden cutting board is way more than just a slab of timber. When you make it yourself, you choose the wood, the shape, and pretty much every lil’ detail. Wanna go round? Sure thing. More into that chunky, rectangular look? You got it!
But the real kicker? DIY wooden cutting boards are so much better for your knives compared to glass or cheap plastic boards. They’re durable, naturally antibacterial, and totally up for daily use. Plus, there’s just something about slicing and dicing on a creation you made yourself that makes food prep *way* more fun.

What You’ll Need for Your DIY Wooden Cutting Board
Alright, let’s get that materials list popping. Here’s what you gotta have to crush your first DIY wooden cutting board project:
- Your Favorite Wood: Maple, walnut, cherry, and beech are awesome picks. Avoid softwoods (like pine), as they can splinter or hold bacteria.
- Wood Glue: Food-safe glue is a must — Titebond III is a classic for a reason.
- Clamps: Board glue-ups love a good tight squeeze.
- Saw: Table saw, circular saw, or even a trusty handsaw if you wanna go old school.
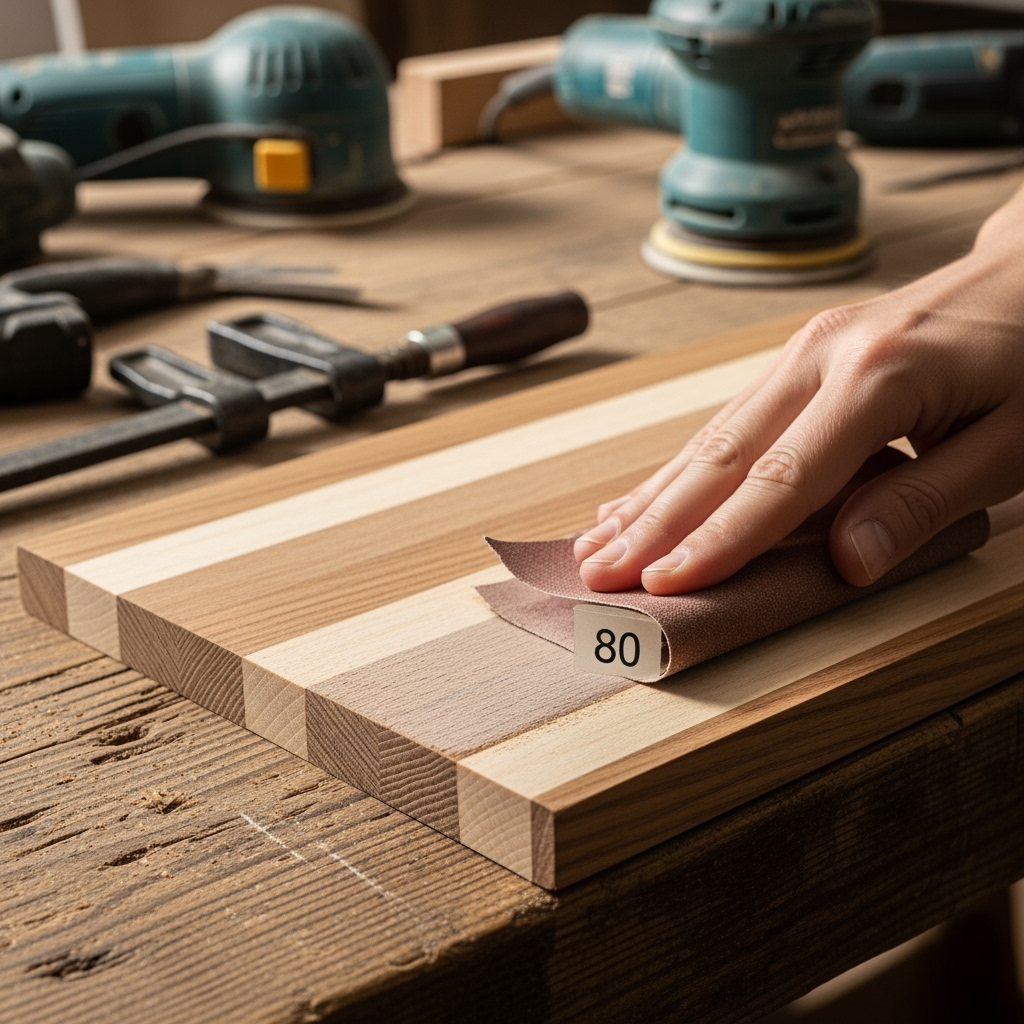
- Sander: Orbital sanders are magic, but elbow grease works too with sandpaper (start at 80 grit, finish at 220+!).
- Finish: Mineral oil or a beeswax/mineral oil blend gives your board that chef’s kiss finish.
- Optional: Router (for rounded edges), food-safe finish, and non-slip feet.
Step-By-Step: How to Build a DIY Wooden Cutting Board
Time for the nitty gritty! Follow along, and you’ll have a gorgeous DIY wooden cutting board in no time.

Step 1: Select and Prep Your Wood
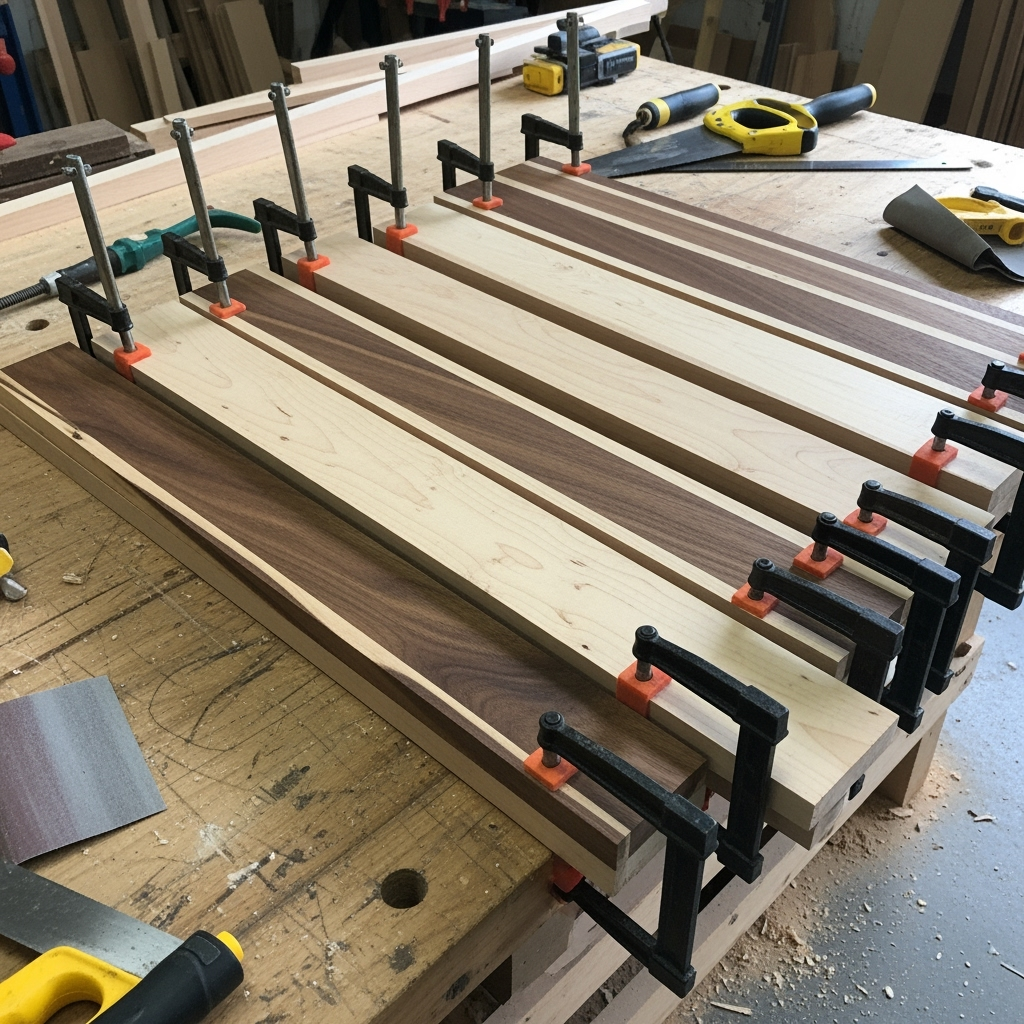
Pick up your favorite hardwood. The thicker, the sturdier (and trust me, you want beefy). Check that your planks or strips are flat and free of cracks or gnarly knots. If you’re feeling fancy, mix and match different woods for a pretty stripe effect! Lay them out and play around with the design — this is where you let your creativity loose.
Step 2: Cut Your Wood to Size
Grab your saw and trim the planks to the same length. Most folks go for a board that’s 12″ by 18″ but honestly, it’s your DIY wooden cutting board —make it big, small, long or round. Can’t mess it up!
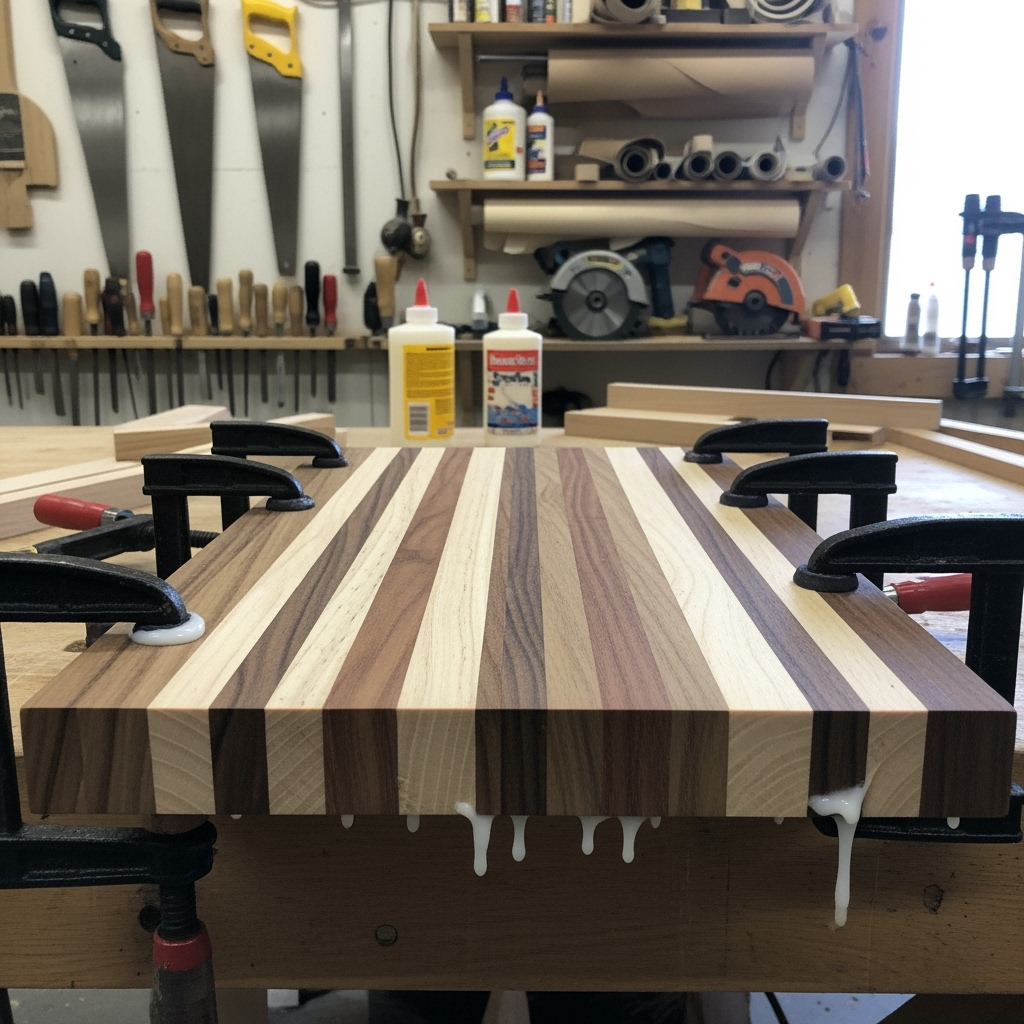
Step 3: Arrange and Glue
Lay out your strips the way you want ‘em. Apply a generous but even layer of food-safe glue between the edges, then squeeze them together. Boom! Set up your clamps and leave it for at least a few hours (overnight is best, especially if your impatient side is yappin’).
Step 4: Smoothing It Out
Once your glued-up soon-to-be DIY wooden cutting board is rock solid, bust out your sander (or sand by hand, if you’re feeling tough). Start with 80 grit to take off rough edges, then slowly go finer until you reach that glassy smooth 220 grit (or higher if you wanna go next level). Wipe off dust between grits. Rounded corners? A quick run with a router or sandpaper by hand makes ‘em smooth and safe.
Step 5: Final Touches and Oil Up!
Wipe down your DIY wooden cutting board to get rid of dust. Hit it with mineral oil or a food-safe finish — not just once, but a few times for ultimate waterproofing and shine. Let that baby soak it up and buff away excess oil with a soft rag. Looking for slick, non-slip footing? Pop on a few silicone or rubber feet on the bottom.

Top Tips for an Epic DIY Wooden Cutting Board
- Make it thick! Boards under 3/4″ can warp easier, so beef it up if you can.
- Check your glue joint — gaps let water in, which is bad news for longevity.
- Stripes and end-grain designs look pro but take a lil’ more time (totally worth it tho!).
- Don’t skip the oiling — dries wood cracks and will make you cry a lil’. Oil = happy board.
- Sneak in a juice groove with a router for that chef-y look & to catch drips.
The Science Behind a Great DIY Wooden Cutting Board
It ain’t just about looks. The right DIY wooden cutting board protects your knives better than anything flimsy from the store. The end grain — that’s when you see all those lil’ wood fibers as tiny squares — lets your knife slip between the fibers instead of slamming into ‘em. Less dulling, more precision. If you’re slicing and dicing daily, an end-grain DIY wooden cutting board will stand up for years (just hit it with mineral oil every now and then, and you’re golden).
Maintaining Your DIY Wooden Cutting Board
Let’s keep your hard work looking sharp! After building your DIY wooden cutting board, maintenance is a snap. Here are the basics:
- Clean after every use: Wash with warm soapy water and dry it straight away. No soaking!
- Oil weekly for a while: Especially at first, help it build up that food-safe barrier. After a month or so, you can get lazy and oil less, lol.
- Sanitize safely: Hit it with a little diluted vinegar or lemon juice, then rinse and dry for that fresh feel.
- Never put it in the dishwasher: Trust me — even a tough DIY wooden cutting board will warp or crack from those dishwasher vibes.
Customizing Your DIY Wooden Cutting Board
This is where you can flex your creative muscles! Wanna really rock your DIY wooden cutting board? Try one (or all!) of these upgrades:

- Juice Groove: Use a router to carve a shallow edge so juices stay off your counter.
- Handle Cutout: Jigsaw a hole for easy grab-and-go action.
- Personalized Inlays: Got a woodburning tool? Add initials, a logo, or a punny kitchen quote for that personal flair.
- Hang Loops: Drill a hole in the corner and tie on a leather loop for hanging storage.
- Stabilizer Feet: Add silicone feet to prevent any wild sliding.
Choosing the Best Wood for Your DIY Wooden Cutting Board
You might be thinking, “Yo, can I just use whatever wood I’ve got lying around?” Well, you could — if you like funky odors or quickly ruined boards. Here’s your cheat-sheet for DIY wooden cutting board success:
- Maple: The classic — super hard, smooth grain, and doesn’t mess with food flavors.
- Walnut: Rich dark looks and almost as hard as maple. Stylish AF.
- Cherry: Warms up with age, takes on a sexy reddish hue. Slightly softer, but still killer.
- Beech: Often overlooked, but tough and affordable.
Avoid softwoods (like pine, cedar, or fir). They stain, they gouge, and they can hold onto bacteria — not cool.
Common Mistakes When Making a DIY Wooden Cutting Board (And How to Dodge ‘Em!)
- Gappy Joints: Rushing the glue-up or using warped wood can give you ugly seams. Check flatness right after clamping.
- Poor Sanding: Don’t stop at 80 grit, or you’ll get splinters and ugly scratches. Work through your grits!
- Skipping the Finish: Wood needs protection. Oiling after every wash (for the first week) sets your board up for the long haul.
- Wrong Glue: Regular ol’ wood glue ain’t food safe. Titebond III or similar is your bud.
- Lazy Cleaning: Don’t let moisture soak into the board for long periods, or else warping might sneak up on you.
Gift Ideas: Spreading the DIY Wooden Cutting Board Love
There’s nothing like handing over a homemade DIY wooden cutting board — it’s personal, heartfelt, and makes you look like a pro. Wanna level up the presentation?
- Bundle your DIY wooden cutting board with a bottle of fancy olive oil or your favorite spice rubs.
- Add a handwritten recipe card (think guac, salsa, or a killer charcuterie).
- Wrap with butcher paper and tie off with twine for a rustic-chic vibe.
Perfect for housewarming parties, anniversaries, or even wedding showers. They’ll remember that gift — trust me!
Advanced Upgrades for Your DIY Wooden Cutting Board
Ready to go full beast mode? Once you’re comfy with the basics, try these upgrades:
- End Grain Magic: Chop and re-glue strips so the “ends” face up for insane durability and an epic checkerboard pattern.
- Resin Inlays: Mix colored resin into carved channels for an artsy pop.
- Live Edge Beauty: Leave one edge natural and rustic for a wild, organic look (be sure to sand smooth and fill voids!).
Frequently Asked Questions: DIY Wooden Cutting Board
How long does it take to make a DIY wooden cutting board?
If you’ve got all your supplies, you can knock out a basic board in 3–4 hours, plus glue drying time. Fancier designs? Might take a solid weekend — but it’s hella worth it!
Can I use reclaimed wood for my DIY wooden cutting board?
Heck yeah! Just make sure it’s clean, hardwood, and free from paint, nails, and nasty chemicals. Sand heavily and finish well for safety.
What’s the best way to keep my DIY wooden cutting board from sliding?
Easy: Add silicone bumpers or non-slip feet, especially if you go with a thinner or lighter board.
Should I use both sides of the DIY wooden cutting board?
Absolutely! Flip it over for different foods or to spread out the wear. Plus, you get double the cutting surface — win!
Why a DIY Wooden Cutting Board Belongs in Your Kitchen
At the end of the day, there’s just no substitute for a solid DIY wooden cutting board. It’s tough, kinda gorgeous, and totally custom — a jaw-dropping centerpiece for your countertop that’ll make your friends jealous and your knives hella happy. Plus, every time you prep a meal, you’ll get a lil’ burst of pride knowin’ you built that beauty with your own two hands. Woodworkers new and old, it’s time to roll up your sleeves and get sawdusty!
Your next steak, salad, or party cheese platter deserves a stage as awesome as the food itself. Get crafty, get creative, and show off your chops — literally! Whether you give ‘em away, sell them at your next craft fair, or keep ‘em all for your own kitchen glory, the DIY wooden cutting board is where woodworking dreams (and dinner magic) begin.


