
Hey there, fellow woodworker! So, you wanna take your DIY game up a notch, huh? You’ve come to the right spot, ‘cause today we’re totally diving into the world of DIY wine rack plans that are perfect for every kind of space and skill level. Whether you’re just starting to tinker or you’ve got sawdust in your veins, building a custom wine rack is the kind of project that brings together function, style, and just a dash of class to your home. Plus, let’s be real: it always feels good showin’ off your handywork whenever friends or fam come over for a glass (or bottle) of vino.
Why Build Your Own Wine Rack?
Plenty of us love poppin’ the cork, but what about having that showroom-worthy spot to store your bottles and show off your collection? Here are a few sweet reasons to get into these DIY wine rack plans:
- Personalization: It’s your style, your wood, your finishes. No two racks turn out exactly the same.
- Cost-effective: A designer store-bought rack can cost you big bucks, but with DIY wine rack plans you control the budget.
- Proud moments: You literally get to brag and say, “Yep, I made that.” Where’s the wine, anyway?
- Skill building: With every cut and screw, you’ll sharpen those woodworking skills.
Tools and Materials for DIY Wine Rack Plans
Alright, before you bust out the saw, let’s make sure you’ve got all the tools and supplies lined up for these DIY wine rack plans. Depending on which style you pick (we’ll get to those soon), here’s a basic checklist:
- Tape measure and pencil
- Circular saw or miter saw
- Screwdriver or drill
- Sandpaper (various grits)
- Wood glue
- Clamps (super handy for getting those pieces nice and snug)
- Wood stain, paint, or sealer
- Lumber: Pine, cedar, or hardwood
- Screws, nails, or dowels
These basics will give ya a running start. As you check out the DIY wine rack plans below, you’ll see some call for extra supplies depending on how fancy you wanna get.

Choosing the Perfect DIY Wine Rack Plan for Your Space
Huge, sprawling cellar? Cozy apartment nook? There’s a DIY wine rack plan out there for every kind of wine lover. Here’s how to pick the right design for your home:
- Size up your collection. Just a handful of bottles on hand, or are you a legit wine enthusiast? Decide how much storage you really need.
- Measure your space. Is your new wine rack gonna go on the wall, on a counter, or tucked inside a cabinet?
- Style vibes. Rustic farmhouse, sleek modern, classic wood? Match the wine rack’s style to your decor for an instant win.
Top 8 DIY Wine Rack Plans
Ready for the good stuff? Here are some of the absolute best DIY wine rack plans for different spaces and skills. Don’t forget to check the details and free blueprints available online. Some of these bad boys even use reclaimed wood or upcycled materials for extra character.

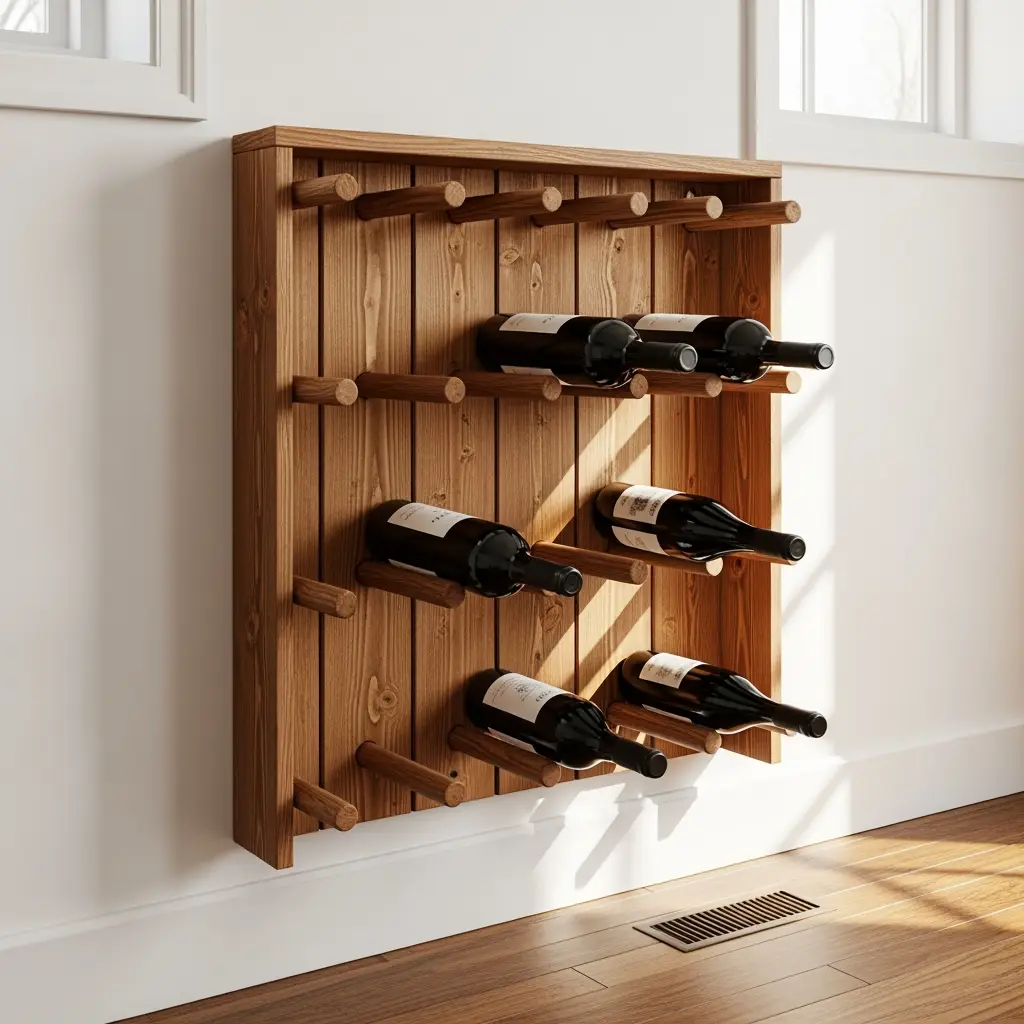
1. Simple Wall-Mounted Wine Rack
If you’ve got a bare wall just screaming for an upgrade, this one’s for you. A basic wall-mounted wine rack can be whipped up with a board, some dowels or pegs, and a few wall brackets. The bottles lay horizontally, keeping corks moist and flavors fresh.
- Cut your board to size (usually around 3-4 feet long works great).
- Drill evenly spaced holes for your dowels—think about spacing for easy bottle access.
- Sand it smooth, finish with wood stain or paint, and attach to your wall studs for sturdy support.
- Slide in the bottles and, boom, instant style!
2. Countertop Wine Rack Box
Love to keep your favorite bottles within easy reach? A compact countertop wine rack is one of the most popular DIY wine rack plans. Typically built from scrap wood or 1×6 boards, this box-style rack can be customized for as many bottles as you want.
- Build two sides and a base to form a U-shaped frame.
- Add diagonal inner slats if you want a crisscross look (super chic and also practical).
- Finish, glue, nail, and let dry overnight. Put your best bottles upfront for instant bragging rights!
3. Hanging Rope & Reclaimed Wood Wine Rack
Wanna channel those cool urban loft vibes? Try out a wine rack plan featuring hanging rope and reclaimed wood. This looks fancy, but trust me, it ain’t hard. Use weathered boards for extra personality.
- Cut your board, then drill holes through each end to thread your rope.
- Space bottle holes along the length or make a small shelf for wine glasses too.
- Hang from ceiling hooks, tie knots, and double-check stability before loading up with bottles.
4. Rustic Pallet Wood Wine Rack
Don’t toss that old pallet! Instead, break it down into planks and create a rustic-style wine rack with built-in glass holder slots. This plan is a favorite among folks looking for that farmhouse touch.
- Disassemble a shipping pallet and arrange boards for a back panel.
- Add horizontal supports spaced for wine bottles and bottom slats for hanging glasses.
- Sand the whole piece but keep some roughness for character.
- Mount it to your wall and get ready for compliments.
5. Standing Floor-To-Ceiling Wine Tower
If you’re that person with a wine collection that’s, uh, getting kinda serious, you need more capacity. Floor-to-ceiling wine towers can fit dozens of bottles and make a statement in your dining or living room.

- Use sturdy 2×4 or 2×6 lumber for the frame and supports.
- Add horizontal or angled slats inside the frame to hold each bottle secure.
- Secure the tower to both floor and ceiling for safety (especially if ya got kids or pets zipping around).
6. Under-Cabinet Wine Rack
Short on space? DIY wine rack plans that tuck under cabinets are a sneaky-smart way to add storage without crowding your counters.
- Use slim boards and screw them into underside of cabinets with enough clearance for the bottles’ necks.
- Slotted designs work best to keep bottles from rolling and for easy access.
7. Geometric (Honeycomb) Modular Rack
Modular style lets you add as your collection grows. A honeycomb pattern looks modern and is quick to build with plywood or MDF. Each hexagon can be glued together or connected with brackets.
- Cut six identical panels per hexagon bottle slot.
- Glue and clamp each into shape, then link together for a custom fit.
- Paint or lacquer for a standout modern look.
8. Repurposed Drawer or Crate Wine Rack
Got an extra drawer or wooden crate gathering dust? This is the ultimate upcycle. Lay the crate on its side, reinforce it with a few slats or dividers for bottles, and, if you like, add legs or stack for extra height.
- Sand rough spots and reinforce corners for durability.
- Install wood or metal dowels as dividers.
- Finish with stain, paint, or keep it raw for that vintage thrift shop vibe.

Step-by-Step Guide: Building a Basic Wall-Mounted DIY Wine Rack
Let’s run through one of these beginner-friendly DIY wine rack plans in more detail. The following steps cover a classic wall rack for six bottles. Scale this up or down to match your wine needs!
Materials You Need
- One 3-ft long 1×6 wood board (pine or hardwood)
- Six 8-inch dowels (¾” diameter)
- Wood glue
- Sandpaper (120/220 grit)
- Stain or finish
- Picture hanging hardware or heavy-duty wall screws
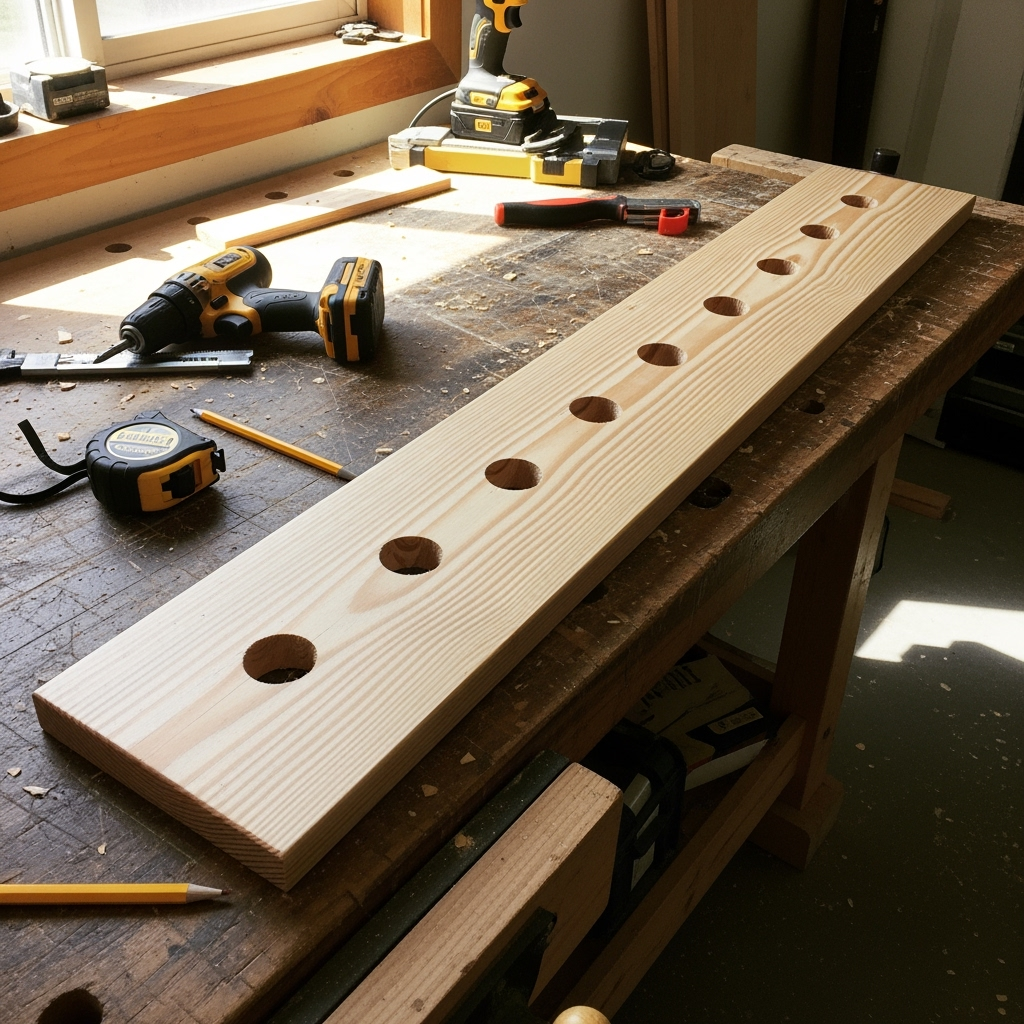
Step 1: Mark and Drill
Mark six evenly spaced spots (4″ to 5″ apart depending on bottle size) along your board. Drill ¾” holes all the way through at a slight upward angle—this stops bottles from slipping out. Test-fit with a bottle if you’re unsure about placement!
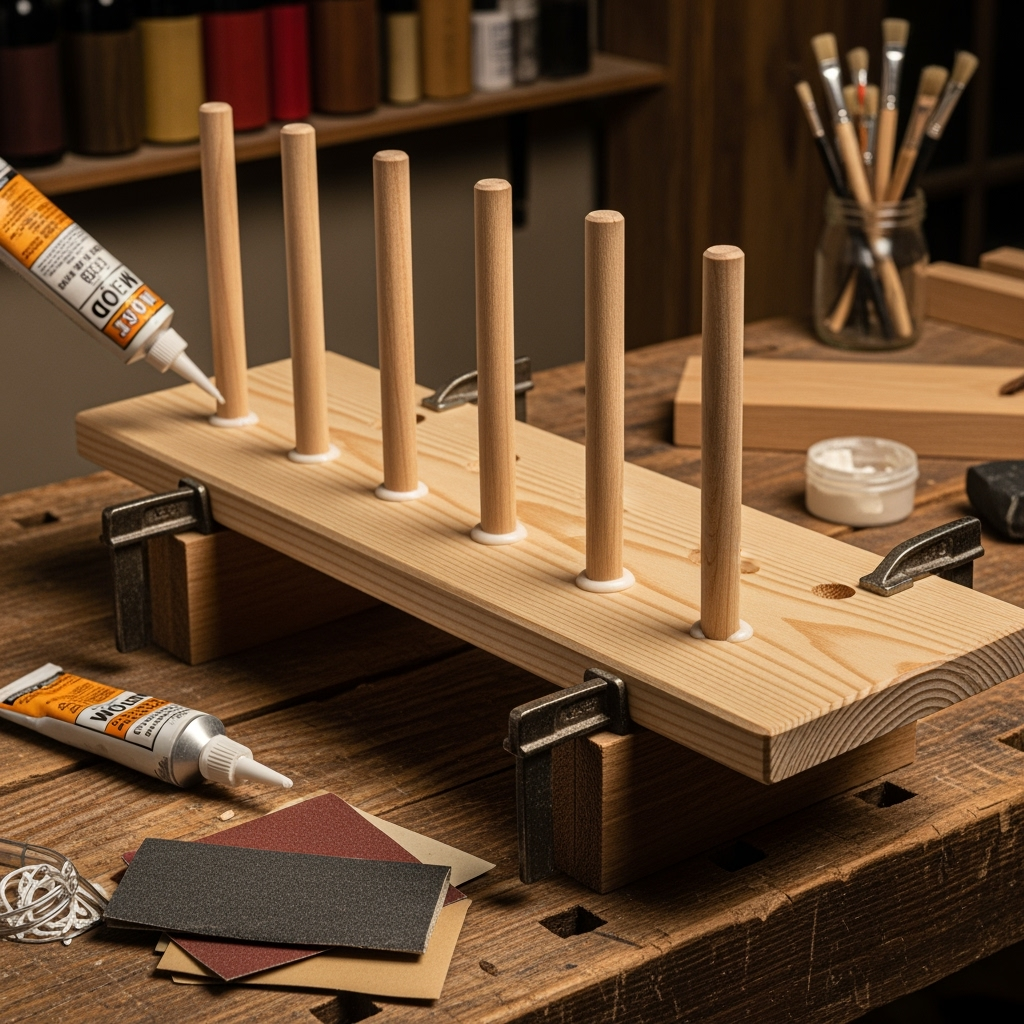
Step 2: Prep and Attach Dowels
Sand the board and dowels smooth. Add a dab of wood glue into each hole, then insert dowels so they project out about 7 inches. Wipe away excess glue.
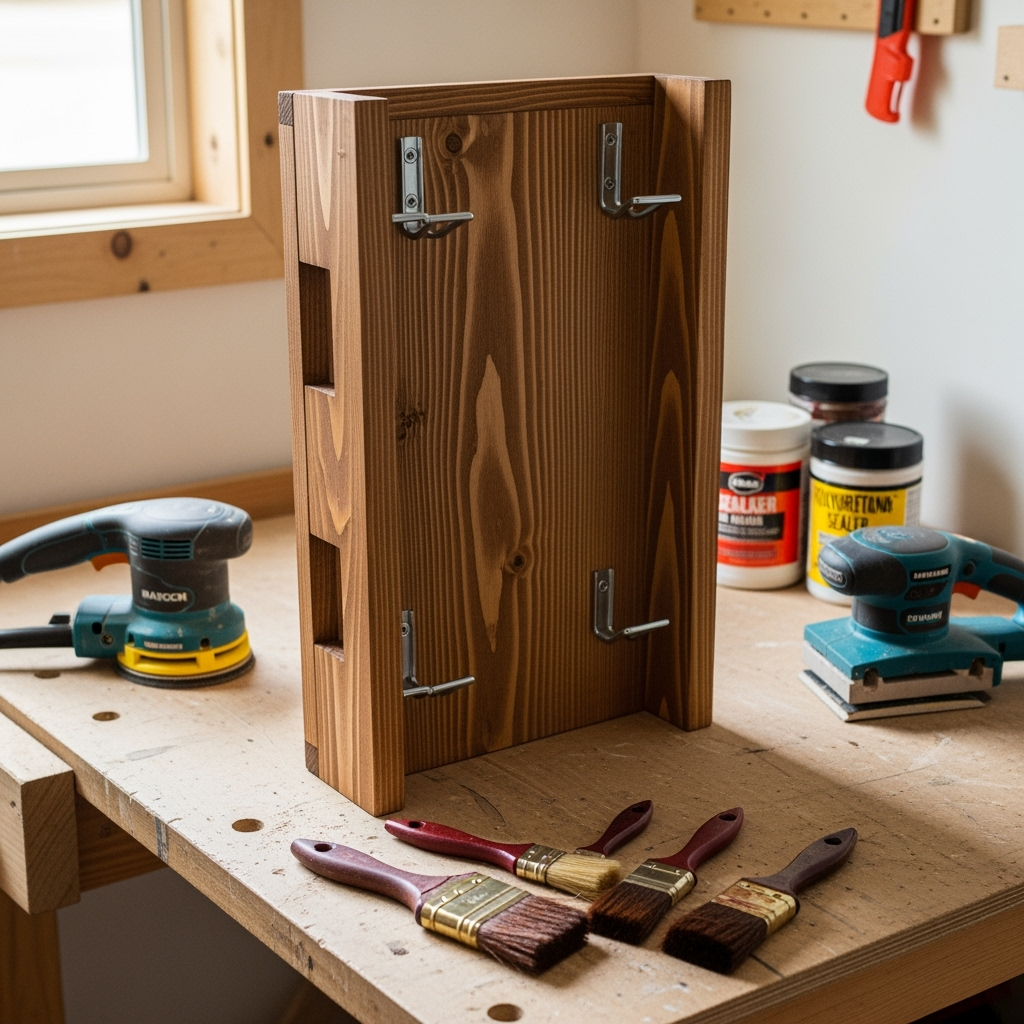
Step 3: Finish and Hang
Once dry, apply your chosen stain or sealer and let it cure. Attach strong hanging hardware on the back, then mount directly into wall studs for heavy-duty support. Load up your favorite bottles and step back—ta-da!—that’s one stylish wall rack.
Essential Tips for Success With DIY Wine Rack Plans
There’s nothing worse than finishing a project only to find out it doesn’t fit, look right, or even hold your bottles safely. Here’s how to avoid rookie mistakes with DIY wine rack plans:
- Plan for bottle size: Standard wine bottles are about 3″–3.2″ in diameter and around 12″ long, but wine comes in all shapes and sizes. Double-check measurements before cutting.
- Use quality wood: Even basic pine works fine, but if your collection is heavy or the rack is big, invest in a sturdy hardwood or quality plywood to prevent sagging.
- Keep it level: For wall-mounted racks, use a level during installation. Trust us, nothing ruins the look like a lopsided rack and rolling bottles!
- Safety first: If you have little ones or pets, make sure tall racks are anchored to the wall, and keep heavy builds away from busy walkways.
- Don’t skip finishing: A quick sand and a coat of polyurethane not only looks pro but protects wood from stains and spills.
Make Your DIY Wine Rack Plans Stand Out
Wanna level up your build? Try these easy tweaks to give your DIY wine rack plans some real wow-factor:
- Mix wood types for contrast—think lighter maple with a walnut accent.
- Add metal accents: Copper pipes, iron brackets, or even reclaimed barn hardware take your racks from ordinary to over-the-top cool.
- Paint bold colors: Got a modern kitchen? Go for matte black or navy blue for major impact.
- Monogram your masterpiece: Use stencils, decals, or a wood burner to personalize your rack for gifts or housewarming parties.
Creative Twists on Classic DIY Wine Rack Plans
Maybe you’re feelin’ bold and wanna try something different. These twists on classic DIY wine rack plans will catch every eye:
- Floating wine shelves: Stack slim floating shelves vertically; each holds a single bottle or two for a minimalist vibe.
- Wine rack with chalkboard: Attach a piece of chalkboard paint or panel to jot down tasting notes or what’s on deck for dinner parties.
- Integrated bar station: Combine a wine rack with glass storage and a mini prep area—perfect for entertaining.
- Outdoor wine rack: Weatherproof wood and install on your patio wall for sip-in-the-sun afternoons.
See? The sky’s the limit when it comes to putting your own spin on DIY wine rack plans.
Frequently Asked Questions About DIY Wine Rack Plans
- Is it cheaper to build or buy a wine rack? Building using DIY wine rack plans is almost always cheaper, especially when you use scrap or reclaimed wood. Plus, you can scale it up or down in size as needed.
- How do I prevent my bottles from falling out? Always install dowels or rails at a slight upward angle and test the fit before final assembly. If mounting on a wall, check for stud placement and use heavy-duty anchors.
- Can I build wine racks with basic tools? Absolutely. Many DIY wine rack plans are designed with beginner tools like a circular saw, drill, and sander. Fancy tools help, but they’re not required for a pro result.
- Which wood works best for wine racks? Pine is easy to find and work with, but hardwoods like oak, maple, or walnut give a more premium look. Go for untreated, food-safe finishes if you want to be extra cautious with your vino.
Wrap-Up: Start Your DIY Wine Rack Plans Project Today
So, you ready to roll? Grab those plans, pick your boards, and get to work—there’s nothing quite like sipping your favorite red or white beside a rack you built with your own hands. DIY wine rack plans let you show off not just your taste in wine, but also your skills as a maker, and that’s something to toast to. Don’t forget to take a pic and share your masterpiece. Who knows, you might inspire a friend (or two) to give DIY wine rack plans a whirl themselves. Happy building, and even happier tasting!


