
If you’re like me, itching for your backyard or balcony to look a bit more lush (without dropping tons of cash), you’re in the right spot. Today, I’m sharing everything cool and nitty-gritty about building a DIY trellis for climbing plants. Trust me, your garden will thank you, and so will your wallet. We’re talking more than just tossing up a couple sticks and calling it good—nope, this is about making something that works, lasts, and actually looks pretty wicked hanging up there! Also, check out our spring garden projects for even more creative planting ideas.
Why a DIY Trellis for Climbing Plants is a Total Game-Changer
A proper DIY trellis for climbing plants is not just a frame to prop up your beans or roses. Nah, it’s like giving your green buddies a ladder to the sky and making your outdoor space come alive. Here’s why you wanna get on this train:
- Maximizes Space: Perfect for small gardens or balconies—vertically growing plants saves big on ground space.
- Keeps Plants Healthier: Off the ground means happier, healthier, less disease-prone plants (no soggy roots!).
- Aesthetic Upgrade: Let’s be honest: Trellised vines or flowers just slap—way prettier than floppy plants.
- Flexible DIY Designs: You can custom-make your DIY trellis for climbing plants to fit any vibe or plant needs.
- Affordable AF: Why buy an expensive one when you can smash one out yourself and be proud of it?
Choosing Your Superstar Plants for a DIY Trellis for Climbing Plants
Not all plants are built for the big climb, but tons are dreaming of swinging around your new DIY trellis for climbing plants. Here are some absolute bangers to try:
- Morning Glory: Fast growers, wild flowers
- Sweet Peas: Fragrant blooms, loads of color
- Clematis: Bold flowers, instant drama
- Beans & Peas: Double win—looks and snacks
- Roses & Jasmine: For fragrance lovers
- Ivies: Classic, chill, and nearly unstoppable
Planning Your Ultimate DIY Trellis for Climbing Plants
So let’s get down to brass tacks. Before you start sawing and drilling, lock in a game plan:

- Pick Your Location: Sunny or shadier? You gotta match your trellis spot to what your plant craves. South-facing spots? Perfect for most climbers.
- Size Matters: Are you giving a home to epic beans or smaller peas? Make sure your DIY trellis for climbing plants gives ‘em room to roam.
- Material Choices: Wood, bamboo, metal? Each one has pros and cons—and the look you want is key.
- Style and Strength: Consider what’s gonna look sweet and last through wild weather over a few seasons.
Popular DIY Trellis for Climbing Plants Styles
Alright, let’s run through killer options for your DIY trellis for climbing plants—from classic to absolutely unique:
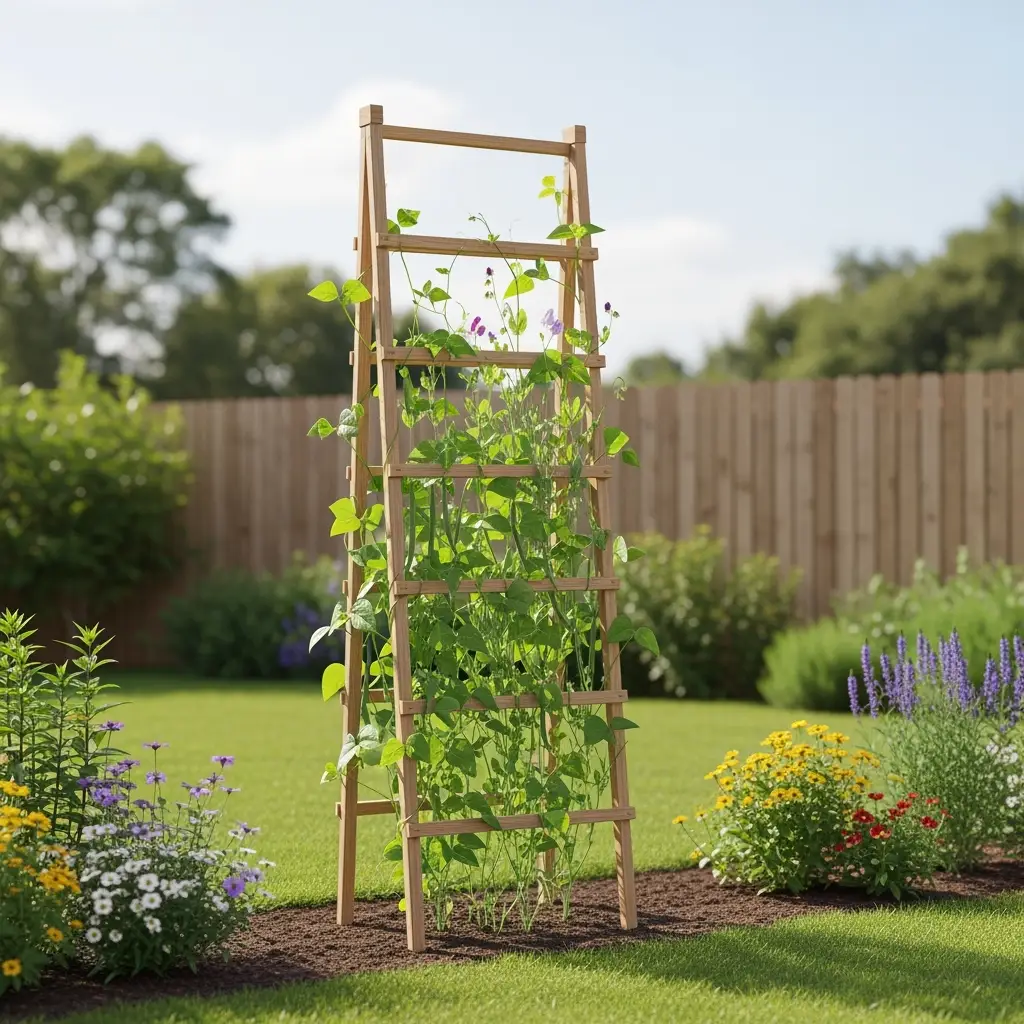
- Classic Ladder Style: Easy construction, great for veggies and flowers alike
- Fan Trellis: Elegant, perfect for statement climbers like clematis
- Obelisk (Teepee or Pyramid): Cool 3D vibes, awesome in pots or raised beds
- Wall-Mounted Grid: Save maximum space against fences or brick walls (also keeps nosy neighbors guessing)
- Arched or Tunnel: Go big—create a walk-under tunnel for maximum wow
Just remember, your DIY trellis for climbing plants is all about you! Mix and match as you like.

Materials Needed for a DIY Trellis for Climbing Plants
Don’t worry if you’re not the handiest person! Most materials and tools are absolutely beginner-friendly.
You might need:
- Wood (lattice strips, dowels, reclaimed timber, or bamboo poles)
- Galvanized wire or strong twine
- Basic hardware: nails, screws, metal brackets, zip ties
- Drill or hammer (screwdriver depends on your method)
- Saw (even a hand saw gets it done)
- Sanding block (for smooth edges/no splinters)
- Paint or outdoor sealant (if you wanna go extra and match your vibe)
Really, a solid DIY trellis for climbing plants doesn’t require fancy stuff—repurposed wood or branch cuttings work a treat, too!
Step-by-Step: Building a DIY Trellis for Climbing Plants
Here’s where the rubber meets the road. We’ll cover a simple ladder or grid design, which is the most useful DIY trellis for climbing plants for most folks. Let’s roll up those sleeves!
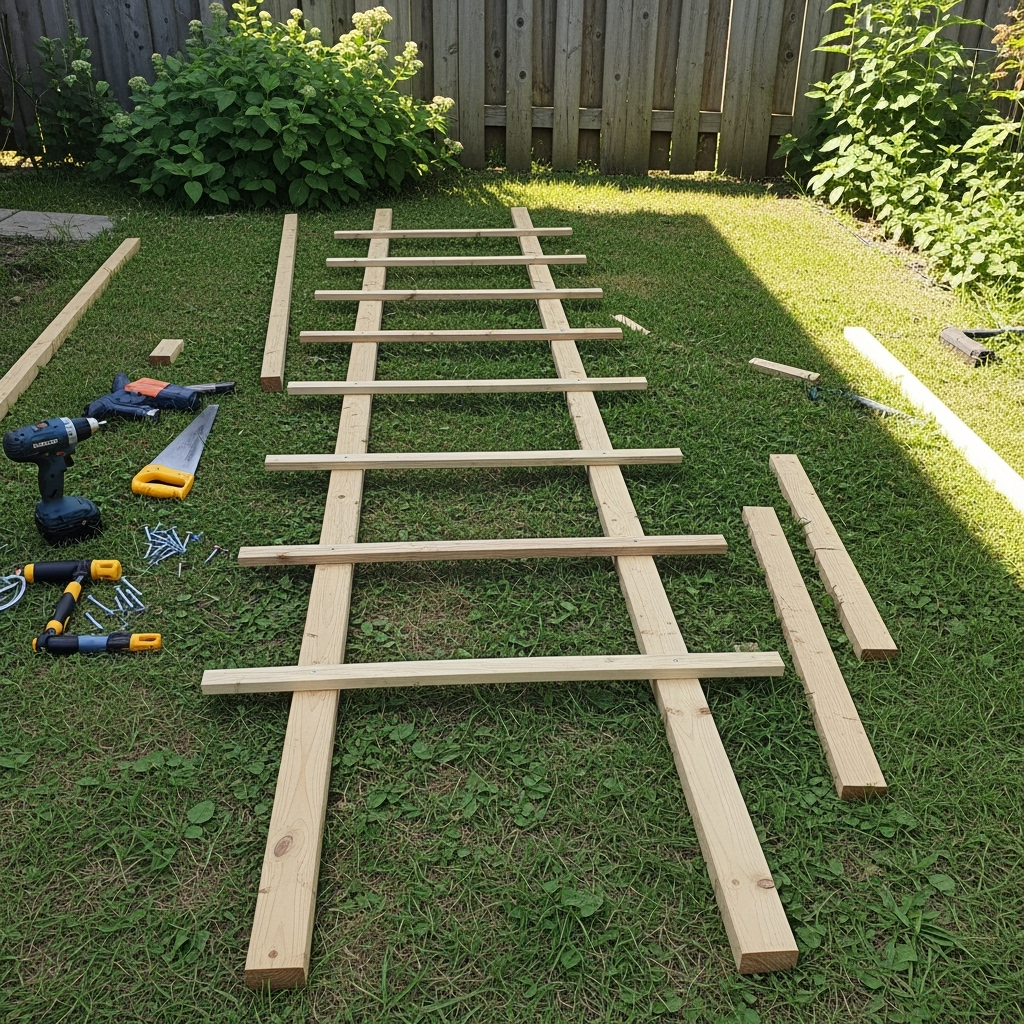
Step 1: Measure and Cut
- Decide your DIY trellis for climbing plants height and width (maybe 6ft tall by 2ft wide—pretty standard stuff).
- Cut vertical strips/posts and horizontal rungs. If using bamboo, keep it tight and lined up.
Step 2: Lay Out Your Trellis
- Place two long pieces on the ground, parallel—these are your uprights.
- Arrange crosspieces (the rungs) equally between the uprights. Spacing depends on what you’re growing—climbing beans need about 6-8 inches, peas and flowers do fine with 4-6 inches apart.
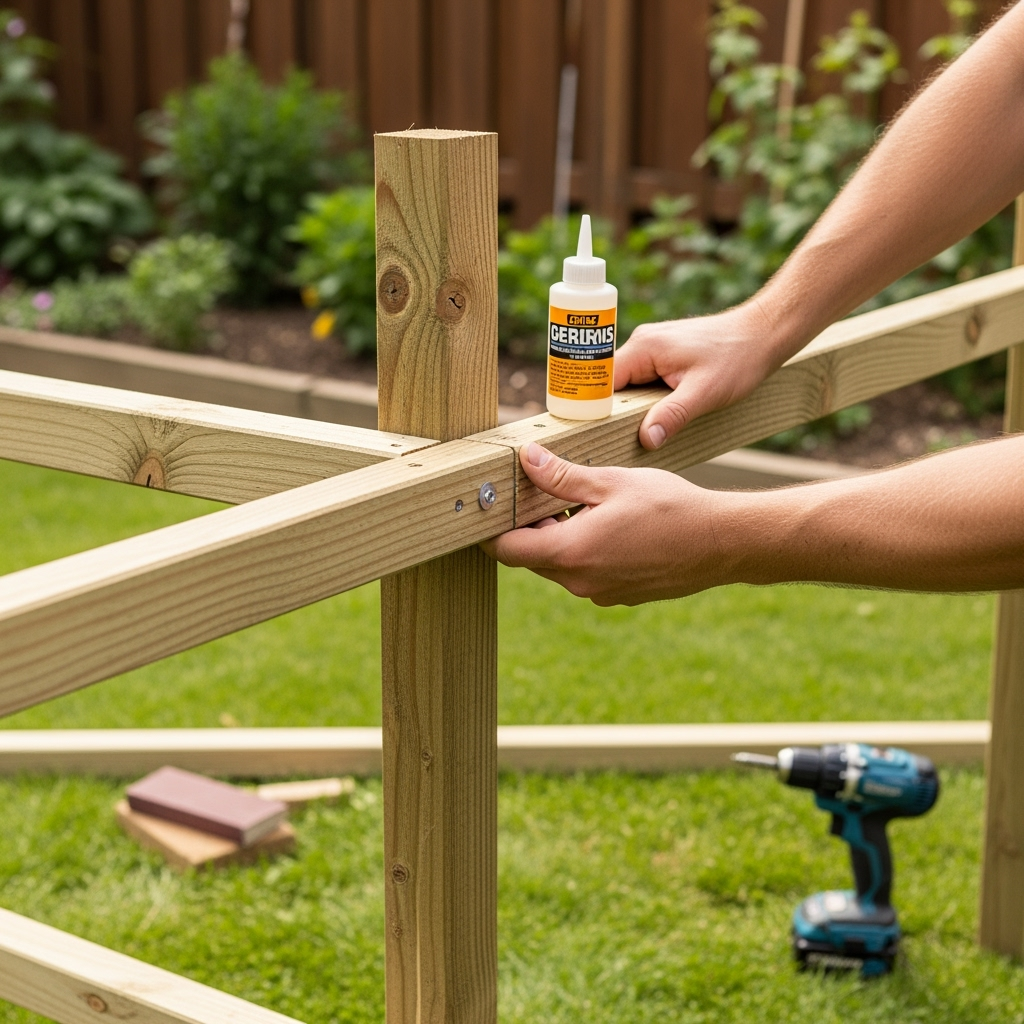
Step 3: Secure Your Crosspieces
- Use screws, zip ties, or outdoor wood glue to fix the horizontal pieces in place. Seriously, don’t skimp—secure connections keep your DIY trellis for climbing plants lasting for seasons!
- If you’re working with wire or twine, anchor each end tightly and wind in a zigzag or grid pattern for extra grip.
Step 4: Sand & Finish
- Run your hand gently along every edge. Hit sharp or rough bits with a sanding block—splinters suck, trust me.
- Throw on a coat of outdoor sealant or paint. This keeps your DIY trellis for climbing plants looking fire for the long haul.
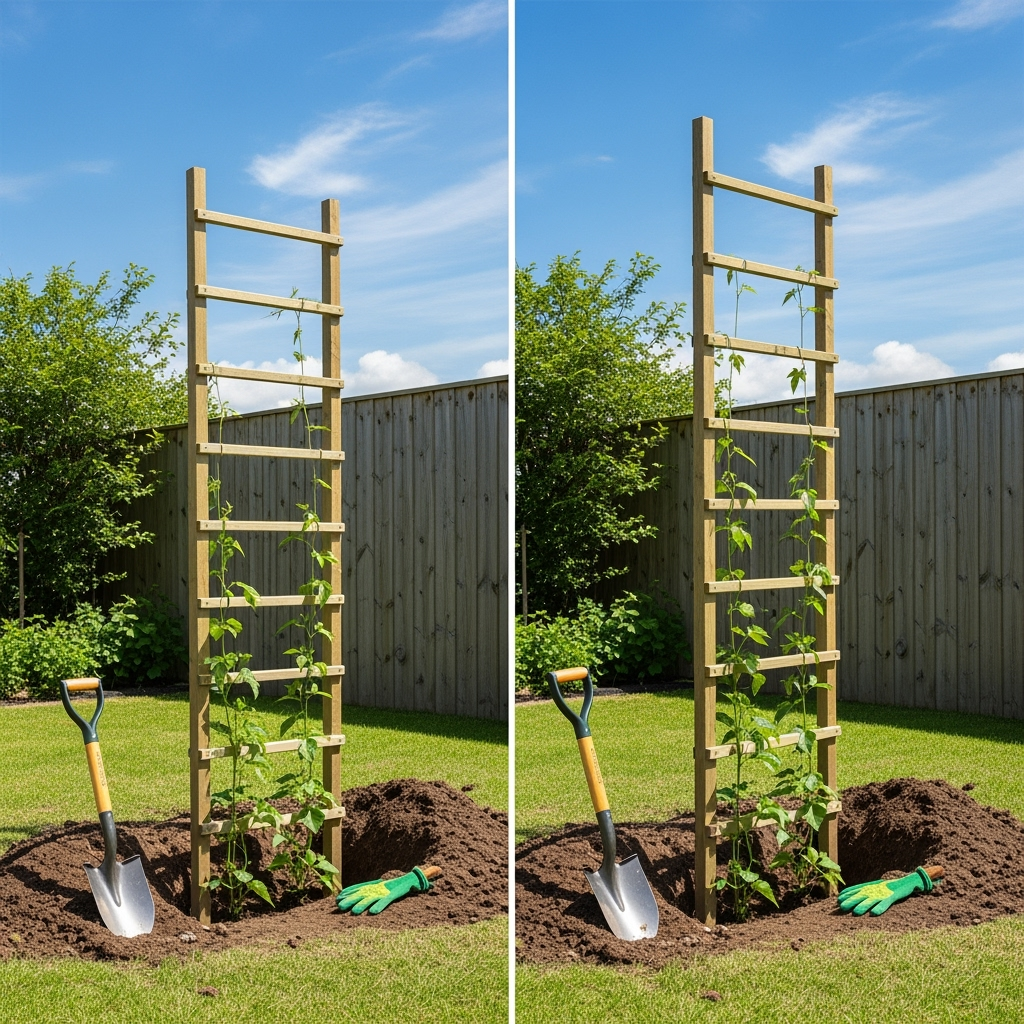
Step 5: Position & Install
- Dig your DIY trellis for climbing plants uprights about 8-12 inches into the ground. Or, if going against a wall, use brackets or hooks to attach it super securely.
Congratulations, you’ve just nailed your own DIY trellis for climbing plants!
DIY Trellis for Climbing Plants on a Tiny Budget
Not all of us are flush with cash (right?), so here’s how to keep your DIY trellis for climbing plants ultra-affordable:

- Raid Your Shed: Scrap wood, old broom handles, or even curtain rods can be re-born as a trellis.
- Bamboo Bonanza: Bamboo is light, strong, and usually cheap or free from friends with wild gardens (just ask).
- Wire Magic: Chicken wire or scraps of garden mesh make perfect climbing grids—just tack to a wood frame.
Heck, even tree branches lashed together with twine give you a rustic DIY trellis for climbing plants look that’s on-trend at the moment. You can even attach it to a garden planter box to create a cohesive planting station.
Pro Tips for Maximum Climbing Success
- Plant at the Base: When installing your DIY trellis for climbing plants, remember to sow or set transplants right at the bottom. Give ‘em a head start, and they’ll climb without a fuss.
- Guide Your Plants: Early on, gently tie or nudge stems onto your trellis (soft twine, not string that’ll choke ‘em!).
- Check in Regularly: Plants sometimes go wild or tangle—give them some guidance to keep things tidy and avoid a tangled disaster.
- Keep Your Trellis Clean: At the end of every season, brush off soil and plant bits. A clean DIY trellis for climbing plants lasts years longer!
- Swap Out Styles: Have fun and experiment. Switch up trellis types as you go to see what looks and works best.
Common Mistakes with a DIY Trellis for Climbing Plants
Even the keenest DIY garden nerds mess up now and again. Here’s how to dodge the classic trip-ups:
- Flimsy Materials: Don’t cheap out too much. Thin dowels or weak plastic snap quick in wind or weight.
- Poor Anchoring: Your DIY trellis for climbing plants needs a stable base. Wobbly? You’ll regret it come storm season.
- Ignoring Growth Habit: Not all climbers grow the same—some twine, some hook. Match your grid style and spacing to their natural moves.
- Bad Placement: Even an epic trellis flops if you put it in full shade with a sun-hungry climber. Know your plants before you launch in!
Keeping Your DIY Trellis for Climbing Plants Looking Sharp
You want your trellis to last, right? Maintenance doesn’t have to be a grind:

- Inspect for Rot or Rust: Check wooden or metal frames every month, especially after wet spells.
- Touch Up Paint/Sealant: A new coat pops color and keeps wood tip-top.
- Tighten Joints & Connections: Wind, rain, and climbing plants can loosen things up. Tighten screws or re-tie knots as needed.
Creative DIY Trellis for Climbing Plants Ideas
If you’re itching to stand out, try these wild DIY trellis for climbing plants projects:
- Bicycle Wheel Trellis: Mount old wheels on a pole or against the shed for a funky look—great for beans and sweet peas.
- Picture Frame Grid: Use salvaged window or photo frames, add wire or twine as gridwork, and make a living art piece.
- Pallet Trellis: A cut-apart or standing pallet quickly becomes a killer vertical garden with climbing slots built in.
- DIY Trellis for Climbing Plants Planters: Attach a trellis to the back of a big planter box for a portable wall of green.
Best Companion Plants for Your DIY Trellis for Climbing Plants
Ramp up your garden game by pairing your DIY trellis for climbing plants with smart companions:
- Marigolds: Repel pests, add bright color
- Basil: Loves similar soil, and adds flavor next to tomatoes or peas
- Lettuce or Chard: Grows in shade at the trellis base—zero wasted garden space
- Garlic and Onions: Help keep pests off your tender climbing crops
FAQ: DIY Trellis for Climbing Plants
- Can I move my trellis after building? Totally! Just be gentle if plants are already growing—otherwise, uprooting might stress or snap fragile stems.
- How do I know if my trellis is big enough? Give yourself a couple feet extra in height compared to mature plant size—better too big than too small!
- Can I build a DIY trellis for climbing plants in winter? Absolutely. Get it ready ahead of spring, and you’ll be banging your head for not doing it sooner.
- Is treatment necessary for wooden trellises? Yes! A good sealer will keep rot and bugs at bay—worth the minor trouble.
Your Garden, Your Rules: Embrace the Climb
At the end of the day, rocking a DIY trellis for climbing plants is all about making your outdoor—or even indoor—space hum with life and color. You don’t have to be a master carpenter to do it, either: most designs are super forgiving, and messing up just means you get a second chance to learn. So, grab those tools, snatch up some wood or bamboo, and let those climbers do their thing! And trust me, nothing feels as rad as pointing at a wall of green and knowing, “Yeah, I made that.”


