
So you wanna totally level up your backyard vibes and harvest your own fresh veggies or flowers? Heck yeah! DIY raised garden beds are the perfect place to start. If you’ve been thinking about building some, but don’t wanna drop a ton of cash or fuss with complicated blueprints, you’re in the right spot. DIY raised garden beds make gardening accessible, neat, and straight-up gorgeous. Let’s dig in (pun intended, oops), and discover everything you need to know about DIY raised garden beds—without all that jargon and confusion.
Why Choose DIY Raised Garden Beds?
- Easy on your back: No more bending way down to the ground.
- Better soil control: You decide exactly what goes in the bed. No gross rocks or weeds.
- Pest protection: Keep out pests and, heck, even nosy pets.
- Drainage is better: DIY raised garden beds drain way faster and more evenly than just regular old ground dirt.
- Looks clean and organized: Let’s face it, DIY raised garden beds just look neat as heck in any yard.
Don’t sweat it if you’ve got zero woodworking skills. Trust me, you don’t have to be some pro carpenter to rock DIY raised garden beds. Even with just a few tools and the most basic materials, you can create a killer garden set-up that’ll have your neighbors swoonin’.
Choosing the Right Materials for Your DIY Raised Garden Beds
First off, sit down and ask yourself: What am I gonna use my raised garden beds for? If it’s just some herbs or maybe a couple veggies, you don’t need to build a massive plot. Honestly, size depends on your yard and what you wanna plant. The keyword, though, is always DIY raised garden beds! The most common and solid choices for your DIY raised garden beds are wood, metal, and composite. Let’s break ’em down:

Wood
Wood’s classic—and pretty cheap, honestly. Cedar and redwood are top picks because they’re rot-resistant, but pine works too if you keep an eye on it. Just skip the treated lumber unless you love chemicals leaching into your plants, ew.
Metal
Corrugated steel is trending with DIY raised garden beds and dang, it looks modern. Some folks combine wood frames with metal sides for extra strength. Metal is pricier but lasts AGES.
Composite
These are made from recycled wood and plastic. They’re a bit more expensive up front, but they’re pretty much weatherproof and don’t rot at all.

Essential Tools You’ll Need
- Saw (a circular saw or just a handsaw if you’re feeling ~old school~)
- Electric drill or screwdriver, ’cause manual tools get old fast
- Measuring tape and pencil—eyeballing it is only cool in theory lol
- Level (unless you want wonky DIY raised garden beds!)
- Screws or nails (stainless steel’s best for outdoors)
- Gloves because, trust me, splinters are not fun
Planning Your DIY Raised Garden Beds
The biggest thing is figuring out where you’ll put your DIY raised garden beds. You want:
- Direct sunlight, at LEAST six hours a day
- Reasonable access to water. Lugging heavy watering cans is zero fun
- Room to walk around the beds and reach everything easily
The standard size for DIY raised garden beds is about 4 feet wide by 8 feet long. Why? ‘Cause it’s easy to reach the middle from each side, and you won’t end up stepping in your bed—bye-bye, compacted soil! A height of 12-18 inches is plenty unless you’re planting super-deep rooted stuff.
Step-by-Step Instructions: How to Build DIY Raised Garden Beds
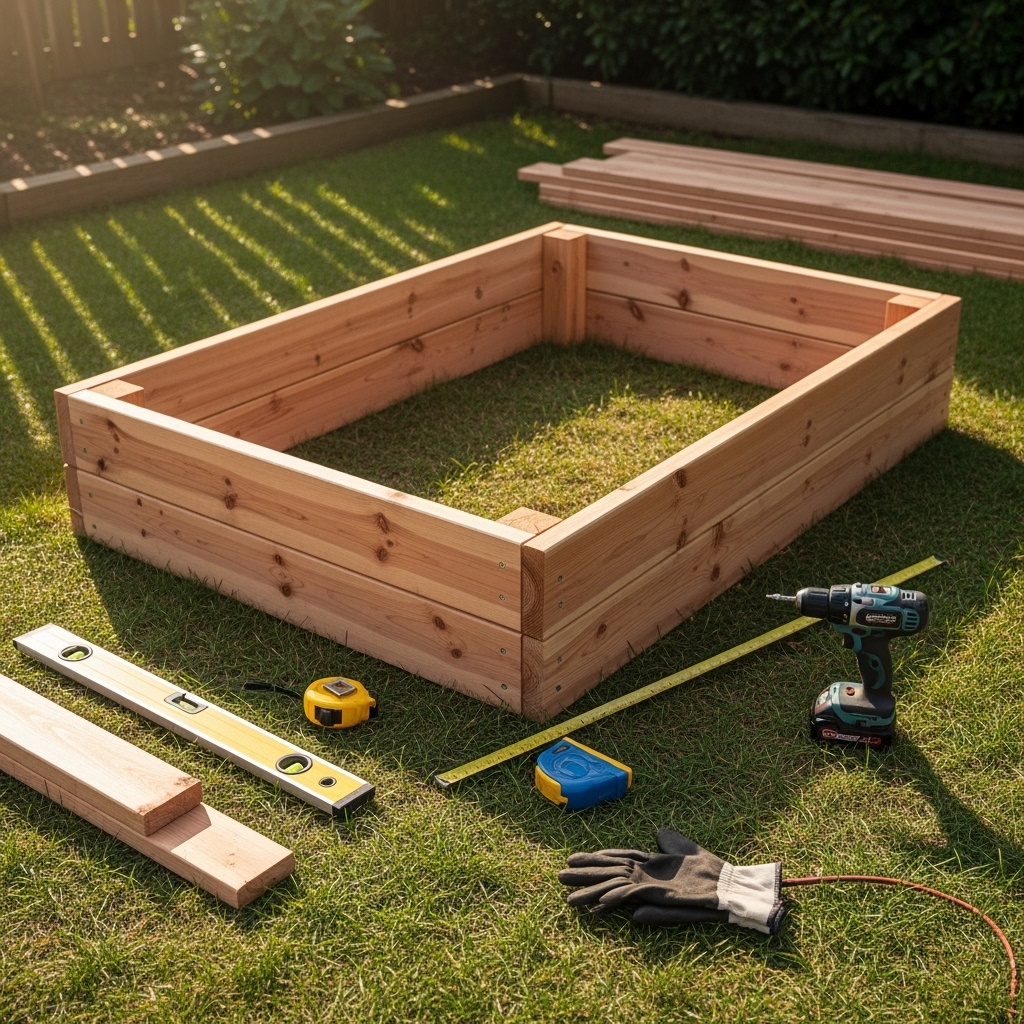
Step 1: Cut Your Lumber
Pick up enough lumber for the length and width you want. If you’re doing a 4×8 foot bed:
- Two 8-foot boards (sides)
- Two 4-foot boards (ends)
Cut to length. Smooth those edges if you wanna spare your knees later.
Step 2: Build a Rectangle
Lay out your boards to make a rectangle. Screw them together at the corners (two or three screws per corner is fine). Again, make sure you keep your screws OUT of where you might accidentally kneel or sit!

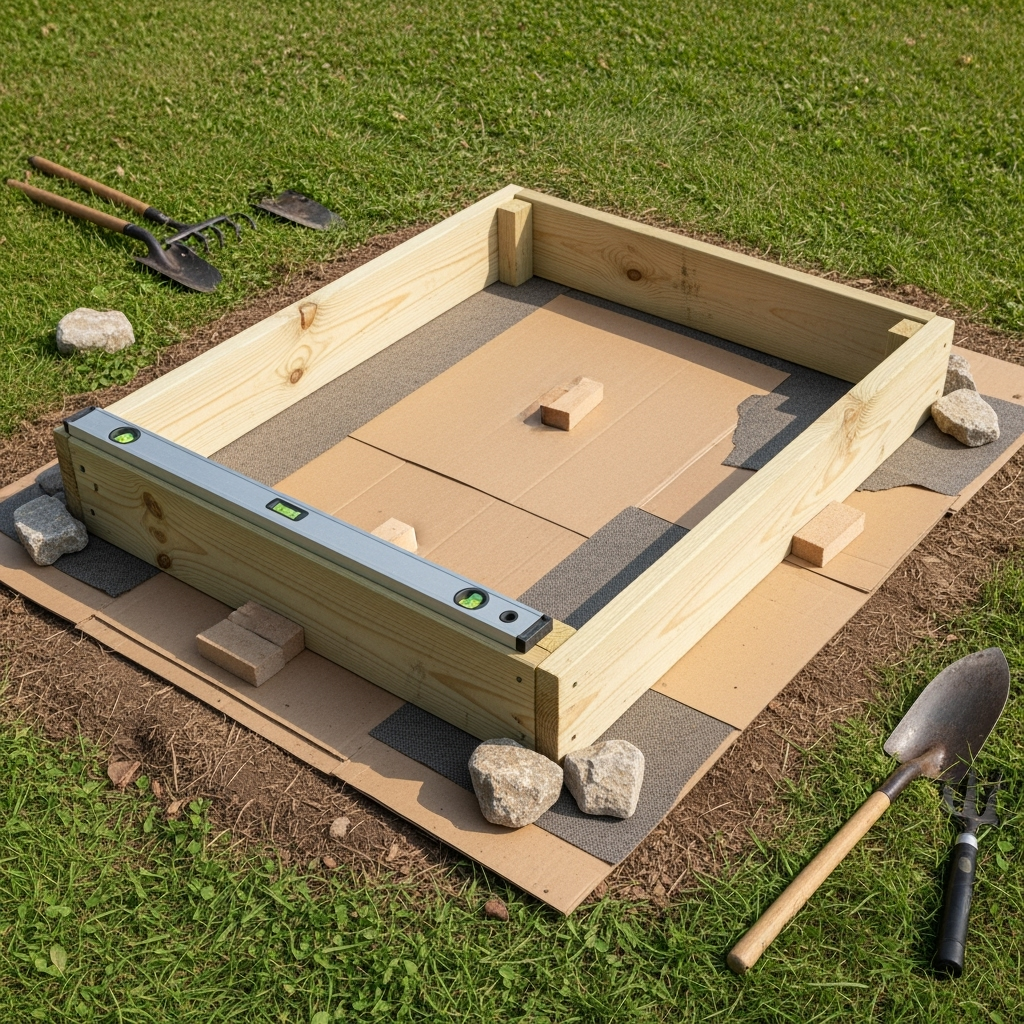
Step 3: Prep Your Ground
Toss down a layer of cardboard, newspaper, or landscape fabric. This’ll block grass and weeds but will naturally break down over time within your DIY raised garden beds.
Step 4: Place Your Bed and Check for Level
Set your rectangle in place. Use a level to check it’s, well, level—they call them DIY raised garden beds, not slanted garden beds! Shim with dirt or rocks until it’s just right.
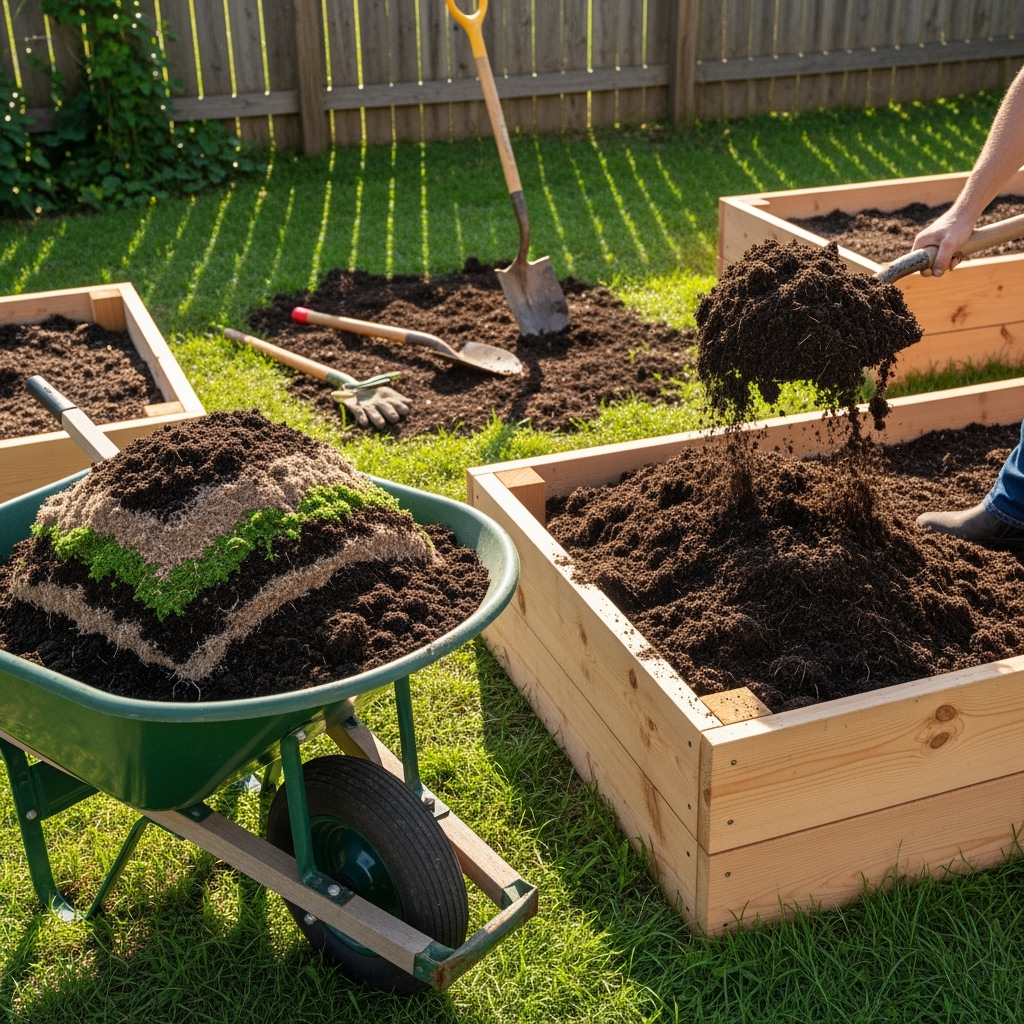
Step 5: Fill Your DIY Raised Garden Beds with Soil
Here’s the best part! Fill your new DIY raised garden beds with a mix of about 60% topsoil, 30% compost, and 10% potting soil or peat moss. If you’re feeling fancy, add a scoop or two of worm castings for extra growing mojo.
Don’t fill it all the way to the top—leave a couple inches so water doesn’t just run off everywhere.

Step 6: Plant and Water
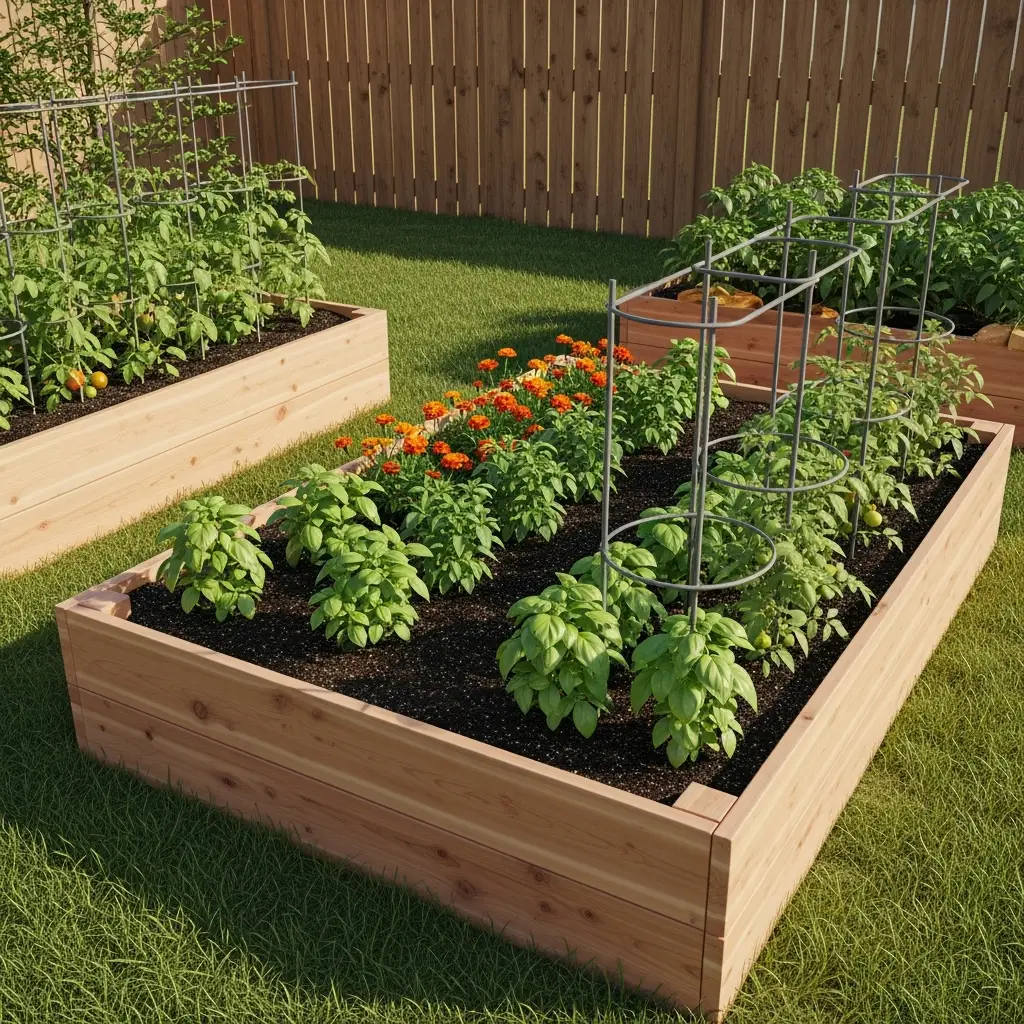
Plant whatever your heart desires. DIY raised garden beds are perfect for tomatoes, squash, greens, herbs, root veggies, and more. Water thoroughly after planting. Boom! Done!
Pro Tips for DIY Raised Garden Beds That Last
- Add corner posts for extra support, especially if going bigger or using thinner wood.
- Line with hardware cloth underneath to block out moles and voles. Buggers can wreck your DIY raised garden beds fast.
- Use mulch on top to keep weeds down and conserve moisture.
- Paint or stain your DIY raised garden beds (with non-toxic stuff!) to add some style and extend their life.
Seriously, DIY raised garden beds are low-maintenance once you’re set up. You’ll wind up with less weeding and watering than old-school ground beds. That’s a win.
Common Mistakes to Dodge in Your DIY Raised Garden Beds Journey
- Going too wide: If it’s wider than 4 feet, you’ll be tempted to step inside or struggle to reach the center. Just don’t, trust me.
- Cheap, thin lumber: It might save a buck, but your bed will bow out or rot in a season.
- Ignoring location: Shady, low, or awkward spots will turn your DIY raised garden beds dreams into a nightmare.
- Not filling beds deep enough: Roots gotta go somewhere—give ‘em room.
- Skipping drainage: Always check that water can flow through, especially if you have clay-ish soil underneath.
Maximize Harvests: Best Plants for DIY Raised Garden Beds
Look, DIY raised garden beds are crazy versatile. Some of the best veggies and herbs to get you started:
- Tomatoes (go with a cage or stakes right away)
- Lettuce, kale, and other greens—they love loose soil
- Radishes and carrots (so easy to sow in neat rows)
- Peppers, both sweet and spicy
- Onions and garlic—won’t get bullied by surrounding weeds
- Herbs like basil, parsley, chives, and dill
- Zucchini and squash if you’ve got the space
Flowers? Go for it! Marigolds, nasturtiums, and calendula help repel pests and add serious color to your DIY raised garden beds. The possibilities are endless.
Customizing Your DIY Raised Garden Beds
Ready to make your DIY raised garden beds extra fancy or suited to your unique space? Here are a few ideas to amp things up:
- Add a trellis: Attach a sturdy trellis on the north side for beans or cukes. Maximizes space in your DIY raised garden beds!
- Multi-level beds: Build different heights for showy tiered gardens—extra visual flair, plus it’s easier on achy backs.
- Bench edges: Top the sides with wide planks to create a bench you can actually sit on while tending your plants (seriously, you’ll thank yourself later).
- Use recycled materials: Scavenge old pallets or bricks for rustic-style DIY raised garden beds. Just make sure anything you use is clean and chemical-free.
- Paint or stencil: Show off your personality! A splash of color or a cool pattern on your DIY raised garden beds is pure curb appeal.
Maintenance Hacks for DIY Raised Garden Beds
DIY raised garden beds make looking after your plants a total breeze, but you’ll need to show yours some love each season:
- Refill soil and compost: Beds settle and nutrients get used up. Top up each spring!
- Check corners and boards: Tighten screws and fix anything sagging.
- Clean out debris: Pull out old plants and weeds so you don’t get surprise volunteers next year.
- Rotate crops yearly: This keeps bugs guessing and prevents soil disease build-up in your DIY raised garden beds.
DIY Raised Garden Beds: Budget-Friendly Tips
- Hit up lumber yards for culled wood: Slightly flawed boards are usually way cheaper.
- Check local online listings: Sometimes people get rid of free or cheap building materials—score!
- Repurpose what you have: Old dressers, bricks, concrete blocks—even tires (if you don’t mind the look) all work for DIY raised garden beds.
- Share bulk soil/compost orders with neighbors: Save cash and make friends.
Honestly, your DIY raised garden beds don’t have to be magazine-perfect. Focus more on function, your plants don’t care if it isn’t Pinterest-worthy!
Frequently Asked Questions About DIY Raised Garden Beds
How deep do DIY raised garden beds need to be?
12 inches is solid for most stuff, but go taller (18-24 inches) if you need ‘em wheelchair-accessible or if you’re doing deep-root crops like carrots or parsnips.
What’s the best soil mix for DIY raised garden beds?
“Lasagna-style” is awesome—layer sticks, leaves, kitchen scraps, and finished compost beneath quality topsoil. Otherwise, stick with a mix of 60% soil, 30% compost, 10% other organic matter like peat moss.
Will the wood rot? Should I line my DIY raised garden beds?
Cedar and redwood last ages without help. For pine, try stapling a food-safe pond liner or landscape fabric inside the boards—it can add years to your frames.
How do I keep animals out of my DIY raised garden beds?
Add some chicken wire arched over the top—easy to set up and keeps out rabbits, cats, you name it.
Let’s Grow—The Magic of DIY Raised Garden Beds!
If you’ve gotten this far, you’re totally ready to rock some DIY raised garden beds. Whether you build a single compact box, a sprawling veggie empire, or a quirky upcycled setup, you’ve now got the tools, the know-how, and the creative juice to totally transform your outdoor space.
Garden beds built with your own two hands just hit different. Every tomato and pepper will taste sweeter (it’s science, right?), and you’ll get bragging rights every time someone asks about those perfect rows.
So what are you waiting for? Get to planning, gather up your supplies, and let the adventure of DIY raised garden beds officially begin! Your future self—and your dinner plate—will freakin’ thank you.


