
Alright, let’s get right into the cozy autumn feels, shall we? If you’re looking to seriously level up your front porch game this season—or just wanna get crafty for a change—you’re in the right place. Today, I’m gunna break down everything you need to know about creating your very own DIY pumpkin stand. This isn’t just another run-of-the-mill project either, cuz a DIY pumpkin stand isn’t just super practical for showing off those perfect pumpkins, it’ll give your home that inviting, seasonal vibe everyone craves as soon as sweater weather hits. Let’s dive in and get our hands (and probably our sweatshirts) a lil’ dirty!

Why a DIY Pumpkin Stand is a Fall Game-Changer
If you’ve ever tried to artfully arrange your pumpkins on your porch steps, you know the struggle. Those bad boys roll, tip, and sometimes totally ruin your carefully curated autumn aesthetic. That’s where a sturdy, stylish DIY pumpkin stand comes in. Not only does it make your collection look intentional (and less like the aftermath of a pumpkin bowling match), but it’s also a cool way to get creative with woodworking—even if you’re a newbie at this kinda thing.
- Elevates your pumpkins: Literally and figuratively—show off your best gourds.
- Flexible design: Make it as big, small, rustic, or chic as you want.
- Eco-friendly and reusable: Ditch single-use plastic displays for seasons to come.
- Conversation starter: C’mon, people WILL ask about it.
Materials You’ll Need for Your DIY Pumpkin Stand
Gathering your goods is half the fun. Here’s what you’ll wanna have on hand before you jump into building your DIY pumpkin stand. Don’t worry—most of this stuff is pretty basic, and you can always swap materials for what you’ve got lying around in the garage or shed.
- Wooden boards – Cedar, pine, or reclaimed wood work awesome
- Nails or screws – Self-explanatory, but don’t forget!
- Wood glue – For that extra bit of hold
- Sandpaper – To smooth rough edges, unless you dig that ultra-rustic look
- Paint or stain – Optional, but makes a big impact
- Power drill/screwdriver – Cuz you don’t want to be twisting screws manually, trust me
- Measuring tape and pencil – Precision pays off
- Safety goggles – Gotta protect those peepers
- Decorative extras – Think burlap, fairy lights, or even stenciled letters
How to Plan Your DIY Pumpkin Stand Design
Before you start sawing away like a mad person, a lil’ sketch or plan goes a long way. The great thing about a DIY pumpkin stand is that it’s totally customizable. Wanna stack pumpkins high? Build a tiered ladder-style stand. Prefer something simple? A single level shelf will do the trick. Here are some design ideas for your DIY pumpkin stand:

- Classic shelf style
- Tiered ladder stand
- Rustic crate stand
- Minimalist plank display
- Wheelbarrow-inspired pumpkin stand
If you want your DIY pumpkin stand to handle big ol’ carving pumpkins, measure out larger spaces between shelves or tiers. For a mix of gourds, add a couple smaller sections too. The key is planning. Measure your porch or display area so you don’t end up with a stand bigger than your whole front stoop—seriously, it’s easy to get carried away!
Step-by-Step: Building a DIY Pumpkin Stand
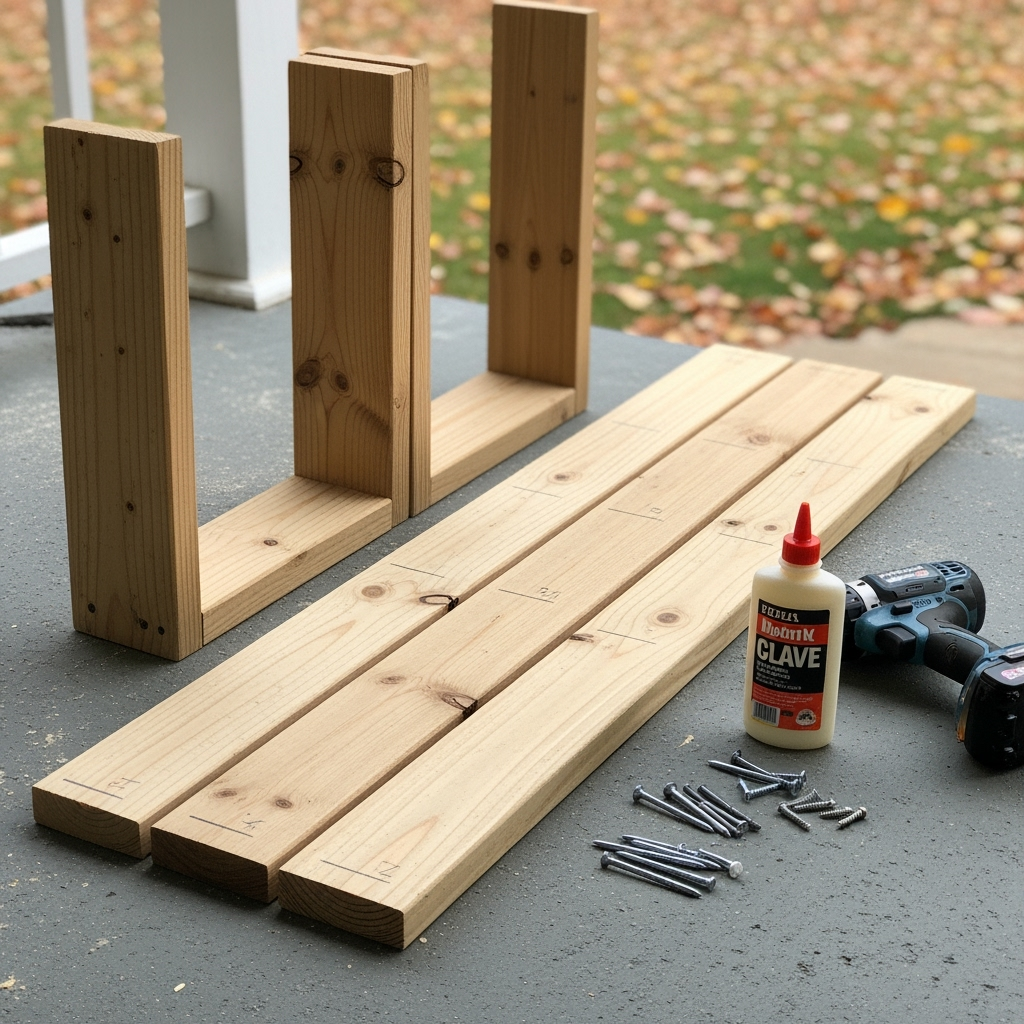
1. Measure and Cut Your Boards
Grab your measuring tape and mark out the widths and heights for your DIY pumpkin stand according to your design. Use a saw to carefully cut your boards to size. For a super simple two-tier stand, you’ll need:

- 2 side boards (the height)
- 2–3 shelf boards (the length/depth)
- Optional: cross braces for extra strength
Remember to double-check each measurement before you cut… nobody wants to end up with mismatched shelves.
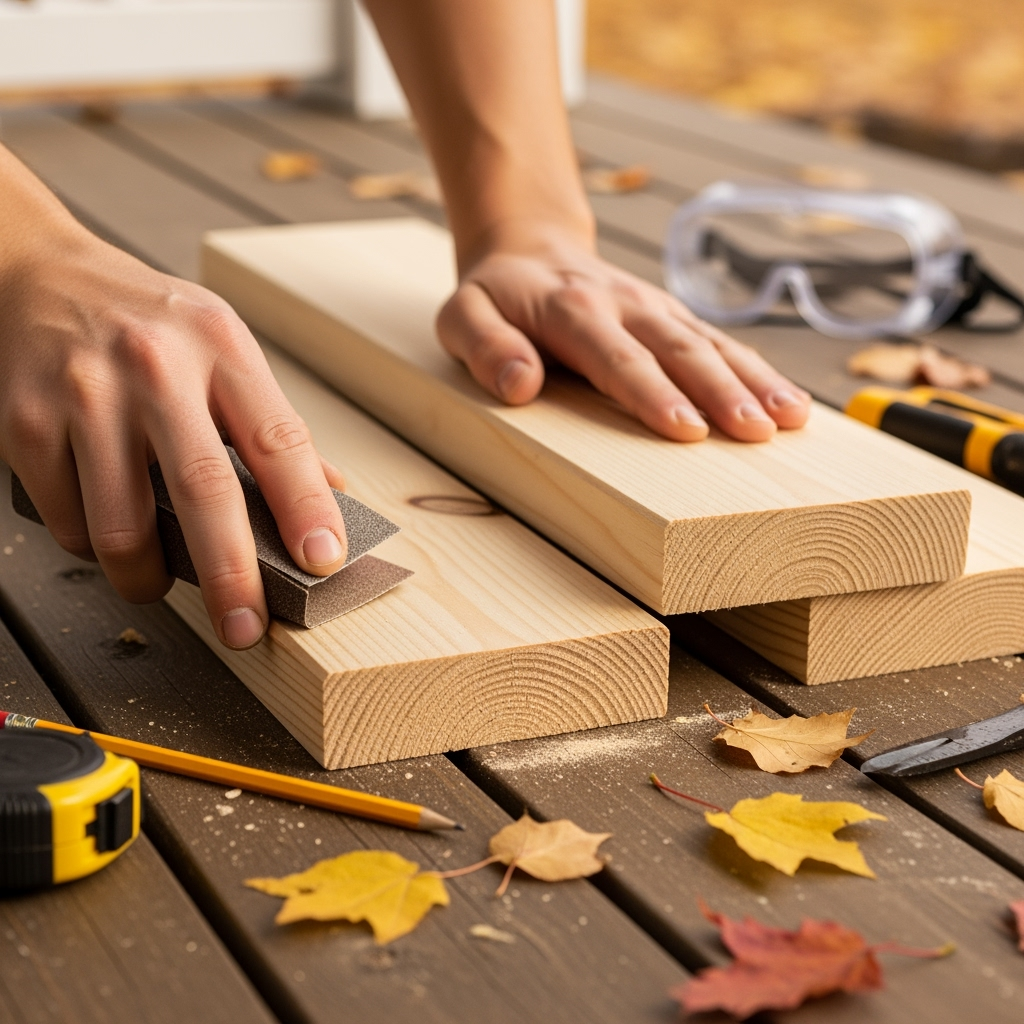
2. Sand Down Rough Edges
This is actually a fun step (for real, try it). Run your sandpaper over any rough, splintery bits on your wood. Even if you want a rustic DIY pumpkin stand, nobody needs a splinter in their finger while grabbing a gourd.
3. Assembly: The Fun Part
Time to put the plan into action! Start by attaching your shelves to the side boards with wood glue, and then reinforce ‘em with screws. If you want the stand to lean for a ladder-style look, attach the shelf boards at a slight downward angle. Add any back braces or extra supports for stability. And don’t worry if things ain’t perfectly square—the quirks just make your DIY pumpkin stand more unique.
4. Stain, Paint, or Leave Natural
Here’s where you can really set the vibe. Want a farmhouse look? Go with a whitewash or light stain. Wanna keep things timeless? A rich brown stain looks fantastic. Or turn your DIY pumpkin stand into a real showstopper with a bold barn red or hunter green. Just remember to let it fully dry before loading it up with pumpkins, or you might end up with colorful gourd-bottoms.
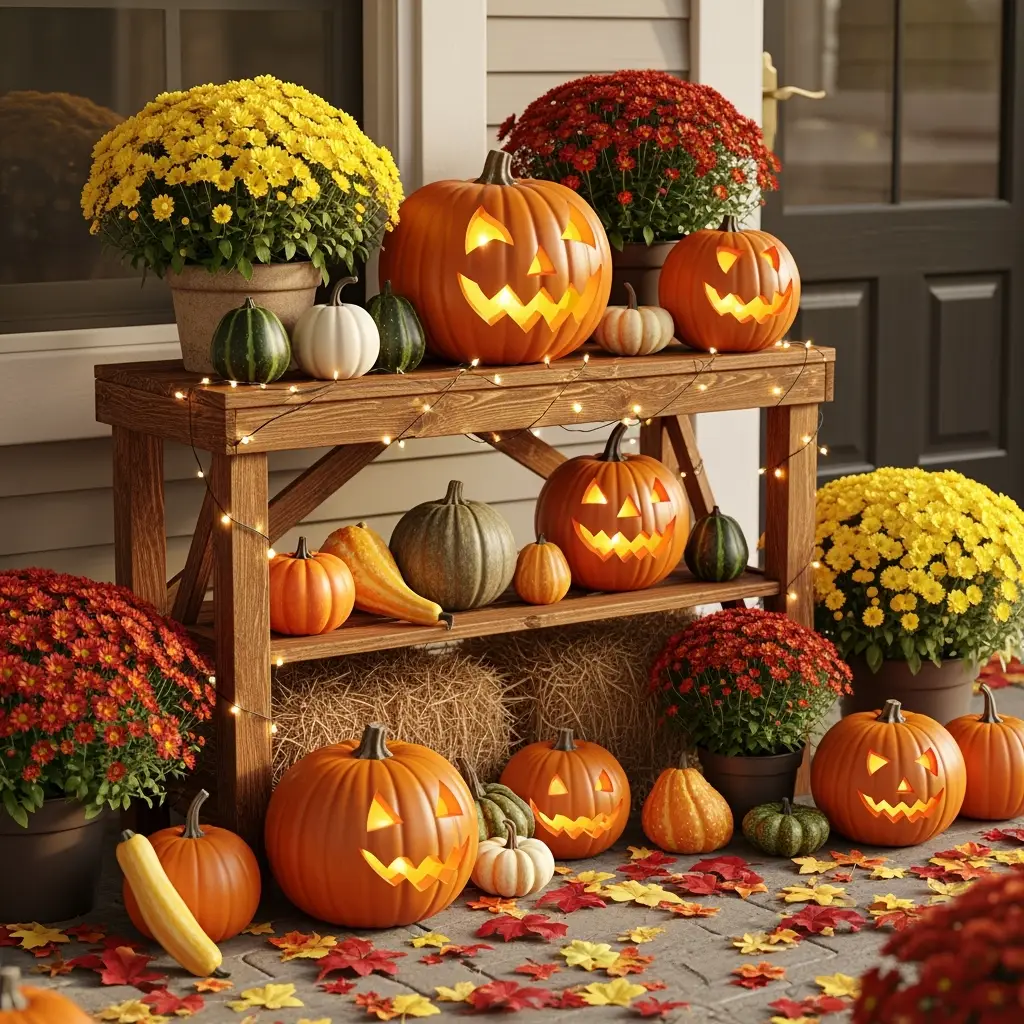
Decorating Your DIY Pumpkin Stand for Maximum Impact
Alright, this is where it gets straight-up fun. Your DIY pumpkin stand isn’t complete until it’s styled to perfection. Here are some tips and tricks:

- Mix pumpkin types: Throw in some odd-shaped gourds and mini pumpkins for variety.
- Layer with mums: Add pots of hearty chrysanthemums or hay bales for a full fall scene.
- String up lights: Wrap your DIY pumpkin stand in fairy lights for instant nighttime magic.
- Add signage: Stencil a welcome message or “Pumpkin Patch” onto a plank for a farmhouse effect.
- Seasonal extras: Switch up accessories as the months move along—add pinecones or faux leaves for texture.
Creative Twists for Your DIY Pumpkin Stand
One of th coolest things about building a DIY pumpkin stand is how totally personal you can make it. Here are a few extra-creative ways to totally nail your autumn décor goals:
- Multi-purpose makeover: After Halloween or Thanksgiving, pop off the pumpkins and use your DIY pumpkin stand for winter greens, spring planters, or summer flowerpots. This project’s way more than just seasonal!
- Kids’ corner: Designate a little shelf for painted pumpkins, so kiddos can join the autumn fun.
- Chalkboard feature: Paint a segment of your stand with chalkboard paint for swapping in seasonal messages.
- Pallet inspiration: Use old pallets broken down into planks to give your DIY pumpkin stand that upcycled, eco-friendly edge.
DIY Pumpkin Stand Mistakes to Avoid (Learn from My Fails!)
Let’s keep it real: not every DIY project goes perfectly first try. I’ve def had my share of wobbly stands and paint drips, so learn from my slip-ups:
- Weak joints: If you skip glue or screws, your DIY pumpkin stand might wiggle under pumpkin weight. Go for both.
- No weatherproofing: If your stand’s going outside, give it a good coat of outdoor sealer!
- Overstacking: Don’t go full pumpkin-hoarder. Keep things spaced out for max effect (and safety).
- Rushing dry time: …Or your pumpkins will stick to the paint. It’s as annoying as it sounds!
The Environmental Perks of a DIY Pumpkin Stand
It might seem like just a small move, but making your own DIY pumpkin stand can actually help reduce that mountain of plastic decor that hits landfills after fall. By choosing reclaimed wood or repurposed boards, you keep things sustainable. Plus, with the right finish, you can tuck your stand away once pumpkin season ends and bust it out again year after year. That’s a win for your porch and the planet.

Involving the Family in Your DIY Pumpkin Stand Creation
This is a killer DIY project to do with kids or friends, even if you’ve got limited woodworking skills. Assign roles: one person measures, another sands, someone handles painting. Let littles help paint decorative accents (just maybe not with your good yard clothes on!). Bringing everyone together for a DIY pumpkin stand build makes the final reveal that much sweeter, and you’ll create some memories along the way.
Maintaining Your DIY Pumpkin Stand
Once your DIY pumpkin stand is up and loaded, don’t forget a little basic upkeep:
- Wipe it down: Pumpkins sometimes leak sap or go squishy as the season goes on. Keep a rag handy!
- Check for wobbles: Every couple of weeks, check screws and shelf stability, especially after big storms or wild winds.
- Store smart: When pumpkin season’s over, clean off debris before storing in a dry spot—your stand will last way longer.
Show Off That DIY Pumpkin Stand!
You did it! You’ve got a pro-level DIY pumpkin stand sitting pretty, just waiting to impress neighbors and up your fall photo game. Snap a pic, toss it up on Insta, and tag your project—you might just inspire someone else to get crafty. Or, ya know, just smile every time you walk past your handy work. Either way, your DIY pumpkin stand is guaranteed to make fall feel a little more magical.
Bonus: Selling Your DIY Pumpkin Stand Creations
More experienced woodworkers—or ambitious beginners—can even turn their knack for pumpkin stand making into a little extra fall cash. Set up a stall at the local market or post in online groups. People love custom, handmade autumn décor, and your DIY pumpkin stand could inspire a whole new biz for you. Make sure your name’s stamped on the bottom, cuz you’ll want the credit for sure!
Final Thoughts: Why the DIY Pumpkin Stand is a Must-Try Project
If you’ve been waiting for the perfect low-pressure, high-impact fall DIY, this is legit it. A DIY pumpkin stand hits all the marks: it’s practical, pretty, eco-friendly, and totally doable for all skill levels. Whether you go for rustic or sleek, giant or mini, your porch (and Instagram feed) will thank you. So grab your tools, embrace the autumn mess, and build a DIY pumpkin stand that’ll become your home’s new seasonal centerpiece for years to come. Happy building—and happy fall, y’all!


