
Ever looked at your messy workspace and thought, like, man, there’s got to be a better way? You’re not alone! A cluttered shop or craft room can drive anyone nuts, and that’s exactly where DIY pegboard organization steps in to save the dang day. In this post, we’re gonna dive deep into the ultimate hacks and step-by-step strategies for mastering DIY pegboard organization, from picking your very first board to totally customizing your own badass wall system. By the end, your space is gonna be so organized, folks will wanna snap pics for Pinterest. Let’s dive in and, trust me, your tools will never be lost again (unless you, um, forget where ya put ‘em yourself…but more on that later!).
Why Choose DIY Pegboard Organization?
First things first: why is DIY pegboard organization such a big deal? The cool part about pegboards is they’re flexible, affordable and suuuuper customizable for any space. Whether you’re into woodworking, sewing, or just like things tidy, these boards can handle it—no sweat. DIY pegboard organization lets you take control, so you set stuff up your way, not by some overpriced company’s blueprint. And hey, it’s not just practical; it also makes your workspace look, like, seriously pro-level.
- Freedom to design: Lay it out however you want. Wanna hang tools, baskets, or even a laptop holder? Go nuts.
- Space saving: Get all your gear on the wall, open up that sweet counter space, and forget digging through cluttered drawers.
- Easy to change up: Add, remove, or shift hooks and shelves as your needs change. No need for a massive room overhaul.
- Visibility: Spot your tools at a glance—no more, “dang, where’d I stash those pliers?” moments.
- Aesthetic: A well-done DIY pegboard organization setup looks sharp and keeps you motivated to stay on track.
What Makes a Good Pegboard?
Before going all out, you gotta pick the right pegboard for DIY pegboard organization. Here’s what to scope out when hitting the hardware store (or scrolling online a little too long):
- Material: Classic pegboards are made of hardboard—cheap, light, and easy to hang. But there’s also metal for extra durability or plastic for moisture-prone spots.
- Hole Size and Spacing: Standard holes (1/4-inch spaced 1 inch apart) will fit most hooks and accessories, but always check your hardware before buying bulk packs.
- Size: Measure your wall! You can go for a classic 2×4 ft, or even customize with multiple small panels for weird spaces. Cor’ner shelves, anyone?
- Weight Capacity: If you’re planning to hang heavy stuff (power tools, saws), opt for thicker boards and tough anchors.
Quick tip: Don’t forget standoffs or spacers so your pegs can, y’know, actually poke through the holes! You need at least 1/2 inch between wall and board to slide hooks in easy.

Must-Have Supplies for a DIY Pegboard Organization Project
Alrighty, time for a supply run! Here’s what you’ll wanna stack up before going wild with DIY pegboard organization:
- Pegboard panels (hardboard/metal/plastic)
- Wood screws and standoffs/spacers
- Stud finder, if mounting to drywall
- Level (crooked pegboards = sad tools)
- Power drill or screwdriver
- Pegboard hook kit (mix of hooks, baskets, and shelves)
- Paint or wall to paint (for peeps who crave color)
- Optional: bins, jars, clips, zip ties, baskets
For those who deal with a ton of small hardware, building a DIY wooden toolbox can be a great complement to your pegboard system.
DIY Pegboard Organization: Step-by-Step Game Plan
Now we’re talking! DIY pegboard organization is a piece of cake if ya break it down. Let’s walk thru a classic wall mount project, step by step:

1. Prep the Wall
- Clear your wall or workspace. Remove anything hanging, wipe off dust and stray cobwebs (nobody wants spiders in their toolbox).
- If mounting to drywall, use your stud finder to mark the studs. For extra support, try to hit a stud with at least one screw per side.
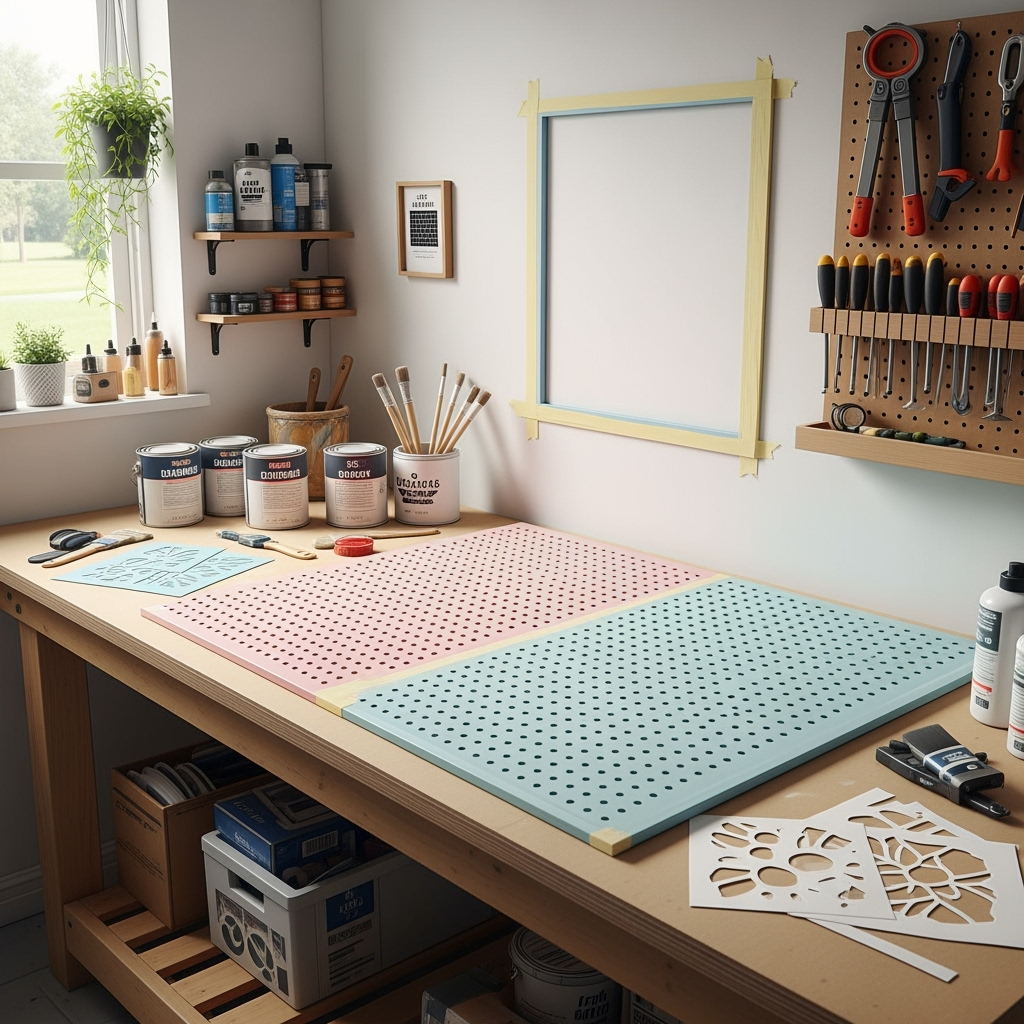
2. Paint or Decorate Your Pegboard
- If you’re a DIY pegboard organization fan with a taste for style, now’s ya moment. Paint the board or stencil some patterns for max flair. Spray paint works like a charm.
- Let it dry completely. Trust me, don’t get fingerprints in fresh paint. It’s not cute.
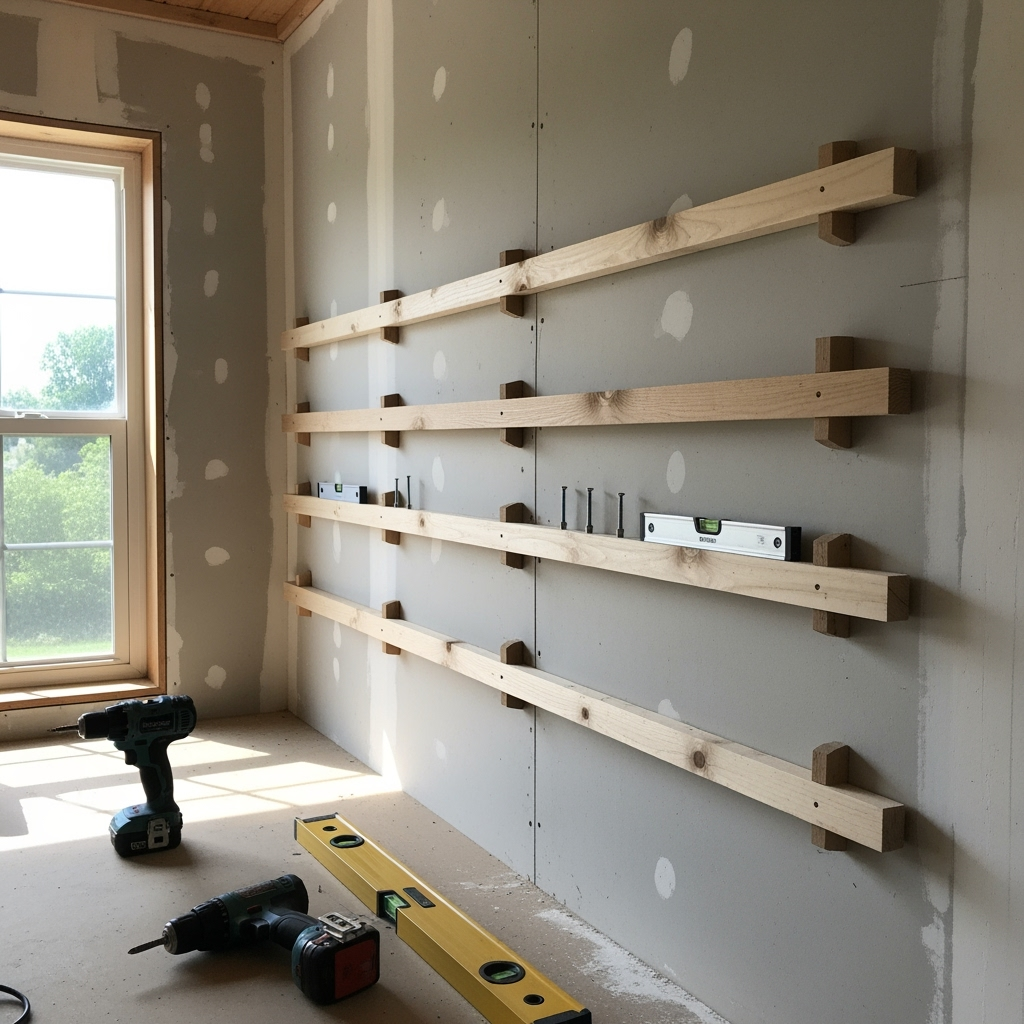
3. Attach the Spacers
- Mounting spacers or strips of wood (1×2 boards are perfect) behind the pegboard is critical. Secure spacers horizontally on the wall, lining up with where you’ll anchor the pegboard.
- This gives your hooks room to poke through and keeps stuff sturdy.
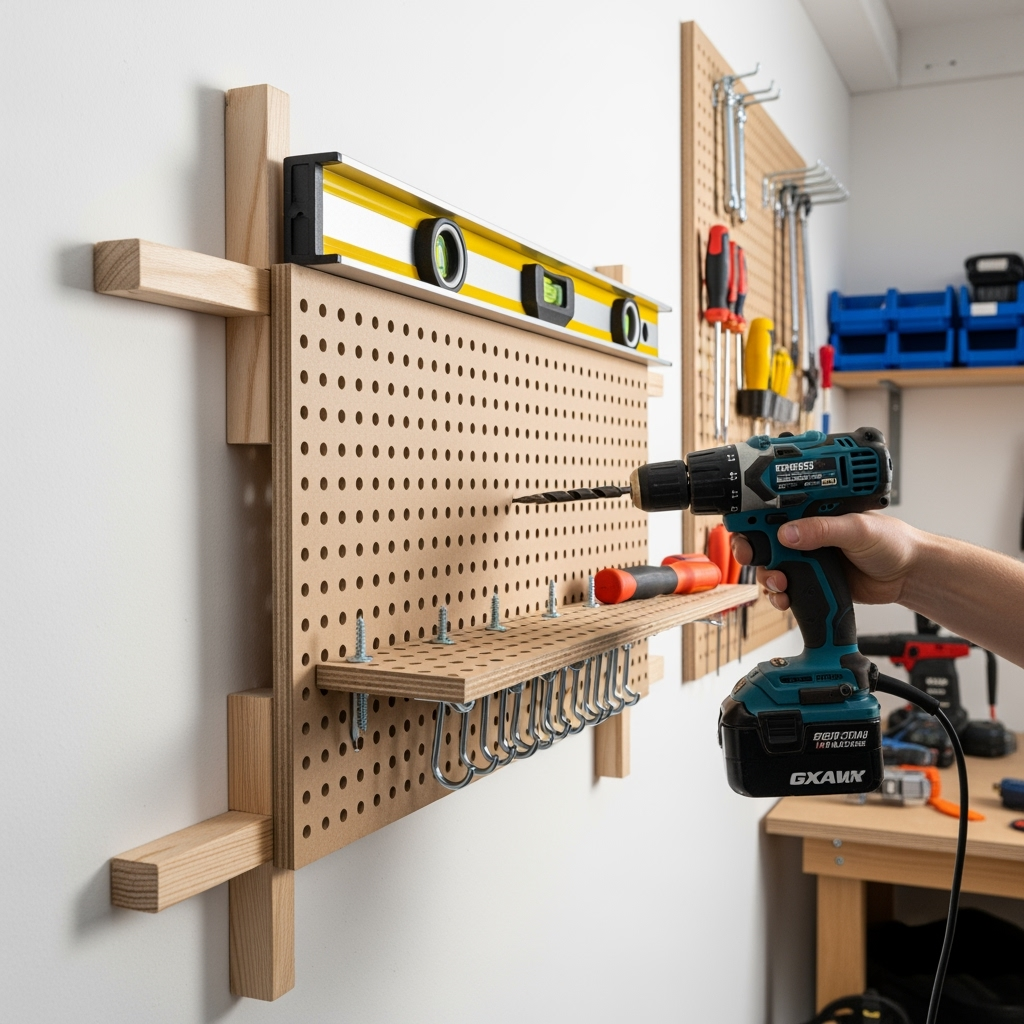
4. Mount the Pegboard
- Mark and pre-drill holes in your pegboard (two on top, two on the bottom is usual).
- With a buddy or some precarious balancing, hold your board in place and screw into the spacers/studs. Double check it’s level—seriously, don’t skip this!
5. Plan Your Layout
- This is where DIY pegboard organization really gets magic. Gather what you wanna hang—tools, brushes, tape, etc.—and play around before committing to hook placement.
- Take a phone pic of the pretend layout, just in case you forget mid-project.
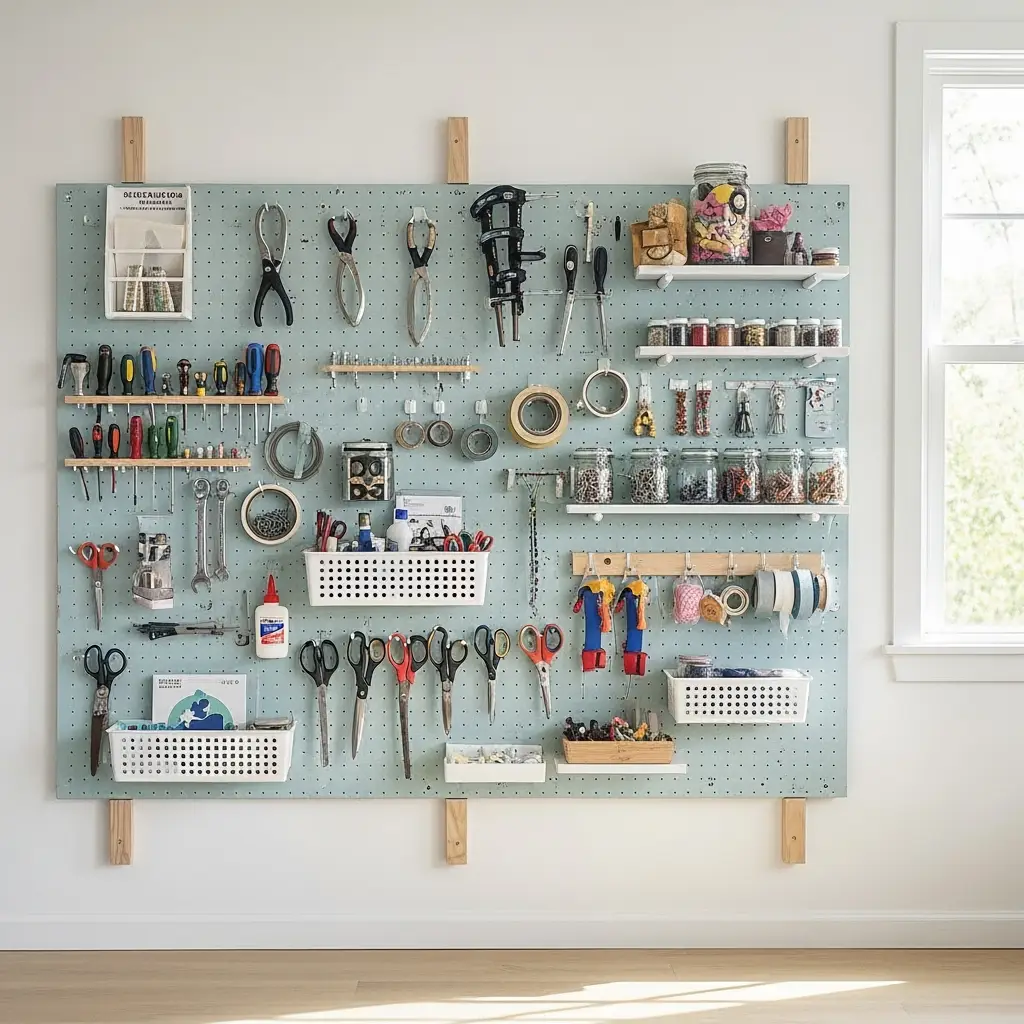
6. Add Hooks, Bins, and Shelves
- Time to customize! Pop on hooks for big stuff (hammers, scissors), bin clips for screws or bits, and baskets for randoms like glue sticks or zip ties.
- Hot tip: Small jars with screwed-on lids can hang from pegs for storing nails and bolts—cheap and genius.
7. Label Everything (Optional But Awesome)
- If you’re all in on DIY pegboard organization, slap on labels! You’ll always know where stuff goes (and so will anyone borrowing your gear, less annoying questions for you, right?).
DIY Pegboard Organization: Hacks for Every Room
Think DIY pegboard organization is just for garages? Nah, fam, pegboards belong everywhere! Here are some of my favorite ways folks have gotten creative — and you can too:
- Kitchen: Hang utensils, pots, oven mitts, or spice racks. Bonus: Looks super cool with painted outlines for each item.
- Home office: Organize supplies, chargers, headphones, or build a mini shelf for sticky notes and pens.
- Craft room/sewing corner: Tame your thread spools, scissors, rulers, and fabric samples in one epic setup.
- Kid’s room: Pegboards let you corral art supplies, action figures, or even tiny sports gear.
- Entryway: Hang keys, masks, and dog leashes—yep, all the drop-zone stuff in one tidy place.
Want to elevate the look of your workspace even more? Check out some creative upcycled home decor projects that pair perfectly with your pegboard setup.
Let’s be real, the possibilities for DIY pegboard organization are basically endless. Toss your own spin on things and make life a little less chaotic.

Pro Tips for Next-Level DIY Pegboard Organization
- Double up on boards: Mount two side-by-side for more gear or set up a corner system.
- Shelf it up: Attach small floating shelves using brackets—great for paints, tapes, or knickknacks.
- Clipboards & file holders: For the planners out there, mount clipboards for to-do lists, designs, or measurements. Pegboard file holders keep plans or sandpaper handy.
- Sliding pegboards: For deep workbenches, try a rolling/sliding system with tracks so you can move boards to reveal hidden storage.
- Mix and match hooks: Don’t just go with the pack—specialty hooks and DIY add-ons (like PVC pipe for drill holsters) add personality and function.
Common Mistakes in DIY Pegboard Organization (And How To Skip ‘Em’)
- Poor mounting: Weak anchors mean fallen pegboards (and banged-up toes). Always hit studs or use good wall anchors and solid spacers.
- Overloading pegs: Too much heavy gear = bent hooks, bent boards, big mess. Distribute weight and don’t overload any single spot.
- Unlabeled chaos: If you don’t label or outline, stuff gets reshuffled and you start losing time again. Even tape stripes work if you don’t wanna print labels.
- No maintenance: Pegboards need a regular check—tighten screws, swap out old or busted hooks, and clean up dust (or spiderwebs, again, ugh).
Personal Stories of Epic DIY Pegboard Organization Turnarounds
Wanna know how well DIY pegboard organization actually works? Here’s some quick testimonials I’ve picked up from fellow tool-heads, crafters, and busy parents:
- Sarah G. (Crafter, super mom): “I thought my craft nook would never stay clean, but after putting in a simple pink pegboard, my scissors and glue aren’t constantly missing. Plus, my kiddos love picking out their favorite colored hooks.”
- Mick (DIY tool addict): “My old toolbox was a dumpster fire, dude. Now all my bits and drivers are right in my face, plus I painted my pegboard bright blue, gives off decent shop vibes.”
- Danielle (Tiny kitchen pro): “Small space, big mess. Mounted a pegboard over my stove, now my spatulas are always at hand, and my partner finally stopped asking where the tongs are!”
Pretty rad, right? Once folks invest a teeny bit of time into their DIY pegboard organization, they save mad time and cut down on stress later.
DIY Pegboard Organization on a Budget
Seriously, you don’t gotta drop a fortune to get killer DIY pegboard organization. Here’s some penny-pincher moves:
- Hit up garage sales or check online ‘free’ sections for used pegboards—paint or sand ’em to bring new life.
- DIY hooks and holders: Bent wire hangers, PVC pipes, and scrap wood can fill gaps in your setup. Creativity = cash saved!
- Recycle food jars or plastic tubs for holding bits and bobs. Just poke a hole in the lid and dangle from a peg.
- Skip the premade bins: Use old shoebox lids (reinforced with tape or paint) as mini storage trays.
Maintaining Your Epic DIY Pegboard Organization System
Congrats, your DIY pegboard organization setup’s lookin’ fresh. But if you want it to stay that way, here’s what to keep in mind:

- Set a monthly reminder to give your board a once-over: tighten screws, dust the surfaces, and ditch whatever you’re not using.
- Every few weeks, ask yourself if your layout’s still working. Tools you use the most should be easiest to reach. Rearrange as needed!
- Keep a small stash of extra hooks and bins in a drawer or near your workspace. Swapping stuff out is waaay easier when you don’t have to run to the store.
Frequently Asked Questions About DIY Pegboard Organization
Can I hang a pegboard if I rent?
Yup! Some renters mount boards with heavy-duty adhesive strips (like Command). Just make sure your load is light and check the rental rules, so you don’t rack up a bill when you move out.
How do I stop hooks from falling out?
A classic hack: wrap a rubber band or tie a small zip tie around the part of the hook that goes through the back of the board. No more runaway pegs!
Is there an easy way to plan my layout?
Totally. Lay out your tools on the ground first, arrange ‘em ’til you like the flow, snap a photo, then transfer that layout directly to the board. Saves a ton of time (and holes).
The Final Word: Is DIY Pegboard Organization Worth It?
If you’re even thinking about trying out DIY pegboard organization, trust me: DO IT. It’s kinda like having a life hack that keeps rewarding you over and over. You’ll save money, save space, find your stuff faster, and your workshop, craft room, or even the kitchen will look pro and stay less chaotic. Plus, you get to brag a bit (not that we’re judging!).
So, what are ya waiting for? Grab a board, rustle up a few hooks, and let your imagination run wild with your own unique spin on DIY pegboard organization.
Happy building, y’all! If you have your own wild pegboard story or tips, drop them in the comments—I wanna see your genius setups!


