
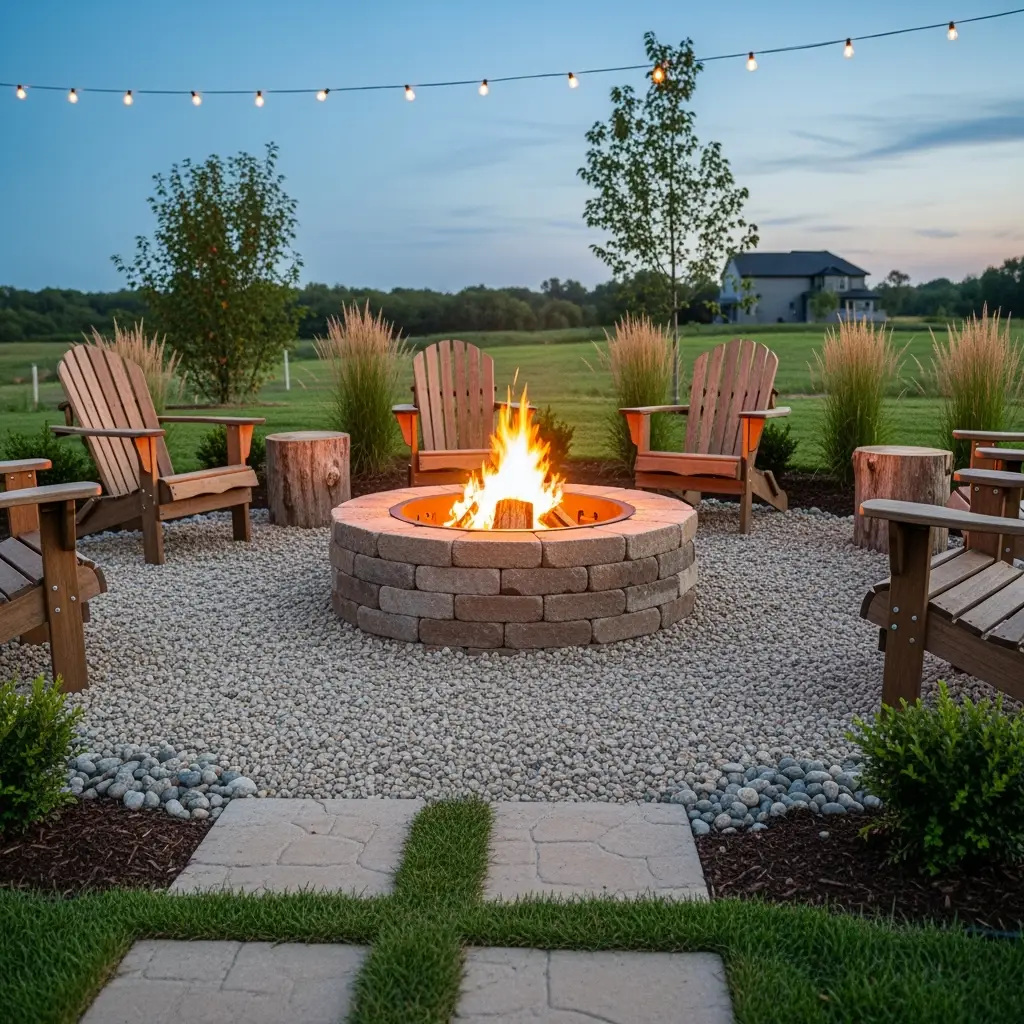
If you’re anything like me, you dream about those chill evenings kicking it with friends, swapping stories, and toasting marshmellows under the stars. So what’s the secret sauce that makes all that happen? You guessed it—building your own DIY outdoor fire pit! Trust me, it’s one of those projects that not only amps up your backyard style but also sets you up for memories that’ll last a lifetime. If you’re looking to break away from the ordinary and claim your patch of backyard paradise, the DIY outdoor fire pit project is where you wanna start.
Why Take the DIY Outdoor Fire Pit Route?
Let’s face it: nothin’ says “let’s hang out” quite like gathering around a crackling fire. But why buy one off-the-shelf when you can add your own creative touch? When you tackle a DIY outdoor fire pit, you’re in full control, picking the materials, the size, and the look that totally matches your vibe. Plus, there’s that killer feeling when you kick back in front of something you built with your own two hands.
- Cost savings: Store-bought fire pits can cost a bundle. With a little elbow grease, you’ll save big.
- Customization: Unleash your creativity—choose the exact size, shape, and materials you want.
- Bragging rights: Your friends will be asking, “Where’d you get this?!” and you’ll smugly say, “I built it!”
Imagining Your DIY Outdoor Fire Pit Space
Alright, picture this: summer nights, good company, and your DIY outdoor fire pit glowing in the middle of it all. Before you go all-in, do a bit of dreaming. Think about how you’ll use the space. Is it for family s’mores sessions? Laid-back chats with your BFFs? Maybe your fire pit is the new spot for neighborhood hangouts? Decide what you want this space to mean to you, ’cause that’ll guide everything from size and shape to what kinda seating you’ll want around your DIY outdoor fire pit.
Choosing the Perfect Location
- Safety first: Always check fire codes and local regulations. Place your DIY outdoor fire pit at least 10-20 feet from your house, fences, or overhanging branches.
- Level ground: Pick a flat surface to make the build easier and safer.
- View and access: You wanna see your fire pit from the house? Make sure it’s easy to get to and sight lines aren’t blocked.
- Wind direction: Set your DIY outdoor fire pit away from prevailing winds if possible, to keep smoke outta your face (and your neighbor’s, yikes!).
DIY Outdoor Fire Pit Materials and Tools
So, what do you need to get rolling on your DIY outdoor fire pit project? Check it—here’s a solid starter list. Don’t get overwhelmed, though! Most stuff is easy to find at your local hardware or home improvement store.

- Fire bricks or paver stones: These are heat-resistant and safe
- Gravel or lava rocks: For a safe fire base
- Fire ring or steel liner (optional but helps prolong the life of your pit)
- Shovel and rake
- Tape measure
- Level
- Rubber mallet
- Wheelbarrow or buckets (for hauling materials)
- Safety gloves and goggles
When picking out materials, remember—anything that’ll get hit by high heat needs to be non-combustable. No shortcuts with regular bricks or stones that might explode when heated! Always mention to the store crew you’re working on a DIY outdoor fire pit and they’ll hook you up with the right stuff.
Step-by-Step DIY Outdoor Fire Pit Construction
Here’s where we roll up those sleeves and get down to business. Building your DIY outdoor fire pit is easier than you think, promise! Just follow these steps and you’ll be roasting hot dogs (or vegan dogs, if that’s your thing) before you know it.

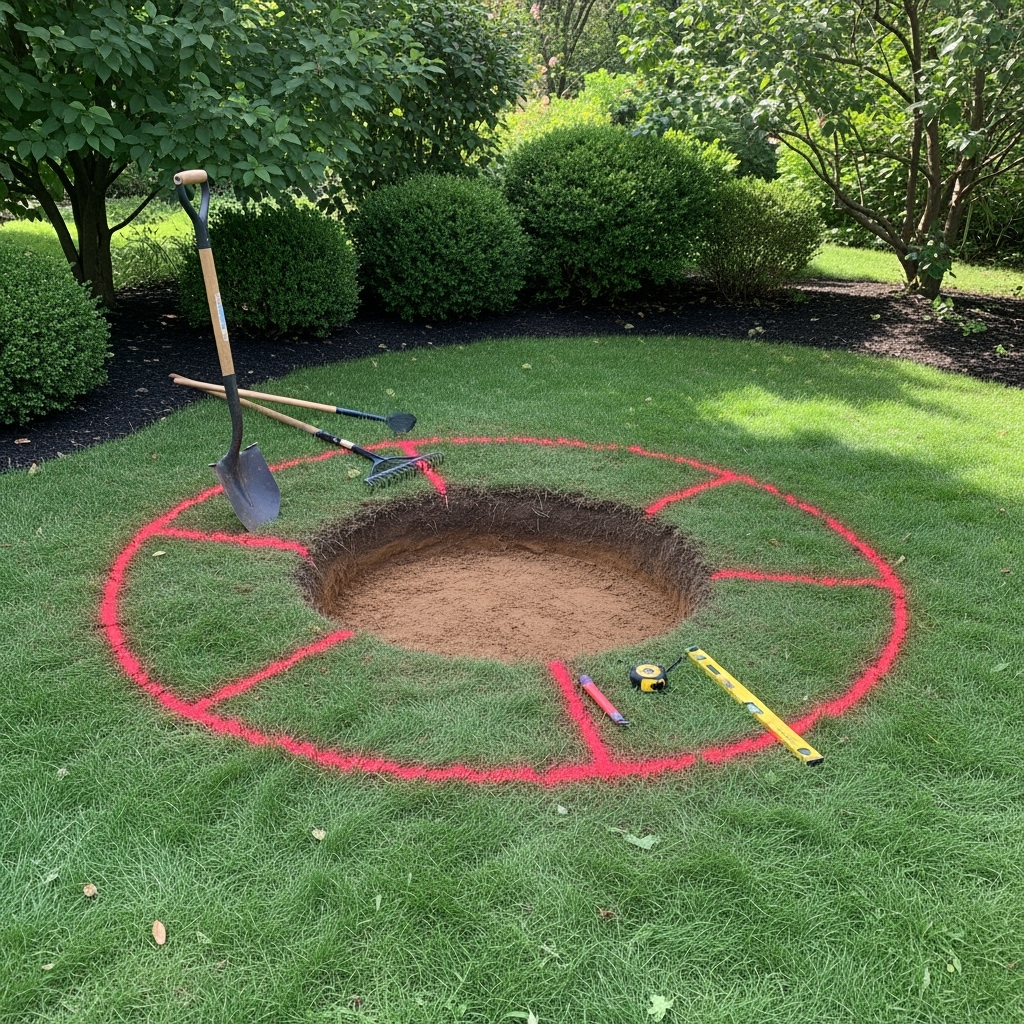
1. Mark Out Your Space
- Use a string and stake to mark a circle. Typical size? About 36-44 inches across, but make it your own.
- Spray paint around your circle, then clear away grass and dirt inside. Shoot for about 6-8 inches of depth.
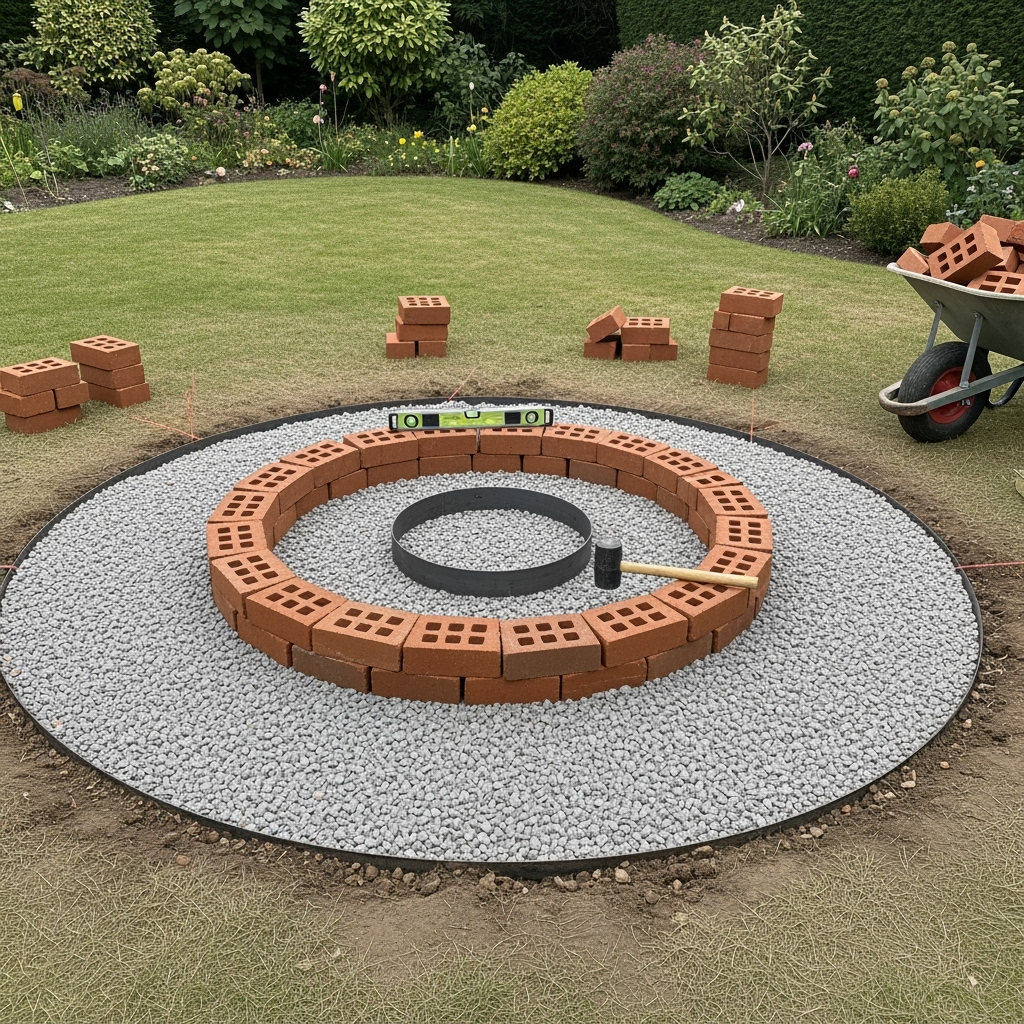
2. Set Up the Base
- Then dump in 3-4 inches of gravel or lava rock. Spread it nice and level—this gives drainage and keeps your fire pit from turnin’ into a swamp after rain.
3. Lay the First Row
- Arrange your first fire brick or paver stone circle right on the gravel. Take your time, eyeballing it to make it as even as you can.
- Use a level across the top and your rubber mallet to tap stones into place. Wobbles? Just keep adjusting till it’s solid.
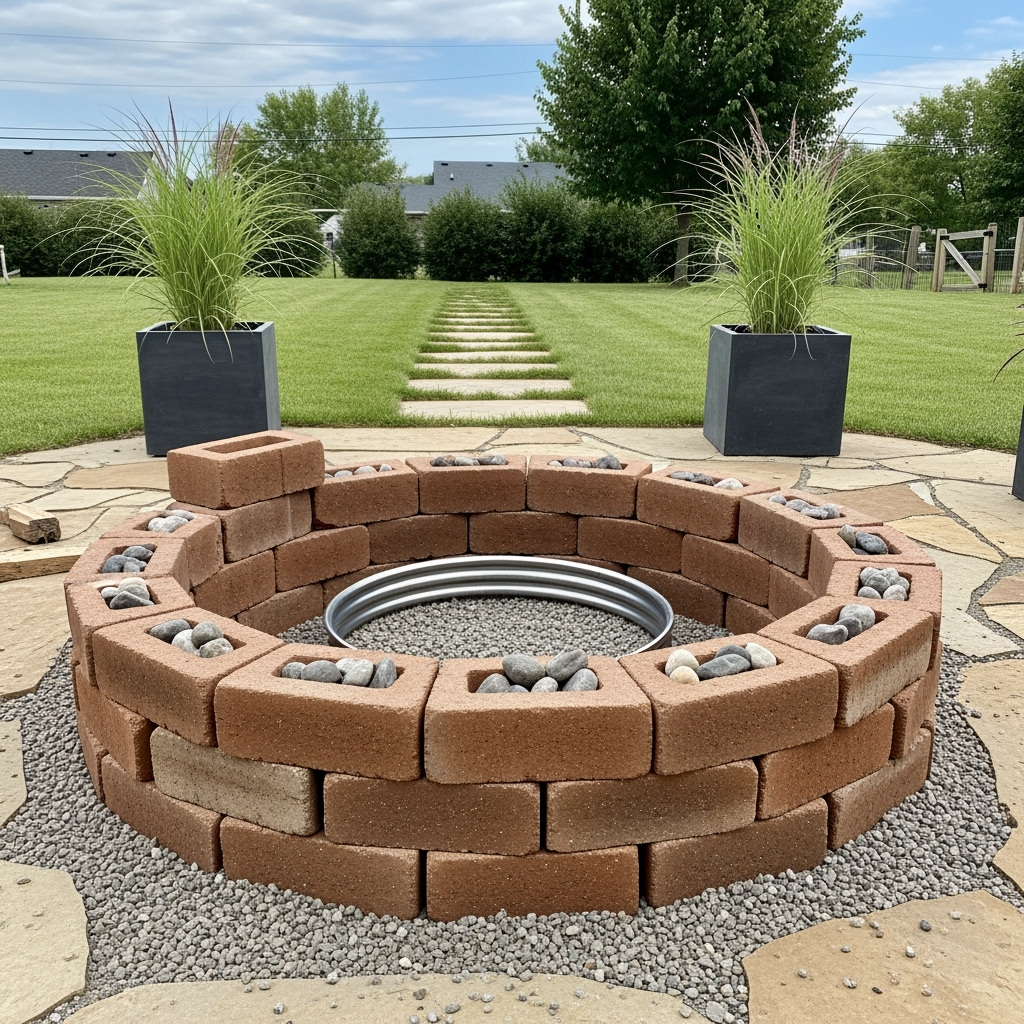
4. Build It Up
- Stack the next rows of bricks on top, staggering the joints like you would a wall. Go for at least 2-3 rows high.
- If you’re using a metal ring, pop it in after the base layer so you can build around it.
- No mortar needed if you use heavy block—gravity and tight fitting is enough for most builds. But you can use construction adhesive made for high temps if you want that extra hold.
5. Finishing Touches
- Sweep out any loose rocks or dirt from your DIY outdoor fire pit.
- Fill gaps with smaller rocks for a real pro look.
- If your pit’s tall enough, consider adding a little edge or capstones for style points.
And that’s it—seriously! Stand back and admire your hard work.
Creative DIY Outdoor Fire Pit Ideas
Okay, want to take it from basic to brag-worthy? There’s loads of cool tweaks and upgrades you can toss into your DIY outdoor fire pit set-up. Check out these ideas:
- Built-in seating: Construct a semi-circle of low walls or benches around the pit for instant chill space.
- Grill grate: Add a fire-safe grill for cookouts, or a swing-over grate for next-level BBQ action.
- Lighting: Rope lights along the edge, solar lanterns in nearby planters, or tiki torches add nighttime magic.
- Stone or mosaic pattern: Mix colors and sizes for an artsy look. Personalize your fire pit with tile or mosaics.
- Rock garden outer ring: Fill a donut-shaped area around your pit with pebbles and succulents to set the scene.
And if you want to expand your outdoor hangout, check out our guide on DIY patio furniture for the perfect complement to your fire pit.
DIY Outdoor Fire Pit Safety: Tips That Save the Day
Yep, blazing fires are awesome, but staying safe is non-negotiable. Keep your crew and your home safe with these pro tips:

- Always keep a bucket of water or hose nearby. Even use a fire extinguisher if you’ve got one.
- Never leave your fire pit unattended, even for a quick run inside.
- Stick to burning dry, seasoned wood to minimize smoke and wild sparks.
- Never burn trash, pressure-treated wood, or anything with chemicals.
- Teach kids about fire safety—no playing near the pit!
- Fully extinguish before going inside. Stir ashes, spray with water, repeat ‘til totally cool.
Affordable DIY Outdoor Fire Pit Upgrades and Accessories
If you’ve already knocked out your DIY outdoor fire pit, why stop there? Trick it out with some budget-friendly upgrades that boost comfort and fun.
- Portable log holder: Keeps firewood dry and tidy.
- Weatherproof cover: A simple tarp or custom cover keeps your pit clean off-season.
- Spark screen: Cuts down on stray embers for extra safety.
- Fire tools: A long-handled poker and tongs are all you need.
- Adirondack chairs or big comfy cushions: Relax in style.
DIY Fire Pit Table Transformation
When the fire’s out, drop a sturdy tabletop over the pit and—bam! Instant cocktail or snack table. Just make sure it’s made from fire-resistant materials and cool to the touch before using.
Landscaping Your DIY Outdoor Fire Pit Area
Bring your DIY outdoor fire pit to life with a rad layout. Create a chill spot that’s as pretty to look at as it is fun to use. Here’s some simple ideas:
- Plant a ring of low shrubs or ornamental grasses on the perimeter
- Pave walkways with flagstone, pea gravel, or mulch for easy access
- Scatter oversized cushions, poufs, or weatherproof beanbags for seating
- Install a cheap pergola or DIY string lights overhead for a cozy vibe
- Place planters and garden art to reflect your own style
Your DIY outdoor fire pit area should feel like an extension of your home—welcoming, relaxed, and totally you.

Frequently Asked Questions About DIY Outdoor Fire Pits
Can I build a DIY outdoor fire pit on a budget?
For sure! Scour Craigslist, Facebook Marketplace, or local construction supply yards for leftover bricks or stones. Upcycle what you can, and you’ll keep costs crazy low all while building a stylish, sturdy DIY outdoor fire pit.
How long does it take to make a DIY outdoor fire pit?
Lots of folks can knock it out in a day if you’ve got all your materials prepped in advance. Allow time for leveling, stacking, and snagging a pizza for those spontaneous helpers (they’ll work for snacks, trust me).
Can I use regular bricks for my DIY outdoor fire pit?
Avoid standard bricks, cinder blocks, or river rocks—they can crack or even explode under high temps. Stick with fire-rated materials only, always.
How do I keep smoke levels down at my DIY outdoor fire pit?
- Burn only dry, seasoned hardwood—wet or green wood makes way more smoke.
- Try the ‘top-down’ fire stacking method for cleaner burning.
Making DIY Outdoor Fire Pit a Year-Round Hangout
Look, just ’cause the weather cools off doesn’t mean you gotta ditch your outdoor mojo. Your DIY outdoor fire pit turns a basic backyard into a four-season retreat. Blanket up with friends, sip cocoa (or cider, no judgment), and let the warmth chase away the chill. Consider adding a windbreak, portable heater, or waterproof cushions to kick up the cozy on those winter nights.
DIY Outdoor Fire Pit Etiquette
Before you fire it up, give the neighbors a heads up about your weekend plans, especially if you’re burning late. Some neighborhoods have burn bans during dry stretches, so always double check.
Don’t burn yard waste, trash, or anything that’ll smoke up the joint. Keep music at a chill level and keep the fire under control at all times. Doing your part means everyone can keep enjoying their outdoor spaces in peace, including you!
Final Thoughts: The Reward of Your DIY Outdoor Fire Pit
Building a DIY outdoor fire pit isn’t just a flex for your backyard—it’s an investment in your lifestyle. It draws people together, fuels laughter and convo, and let’s you make the most of those long nights or crisp fall evenings. Whether you’re a rookie handy-person or a seasoned DIY warrior, the DIY outdoor fire pit project brings big rewards for relatively little effort or cash outlay.
So what are you waiting for? Stop scrolling, start sketching, and turn your backyard into the ultimate hangout. When you gather around that first DIY outdoor fire pit blaze, you’ll know: you created not just another fireplace, but a gathering spot everyone will remember. Go get it!


