
So, you wanna know all about DIY floating shelves? You’re definitely not alone! There’s something about slapping up some slick, invisible shelving that just makes any room look crisp, modern, and straight-up magazine-worthy. Whether you’re a total newbie or got sawdust in your veins, building your own DIY floating shelves is crazy satisfying and way more affordable than buying those pricey store ones. Trust me, once you get rolling with these, your walls will be begging for more! Let’s dive in and break down this killer home upgrade so you can get those dreamy DIY floating shelves up and showing off your style.
Why DIY Floating Shelves Rake in the Praise
First, let’s be real: every home or apartment needs more storage. But if you’re tired of boring old bookcases or clunky wall units, then DIY floating shelves deliver all that sleek storage without the bulk. The secret sauce? Because they’re wall-mounted with hidden brackets, DIY floating shelves seem to magically float—turning a plain wall into a functional display zone that’s both stylish and practical. And let’s not forget: you get to brag to everyone about making them yourself!
The Benefits of Choosing DIY Floating Shelves
- Endless style options: Paint, stain, or leave natural—DIY floating shelves always match your vibe.
- Budget-friendly vibe: Store-bought shelves are spendy, but these can cost peanuts if you play your cards right.
- Customizable to the max: Build ‘em as thick, thin, long, or stubby as you want—fits your space exactly.
- Space savers: Perfect for small rooms or apartments where every inch matters.
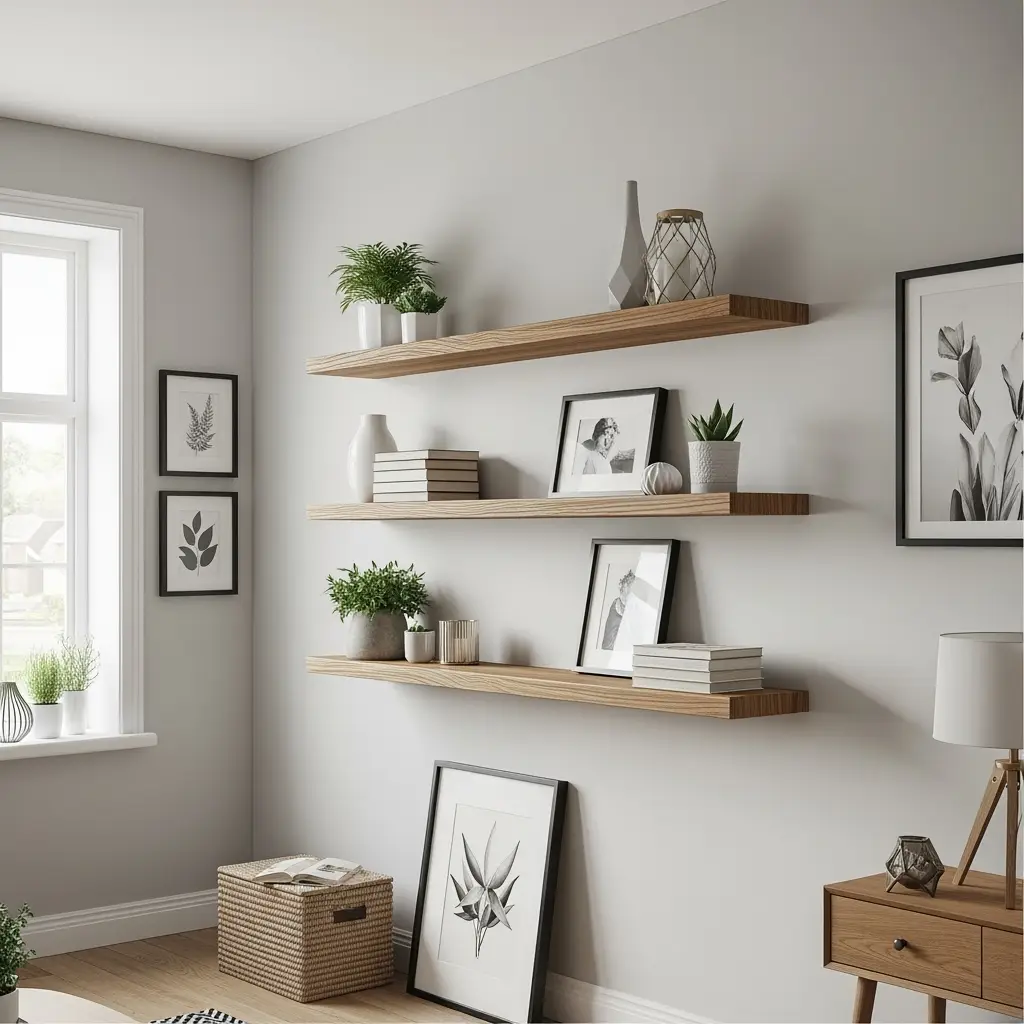
- Display boss: Books, plants, photos, knick-knacks—floater shelves showcase what you love.
Materials Needed for DIY Floating Shelves
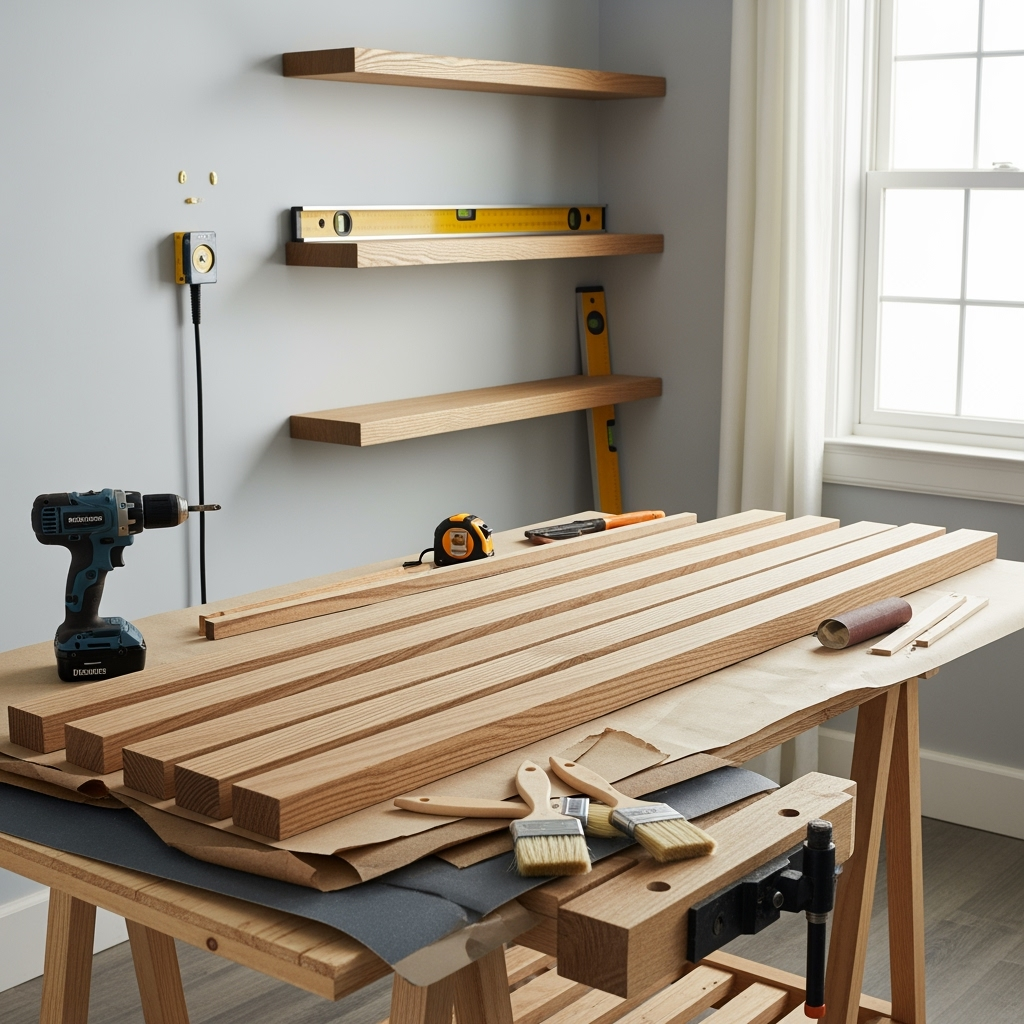
Alright, let’s talk gear. The cool thing about this project is you really don’t need fancy-schmancy tools or expensive supplies. Most can be grabbed at your local home improvement store or even upcycled from leftover wood. Here’s your shopping list for standard DIY floating shelves:

- Wood planks (pine, oak, maple, or reclaimed wood work great)
- Floating shelf brackets or heavy-duty L-brackets
- Wood screws (2-3 inch)
- Anchors (if you’re NOT going into studs)
- Stud finder
- Measuring tape
- Level (don’t skip this if you want straight shelves!)
- Screwdriver or drill
- Sandpaper or sanding block
- Paint or wood stain + brushes/rags (optional, but makes things pop)
Told ya, nothing too crazy for DIY floating shelves. Most of it you might already have lying around.
The Step-by-Step Guide to DIY Floating Shelves
Here comes the fun (and slightly messy) part. Building DIY floating shelves can look fancy but is surprisingly straightforward if you keep your wits about you. Let’s break it down:
1. Planning Your DIY Floating Shelves
- Measure your wall space—pay attention to both width and height for each shelf.
- Decide shelf length and depth. For most standard DIY floating shelves, 8-12” deep is perfect, but it’s all your call.
- How many shelves can your wall handle without looking too crowded?
- Mark out where each DIY floating shelf will sit. Painter’s tape is handy for visualizing before drilling holes.
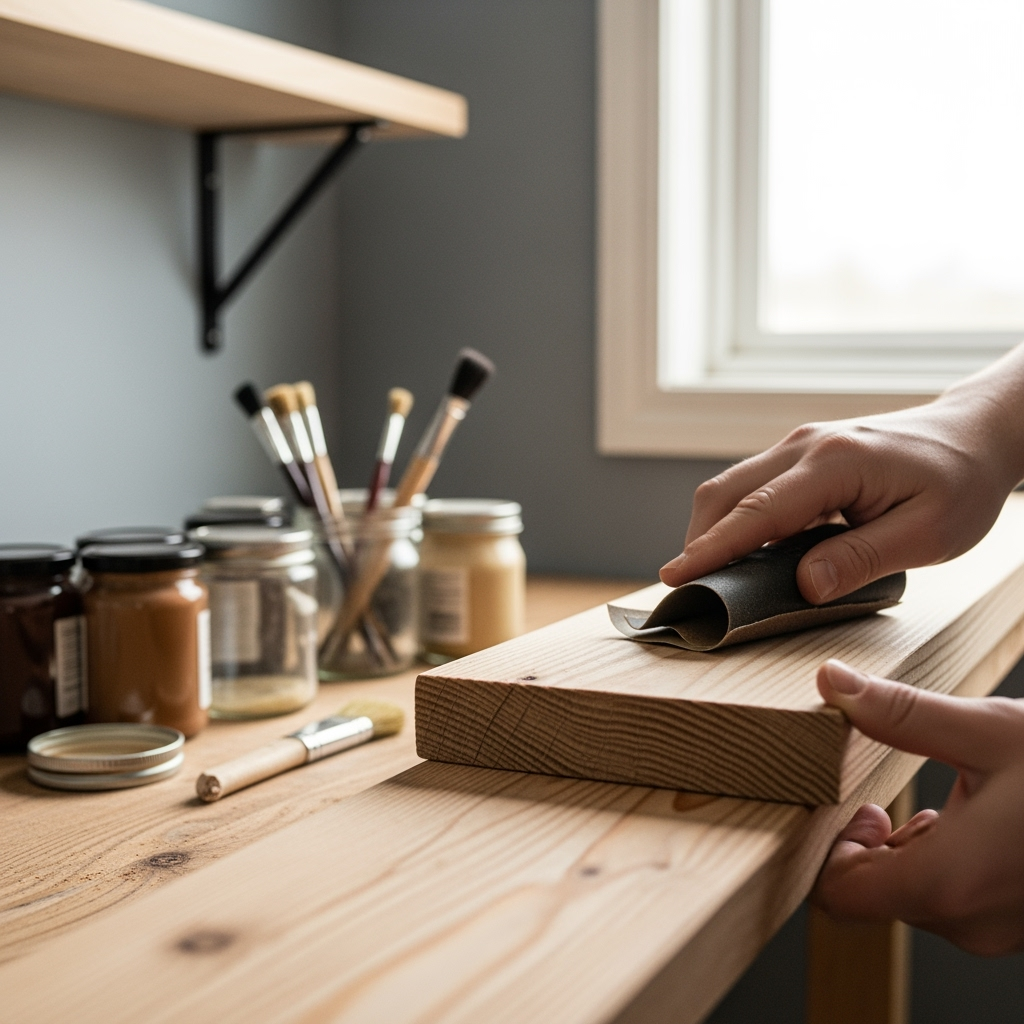
2. Prepping the Wood
- Cut wood planks to your desired length using a circular saw or miter saw.
- Sand all sides until smooth. DIY floating shelves really pop when they’re silky to the touch!
- Stain or paint—whatever matches your jam. Wait for it to dry fully before you start installing.
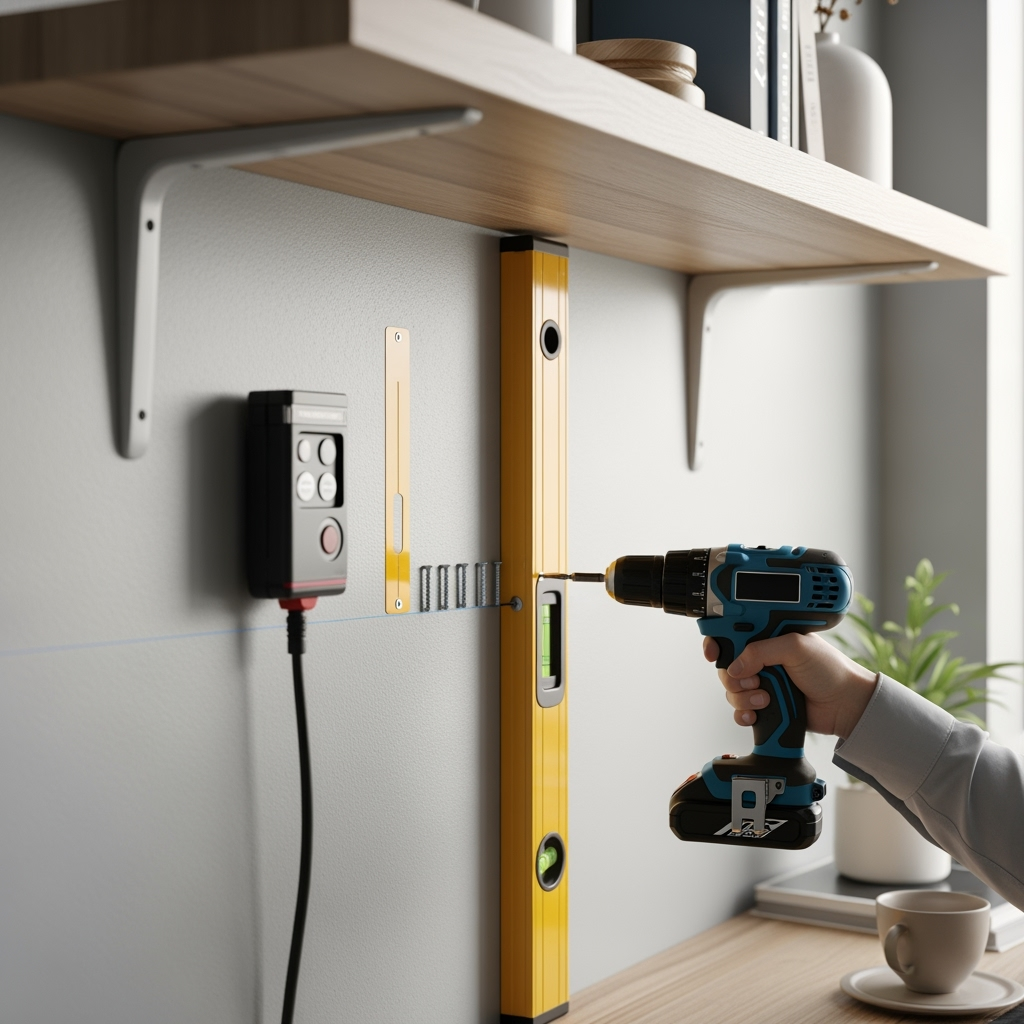
3. Installing Shelf Brackets for DIY Floating Shelves
- Using a stud finder, locate wall studs for the strongest support.
- Mark bracket spots on the wall. Hold your level to make sure they’re lined up and not at some random slant.
- Screw brackets in place. If you miss a stud, use drywall anchors rated for the weight of your DIY floating shelves.
4. Mounting Your DIY Floating Shelves
- Slide the prepped shelf onto your brackets or attach it according to your hardware instructions (some brackets need screws from underneath).
- Double check the level before finishing up. Once you’re sure it’s solid and straight, you’re golden!
Step back and behold! Your DIY floating shelves are ready for some epic styling.

Pro Tips to Make Your DIY Floating Shelves Extra Solid
- Don’t cheap out on hardware. Heavy-duty brackets = less sag over time.
- Consider a cleat system—a hidden strip of wood on the wall for maximum support for beefier DIY floating shelves.
- For longer DIY floating shelves (like over 3 feet), support in the middle is a must.
- Always pre-drill pilot holes to avoid splitting your wood planks.
Insanely Cool Design Ideas for DIY Floating Shelves
Once you get comfy with classic DIY floating shelves, it’s time for the fun stuff—making your shelves as unique as you are. Here’s some creative twists to try with your next set:
- Chunky farmhouse look: Use thick reclaimed wood with a natural stain for rustic vibes.
- Modern minimalism: Paint your DIY floating shelves white (or match your wall color) for seamless flair.
- Live-edge statement: Score some live-edge slabs for organic, artsy shelf drama.
- Industrial cool: Mix in black steel hardware or brackets for a warehouse-inspired touch.
- Corner floating shelves: Wrap two shelves around a corner for bonus storage and style.
- Geometric patterns: Stagger shelves at varying lengths and heights for eye-catching wall art + function.
How to Style Your DIY Floating Shelves Like a Pro
Hey, you built some bomb DIY floating shelves, now don’t just pile them high with random junk! Here’s how to make ‘em look intentionally styled with these easy hacks:
- Layer heights: Mix short and tall items (think plants, photos, books, vases) for depth.
- Odd numbers win: Group objects in threes or fives—it’s a design cheat code!
- Slap in some greenery: Trailing plants look insane draping from DIY floating shelves.
- Create a color palette: Stick to a theme for a clean, collected look.
- Add little art pieces: Stand framed prints or original artwork against the wall behind your stuff.
Common DIY Floating Shelf Mistakes (And How to Dodge ‘Em)
Honestly, I’ve made my fair share of flubs putting up DIY floating shelves. Wanna avoid those “oh crap” moments? Read this!
- Skipping the studs: Drywall alone won’t hold much. Anchors help, but find those studs whenever you can.
- Forgetting the level: No one likes lopsided DIY floating shelves. Triple check before you screw anything in.
- Overloading: These shelves are strong but not magic. Mind the manufacturer’s weight limits if using pre-made brackets.
- Using warped wood: Inspect your lumber at the store. Warped boards = saggy, ugly shelves.
- Not sealing raw wood: Unfinished wood stains fast and can splinter. Hit it with at least a clear coat.
Budget Breakdown: How Cheap Can You Go?
One of the top reasons DIY floating shelves are so beloved is because you get major style on a shoestring. Here’s a quick cost breakdown for a single standard shelf (all prices USD, just ballparking):

- Wood plank: $8-$20 (depending on size and species)
- Brackets: $5-$15 per set (fancier = pricer)
- Screws & anchors: $5
- Stain/Paint: $5 (for a small can)
- Total: $20-$45 per shelf
Example: I put up a set of three chunky DIY floating shelves for about $60—not even close to the $200+ price tag you’d find at stores.
When to Splurge: Store-Bought vs DIY Floating Shelves
Honestly, building your own DIY floating shelves wins 99% of the time. You’ll only want to grab premade if you want made-to-measure installs or need ultra-load-bearing options for things like a full library wall. For everything else, the control, customization, and savings are worth the slight learning curve. Plus, your projects only get better with each shelf!
FAQ: All the Little Things About DIY Floating Shelves
- Can I install DIY floating shelves on tile or brick? Yep! Use a masonry bit and the proper anchors. Go slow to avoid cracks.
- How much weight can DIY floating shelves hold? Depends how you mount ‘em and what hardware you use, but 30-50 lbs is standard if you hit the studs.
- Best finish for kitchen or bathroom floating shelves? Use a waterproof sealer (like polyurethane) so moisture won’t mess ‘em up.
- Best wood for heavy DIY floating shelves? Stick with dense hardwoods like oak, maple, or walnut if you’re stacking books or gear.
- How do I hide brackets completely? Use routered slots on the back of your boards or buy specialty “invisible” floating shelf brackets for that totally clean look.
Ready to Nail Your Own DIY Floating Shelves?
Look, DIY floating shelves are one of the quickest wins in any DIYer’s playbook—looks pro, solves storage headaches, and you get to show off your handiwork. Whether you go rustic, modern, or wild, you’ll only regret not starting sooner. And if you hit a snag or two on your first go? So what! Every project gets you better skills for next time. Now, go grab those tools, rip open a cold drink, and get to building those epic DIY floating shelves. Your walls (and Insta feed) will totally thank you.


