
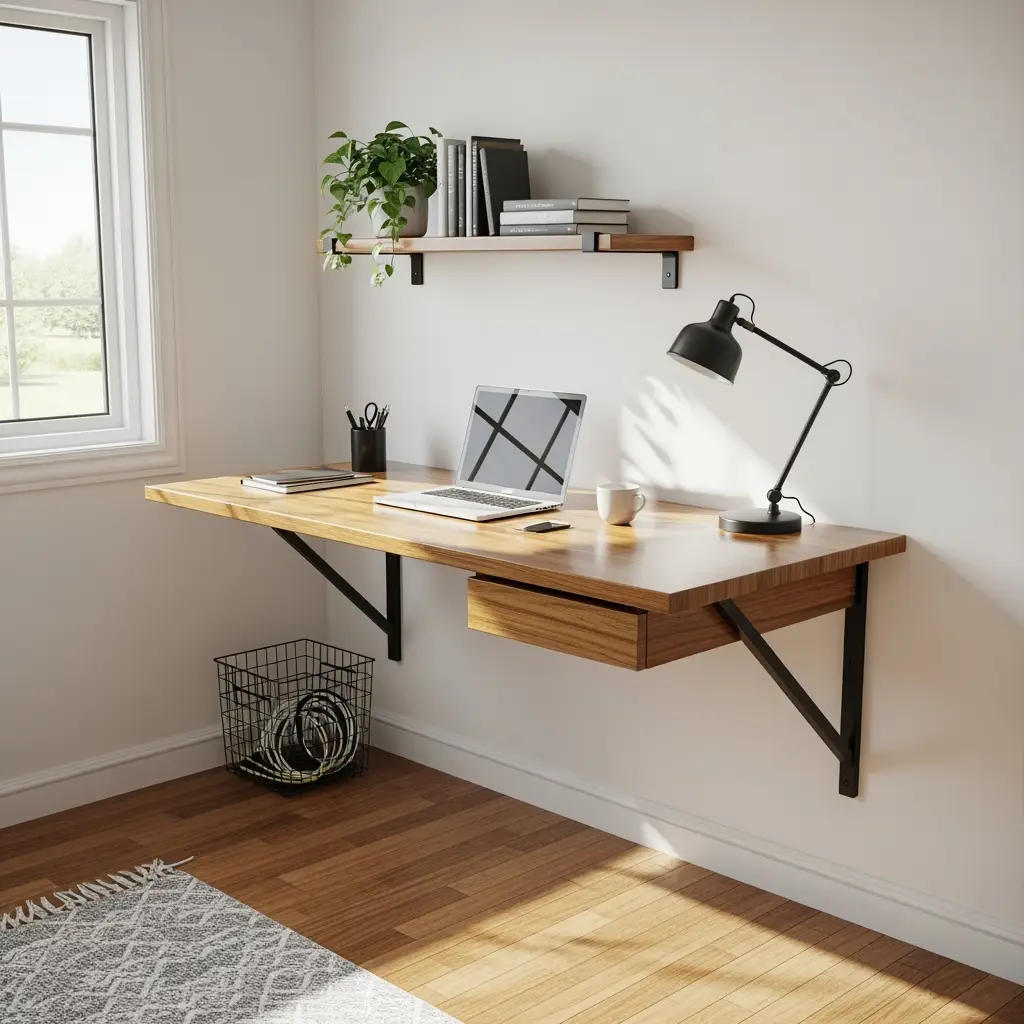
Ever walked into a room and just instantly felt like the space had its stuff together? Odds are, there was a killer focal point in there—like a sleek, modern DIY floating desk. Trust me, these desks are more than just a pretty face for your wall. If you’re sick of bulky furniture or just jonesing for a fresh vibe in your home office, bedroom, or even that random alcove you don’t know what to do with, it’s high-key time to dig into DIY floating desk ideas. In this epic guide, I’ll spill everything you need to know—pro tips, budget tricks, step-by-step builds, and enough inspo to get your creative engine roaring.
So, grab your measuring tape, dust off that drill, and let’s jump headfirst into the awesome world of DIY floating desk magic!
Why a DIY Floating Desk Totally Rocks
First off, let’s break down what makes the DIY floating desk such a winner. Seriously, this isn’t just about looks (though, yeah, they look dope). There’s legit purpose and practicality behind building your own DIY floating desk:
- Space Saving: A DIY floating desk frees up floor space, so your room actually breathes. Great for tiny apartments, dorms, or anywhere vibes get cramped.
- Custom Fit: Got a weirdly-shaped wall or nook? You can build your DIY floating desk to fit exactly where it needs to go. No more awkward shuffling or wasted space.
- Minimalist Aesthetic: Let’s face it, the DIY floating desk just looks clean. It’s modern, sharp, and makes the room instantly tidy.
- Hidden Storage: Add drawers or a cable rack underneath and suddenly clutter disappears. Boom!
- Cost-Effective: Building a DIY floating desk is often way cheaper than buying a fancy new desk from the store.
Planning Your DIY Floating Desk: Get It Right from the Jump
Planning is half the battle—okay, maybe more like 80%. Here’s how to get your DIY floating desk project off to a killer start:

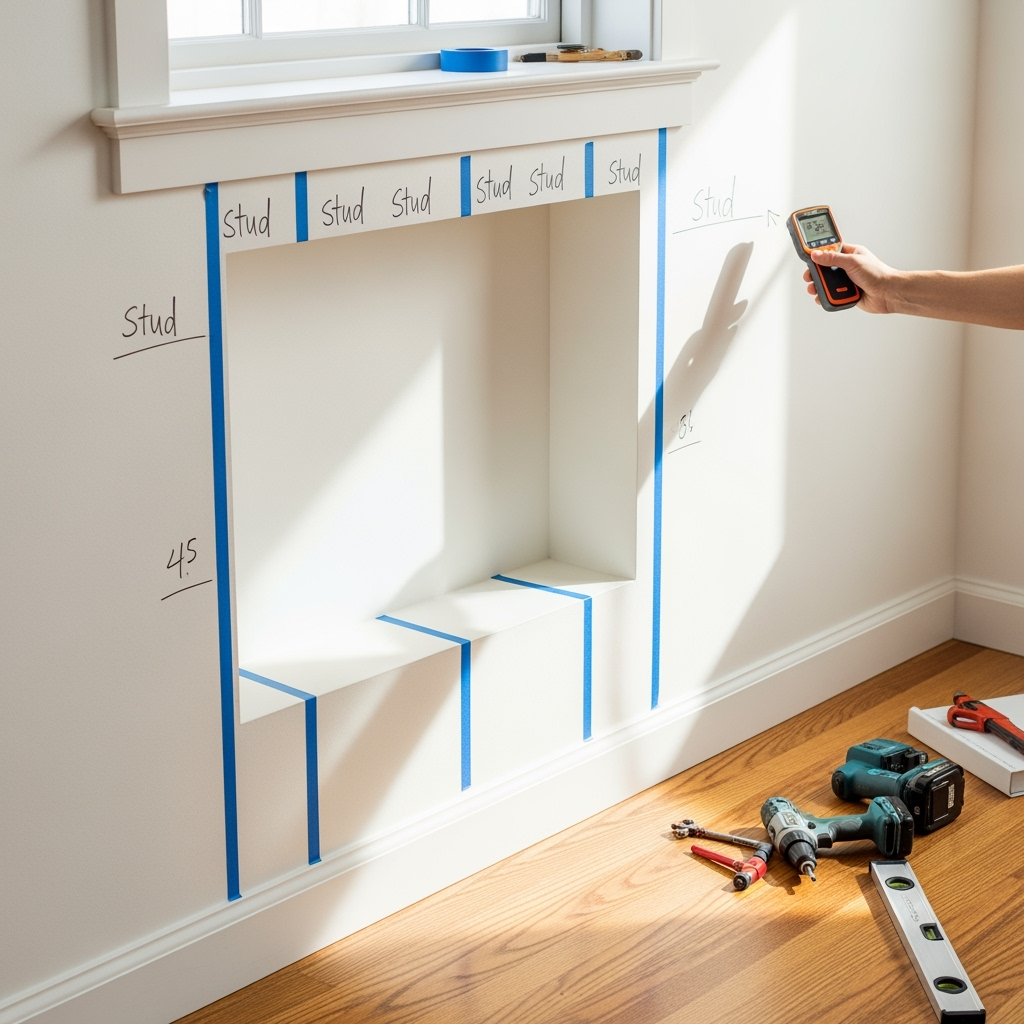
1. Choose Your Spot
- Find a wall that’s got good studs behind it. Your DIY floating desk needs solid anchors.
- Check power outlets if you want your desk to host tech gear.
- Note the lighting—natural light is a game-changer if you can nab it!
2. Measure Like a Pro
Measure once, curse twice—or, wait, that’s not how it goes, right? Jokes aside, make sure you:
- Mark the length and depth you want for your DIY floating desk.
- Check the seating height. Standard is around 29–30 inches, but make it comfy for you.
3. Dream Up Your Style
One of the best things about a DIY floating desk? Custom is king! Consider:
- Material: Solid wood for that warm, classic look; plywood for budget builds; live edge planks for a natural vibe.
- Finish: Glossy, rustic, painted white, black stain, or leave it raw and organic.
- Features: Are you going high-tech with cord grommets, or all-natural with zero cords?
What Materials Should You Use for Your DIY Floating Desk?
Here’s what you might wanna round up before rolling up those sleeves:

- Desk Surface: Solid hardwood, plywood (get a thick sheet for strength), or a pre-made countertop slab.
- Wall Brackets: Heavy-duty L-brackets or floating shelf hardware will support your DIY floating desk.
- Screws and Wall Anchors: Use long screws into studs, and beefy anchors for extra muscle.
- Finishing Supplies: Sandpaper, paint or stain, protective topcoat.
- Drill, Level, Stud Finder: Don’t skimp on gear—tools make or break a slick final look, so keep them organized in a sturdy wooden toolbox.
Step-By-Step: Building Your DIY Floating Desk
Alright, here’s the meat and potatoes. Let’s actually build your DIY floating desk.
Step 1: Find the Wall Studs
- Grab a stud finder and mark out the studs where your desk will go. This is where you’ll anchor your desk for max stability.
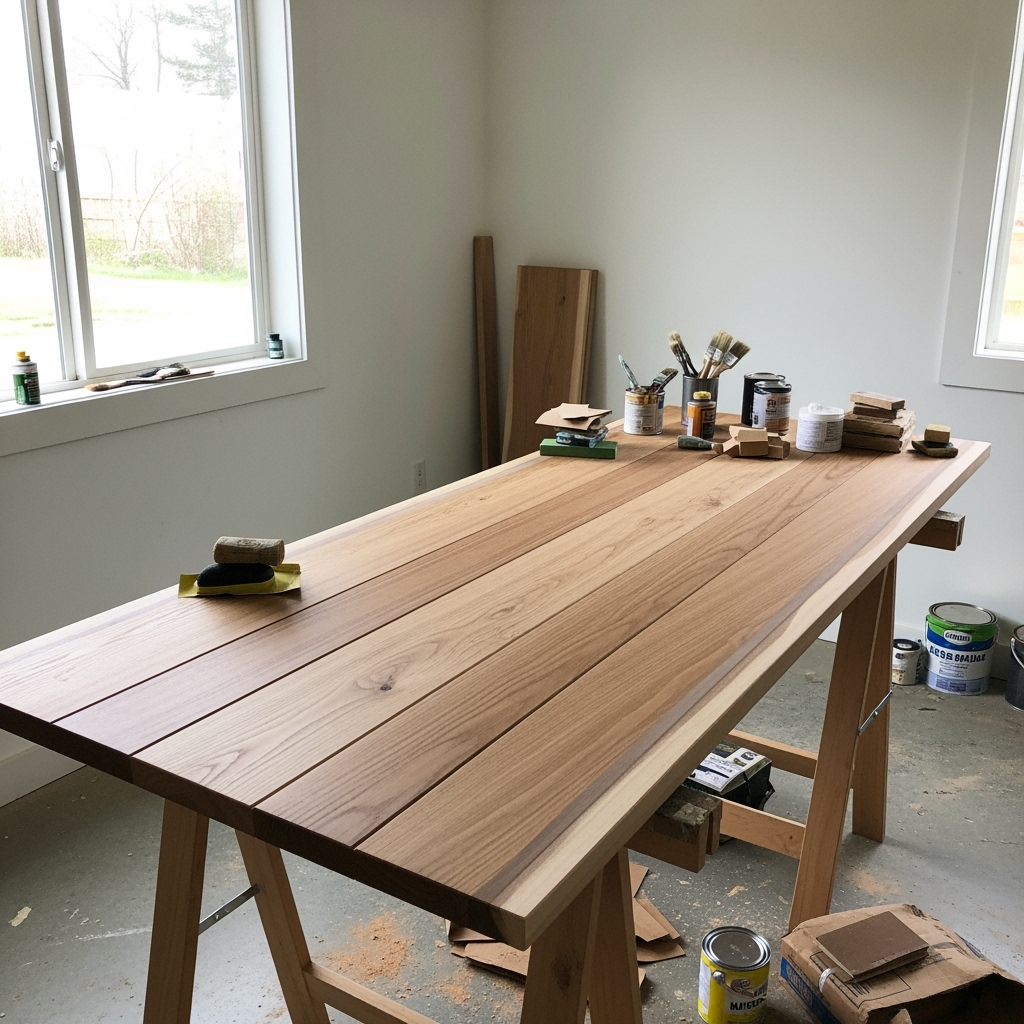
Step 2: Cut & Prep Your Desk Surface
- Cut your board to the right length and depth. Sand those edges, seriously—nobody likes splinters!
- Finish the wood with your chosen stain or paint. Let it dry, don’t rush it, even if you wanna see your DIY floating desk up ASAP.
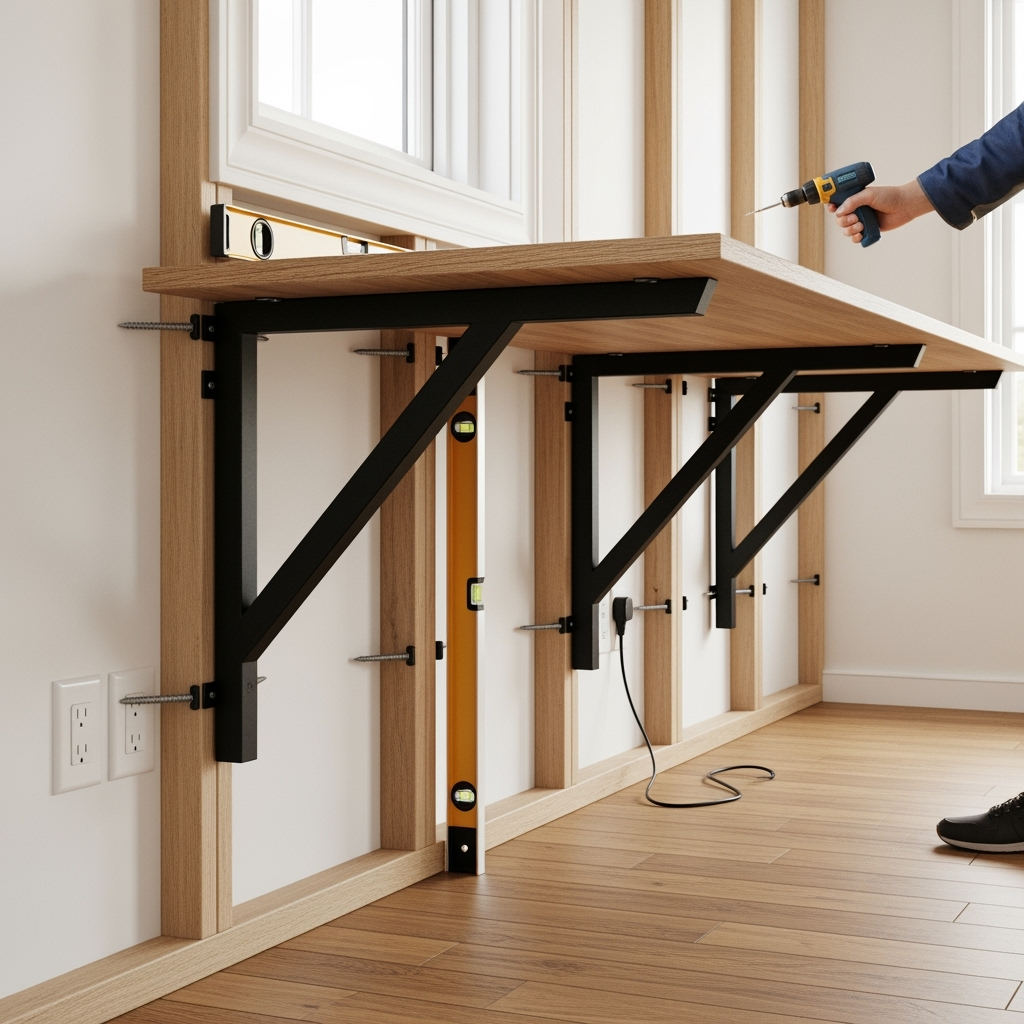
Step 3: Install the Wall Brackets
- Mount L-brackets or hidden shelf supports directly into the studs. Use a level so your desk doesn’t end up looking all janky.
Step 4: Set the Desk Surface
- Place the surface on the brackets. Secure with wood screws from underneath. Check that everything is sturdy before plopping a laptop down!
Step 5: Add Features
- Drill holes for cords if you need.
- Add a shallow drawer using simple sliders if you’re organized (or wanna be).
- Install a set of floating shelves above for books or plants to make your DIY floating desk double cute and functional.
Genius Tips to Nail Your DIY Floating Desk
- Double Down on Support: If the desk’s over 48”, add extra brackets or supports in the middle—nobody wants a sagging desk over time.
- Cable Management: Systems like a pegboard organization panel can keep cords outta sight, outta mind.
- Think Lighting: Clamp lamps or LED strips look sweet and keep shadows at bay.
- Personalize: Paint, decals, and even epoxy resin pours can make your DIY floating desk one-of-a-kind.
Top 5 DIY Floating Desk Design Ideas (With Some Real-World Mojo)
- Minimal White Desk: Use a chunk of plywood, white paint, and slim brackets. Less is actually more.
- Live Edge Floating Desk: Sand and finish a live-edge plank for a nature-meets-modern look.
- Compact Corner Desk: Perfect for reading nooks or awkward corners. Angle-cut your surface to fit.
- Hidden Storage Desk: Build a shallow drawer underneath or a flip-up panel to hide your junk.
- Floating Desks for Two: Run a long piece of wood along the whole wall—hello, work-from-home partner setup!
DIY Floating Desk FAQ: Your Biggest Questions, Answered
How strong will my DIY floating desk be?
If you drill into studs and use burly brackets, a DIY floating desk is rock-solid. Don’t trust drywall anchors for big jobs; always anchor into wood framing! For super-long desks (like six feet or more), add more brackets or a thin cleat under the back edge for extra stiffness.
What’s the easiest material to use?
If you’re brand new, start with plywood that’s at least 1 inch thick—easy to cut and finish, and it’ll be plenty sturdy for most uses.

Can I remove the desk later?
Heck yeah! Patch the screw holes and repaint, and you’re golden. Way easier than hauling out clunky desks if you move.
Will a DIY floating desk actually hold my monitors?
You bet—as long as you hit those studs and use proper brackets, your DIY floating desk will shrug off even the big dual-monitor setups.
Maintenance and Upkeep for Your DIY Floating Desk
Keeping your DIY floating desk in pristine shape isn’t rocket science, but there are a few things to keep in mind.
- Check mounts every 6 months: Give your brackets a quick check and tighten screws if needed.
- Watch for spills: Use a waterproof topcoat and clean up messes fast, especially if you eat at your desk (guilty!).
- Lift, don’t drag: Don’t drag heavy stuff over the surface or you’ll scratch your work.
Common Mistakes to Sidestep
- Not finding studs: The desk WILL fall if you skip this! Always support with solid anchors.
- Neglecting leveling: Crooked desks are annoying, trust me.
- Going too thin: Thin boards might flex. Opt for at least 1” thick desk tops for regular work setups.
- Underestimating weight: If you’re using stone or super-thick hardwood, double-check your wall can handle it.
DIY Floating Desk Cost Breakdown (Spoiler: It’s Cheap!)
- Plywood/wood slab: $30–$80 depending what you pick
- Brackets: $10–$30 each (you’ll need at least 2)
- Screws and drywall anchors: $10
- Sandpaper, paint/stain, finish: $15–$30 total
All-in, your DIY floating desk can run from about $60 to $180 for most builds. Compare that to those swanky furniture stores… dang, you’re basically scamming the system (in a good way!).

Real-World DIY Floating Desk Success Stories
I’ve seen some wicked builds over the years. One of my besties turned an alcove into a “Zoom room” by slapping up a floating desk with built-in power strips. My dad hacked an old butcher block countertop and now it’s a desk that holds more tech junk than a 90’s Radio Shack. Moral? You can totally customize your DIY floating desk to suit your life, your space, and your style—no two builds are ever the same.
Ready to Upgrade? Your Next Steps
Feeling hyped yet? Your DIY floating desk is more than just a workspace: it’s proof that you can literally shape your world. You’ll get mad bragging rights, a professional vibe in any room, and maybe even a fresher headspace to get stuff done. If you’re ready to get rolling, start with small builds (like a bedside floating desk) and work up to bigger builds as your confidence grows. Either way, don’t get caught up in perfection. Even if your first cut is a little wonky, that’s what makes homemade projects awesome—it’s your desk, built by you.
If you rocked your own DIY floating desk, totally drop a pic in the comments or tag me on social media—I wanna see your setups and steal (err… get inspired by) your genius ideas!


