
Let’s be honest — who doesn’t love seeing bright, chirping birds hanging around your backyard? If you’ve ever wished you had more feathered buddies visiting or dreamed about giving them a cozy home, you are totally in the right place. In this DIY birdhouse tutorial, we’re going to go step-by-step from choosing wood scraps to adding the finishing touches, all while keeping it fun and suuuper easy. Whether you’re a total noob with a hammer or basically a woodworking wizard, you’ll find loads of tips, some cheeky hacks, and enough inspiration to craft a birdhouse that’s actually loved by real birds (not just Pinterest).
So, why build a DIY birdhouse? It’s more than just a wooden box on a stick. It’s a way to help local wildlife, teach kids about nature, and (let’s be honest) flex your creativity. Plus, a cool DIY birdhouse tutorial will save you some serious cash versus buying those overpriced store ones. Sounds good? Grab your mug of coffee, roll up those sleeves, and let’s dive into this DIY birdhouse journey!
Why You Need a DIY Birdhouse Tutorial in Your Life
So, maybe you’re on the fence — is taking on a DIY birdhouse tutorial really worth it? Here’s the scoop. With a homemade birdhouse, you control the design, the safety features, and get the final say on those adorable decorations. Not only are you making something unique, but you’re also giving local birds a safe spot to nest. That’s the real win!
- Super cost-effective: With basic materials, you can create a sturdy birdhouse for less than ten bucks.
- Customizable styles: Match your garden vibes — rustic, modern, silly, or classic, all your choice!
- Kid-friendly project: Great for teaching patience, responsibility, and the basics of woodworking.
- Boosts local biodiversity: Real talk, birds help control pests and pollinate plants. More birds = happier garden.
- Therapeutic benefits: Sawdust and sunshine, anyone? Making something with your hands is pure stress relief.
Alright, now that you’re pumped, let’s talk materials and tools before we jump into the buildin’ part of this DIY birdhouse tutorial.

Gatherin’ Your Materials for a DIY Birdhouse
No need to overcomplicate things for this DIY birdhouse tutorial. Here’s a down-to-earth list you’ll want to round up. Odds are you’ve got most of this stuff laying around your garage or shed already.
- Wood: Untreated cedar, pine, or redwood (scrap wood or old fence boards work great!)
- Screws/nails: 1.5 to 2-inch galvanized nails or weatherproof screws
- Wood glue (totally optional)
- Drill
- Saw (hand saw or circular saw if you wanna go speedy)
- Measuring tape, pencil, and a ruler
- Sandpaper (medium to fine grit)
- Exterior paint or wood stain (optional for pizzazz)
- Hinges (if you want an openable roof for cleaning)
- Safety goggles and gloves (safety first, always!)
Seriously, that’s it. The essence of this DIY birdhouse tutorial is simplicity and creativity with what ya got. Now let’s move on to designing your masterpiece.

Picking the Right Design for Your DIY Birdhouse
The core of any awesome DIY birdhouse tutorial is helping you nail the right design. Not all birds need (or want) the same thing. Plus, you want your birdhouse to actually attract birds, not just look cool on Instagram. So ask yourself:
- What birds are in your area? (Bluebirds, chickadees, wrens — check online guides or apps like Merlin Bird ID!)
- Is your backyard open or more wooded?
- What’s your weather like: rainy, hot, or snow-mageddon?
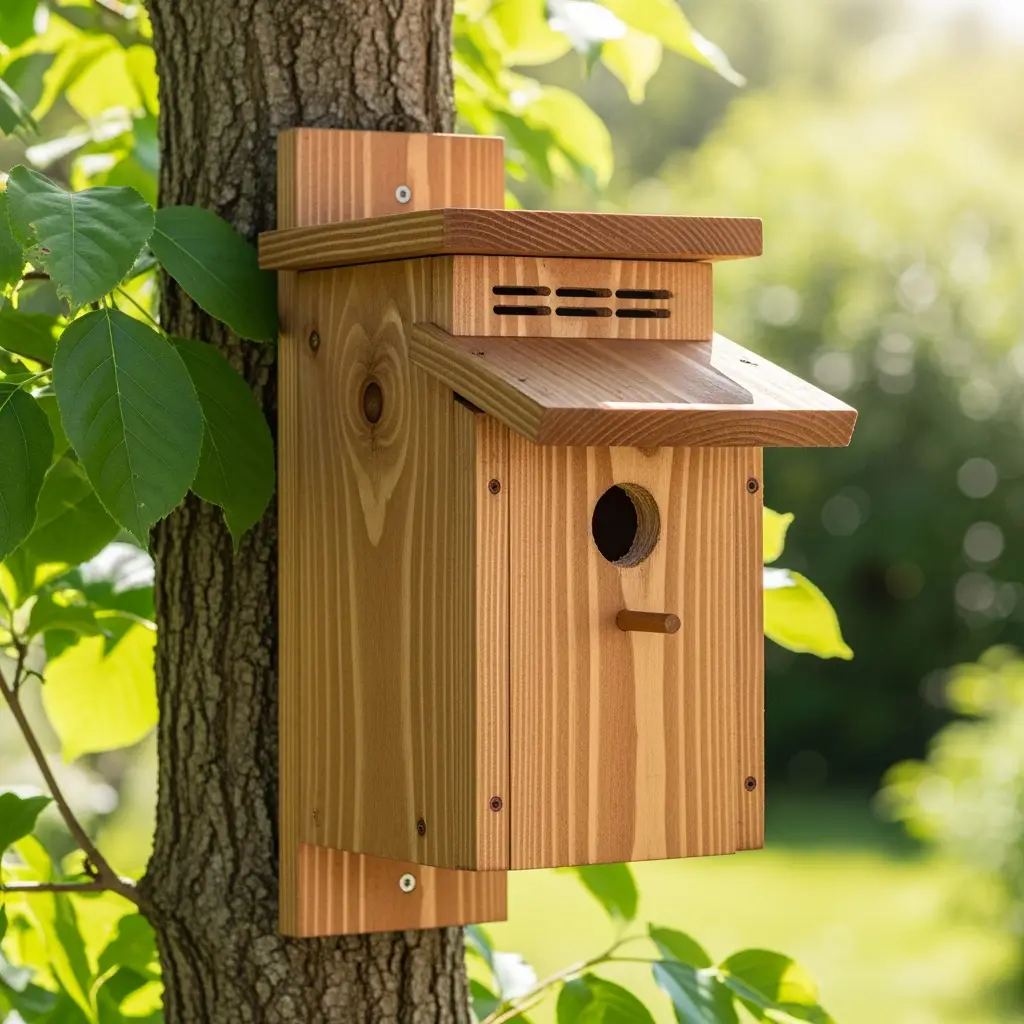
Here’s a basic blueprint, perfectly suited for most small songbirds in North America:
- Floor: 4 x 4 inch square
- Height: 8 to 10 inches tall
- Entrance hole: 1.25 to 1.5 inch diameter (a drill bit or a hole saw works wonders here)
- No perch! (Yeah this is breakin’ some hearts, but perches just invite predators. Most birds don’t need it.)
And always, always include drainage holes on the bottom and small ventilation holes near the roofline. This is key to a proper DIY birdhouse tutorial, keeping your bird guests healthy and mold-free.
DIY Birdhouse Tutorial: Let’s Build!
Time for the part you actually came for — the step-by-step DIY birdhouse tutorial. I’ll break it down into easy-to-follow chunks (trust me, no engineering degree needed). And if you make a mistake, don’t sweat it. Birds aren’t picky about perfect corners or straight lines!
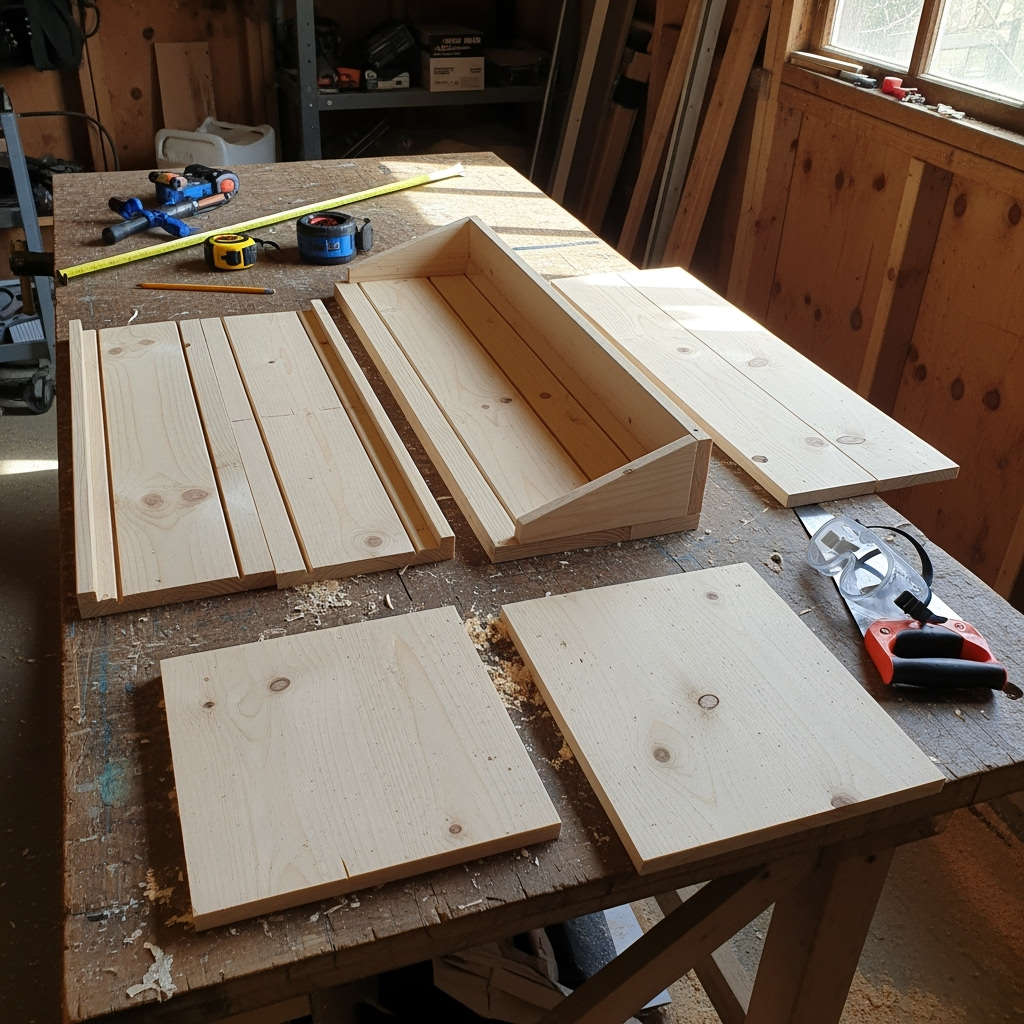
Step 1: Measuring and Cutting Your Wood
- Start by marking up your wood:
- Front/back: 8 inches tall, 4 inches wide
- Sides: 8 inches tall, 4 inches deep (angle one side of the roof for water runoff if ya want!)
- Floor: 4 x 4 inches
- Roof: 6 x 6 inches (a little overhang shields the entrance from the rain)
Use your saw and go slow. Wobbly lines? Don’t panic — sandpaper and paint hide a lot!

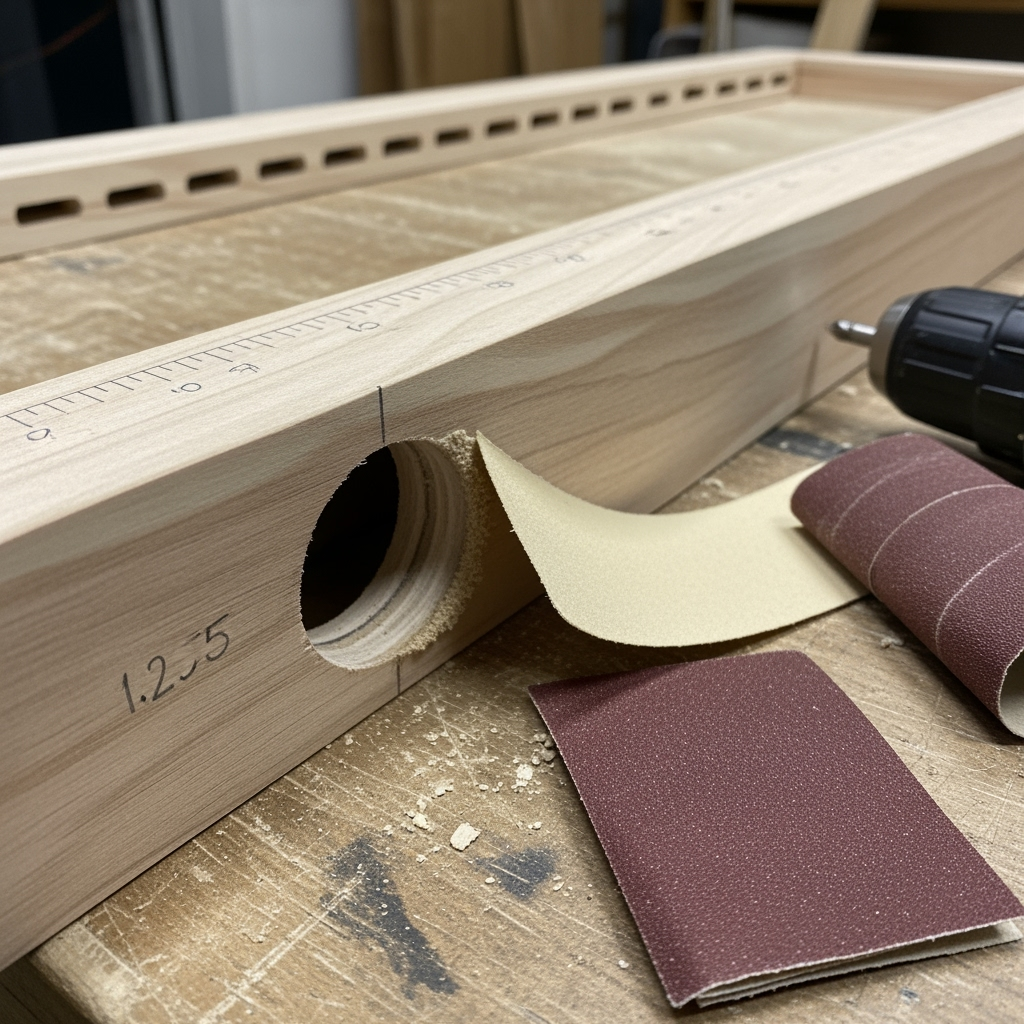
Step 2: Drillin’ the Entrance
- Take your front panel, and measure about 6 inches from the bottom.
- Use your hole saw or drill to create a 1.25 to 1.5 inch entrance hole.
- Sand the edges smooth for a cozy birdy door.
Step 3: Making it Breathable
- Drill tiny holes in the floor for drainage (three or four does the trick).
- Add two ventilation holes under the roof on each side. Super important step!
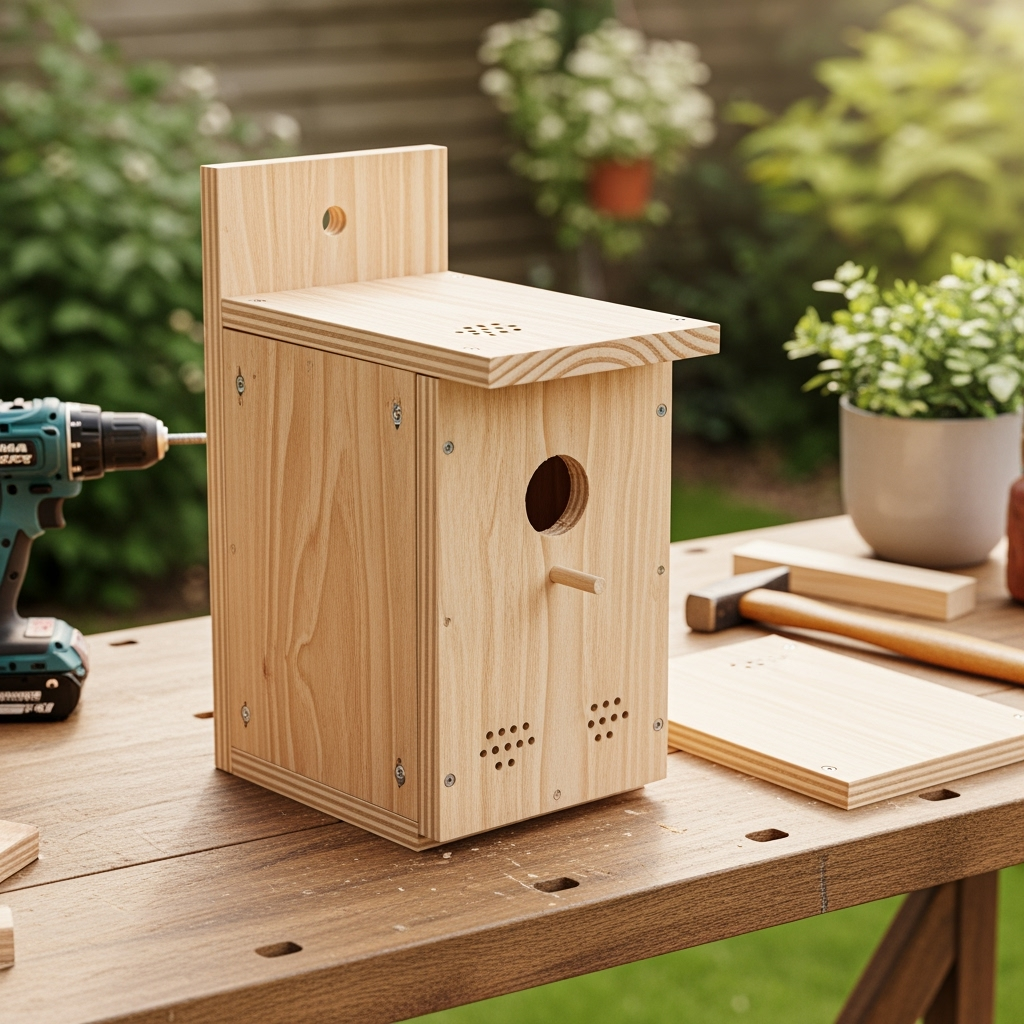
Step 4: Assembling the DIY Birdhouse
- Start by attaching the sides to the floor using nails or screws.
- Secure the back and front panels.
- Double-check that everything fits square — tweak as needed. Imperfection is personality, ya know?
- Attach the roof last — use hinges if you want a clean-out option, otherwise just fix it in place.
A quick hack: If you want to paint or stain, now’s the time. Go wild with colors that match your vibe but skip bright shades — subtle and natural colors are best for the birds.
Step 5: Mounting and Placing Your DIY Birdhouse
This part makes or breaks your hard work, so let’s get it right. Ideally, your birdhouse should be:
- Mounted 5 to 10 feet above ground.
- At least 10 to 15 feet away from dense brush (cat ambush zones!)
- Facing east or southeast to avoid the hot, afternoon sun.
Attach your DIY birdhouse with screws to a pole, tree, or fence. Skip wires — those can hurt the tree and make your work wonky if things shift in the wind.

Finishing Touches: Style & Safety
This DIY birdhouse tutorial wouldn’t be complete without some extra ideas to trick out your build and keep its tenants safe:
- Paint or seal the exterior. Use non-toxic, water-based paints and avoid painting inside — birds need natural wood for grip.
- Add some camouflage with twigs, moss, or natural stains for a rustic, cozy look.
- Use baffles or predator guards if you have a lot of squirrels or snakes around. These can be made with metal flashing or hardware cloth, easy peasy.
- Skip birdseed trays or feeders nearby if you want a nesting box — those attract nest raiders.
Routine Maintenance: The Long Game
This isn’t just a DIY birdhouse tutorial for one season — good nesting boxes last years with a bit of TLC:
- Check once a year (best in late fall) to clean out old nests, debris, and check for wasps or ants.
- Scrub gently with hot water. Don’t use harsh chemicals — birds are sensitive critters.
- Inspect your handiwork: Tighten any loose screws or patch up damage. Wood expands and contracts, especially if outside year-round.
- Make notes on which birds are stopping by. It’s handy if you want to tailor future builds (or just brag a little, haha).
Common Bugs (and How To Fix ‘Em) in Your DIY Birdhouse
All right, time for some real talk. Not every DIY birdhouse tutorial goes off without a hitch. Here’s what might trip you up — and how to fix it:
- Leaky roof? Check your roof angle or overhang. Felt paper or scrap shingles add instant waterproofing.
- Ants or wasps move in? Give it a solid clean. Lightly rub inside with a bar of soap to make it less attractive to bugs.
- No birds using it? It could be placement — move it to a quieter spot or higher up. Also, it can take a season before local birds trust a new house.
- Wood splitting? Pre-drill holes before inserting nails or screws. If you get a stress crack, wood glue and clamps usually fix it.
Level Up: Advanced DIY Birdhouse Tricks & Upgrades
If you’ve caught the bug and want to try something new, here’s how to take your DIY birdhouse tutorial to a pro level:
- Add a swing-out door for super easy cleaning. Attach with small brass hinges on one side and a hook-and-eye latch on the other.
- Decorative shingled roofs. Use leftover cedar shakes, coffee stirrers, or craft sticks for extra class.
- Solar-powered camera. Mount a mini wildlife cam to the birdhouse and watch nesting chicks from your phone!
- Two-story townhouse. Get creative and build a duplex for bird families — just remember separate entrances.
- Planter box underneath. Grow trailing flowers below the birdhouse for a real wow factor.
Real Stories: DIY Birdhouse Wins from Readers
This wouldn’t be the ultimate DIY birdhouse tutorial without hearing from other makers. Here’s a few real success stories you can learn from:
- Jill in Minnesota turned her old fence pickets into five gorgeous bluebird boxes and saw her first ever nest last spring!
- Paul and his daughter painted funky polka dots on their DIY birdhouse…and wound up attracting a bright yellow wren they hadn’t seen before.
- Trisha built a camera birdhouse that helped her monitor wrens — and catch a snooping squirrel in action (spoiler, the baffle worked!).
Your story could be next — all it takes is a little inspiration, a couple of boards, and this DIY birdhouse tutorial to get started.
FAQ: DIY Birdhouse Tutorial Quick Answers
- How big should the hole be? For most songbirds, 1.25 to 1.5 inches is best.
- Do I need to add a perch? Nope! Birds don’t need it, but predators sure like ‘em.
- What paint is safe? Water-based, non-toxic exterior paints only on the outside.
- Can I use plywood? Thin plywood doesn’t last, but thick exterior-grade works in a pinch. Stick to solid wood if you can.
- Can I put it on a tree? Yes, but use aluminum nails or straps to prevent tree damage.
Wrap Up: Your Next Steps with This DIY Birdhouse Tutorial
So there you go, one mega DIY birdhouse tutorial from start to finish. If you mess up a cut, don’t stress. If you get paint on your jeans, call it modern art. The best part is you’re making something real that truly helps your backyard ecosystem. And that’s what DIY is really about — learning, laughing at your own mistakes, and making something with love (and maybe a lil’ bit of mess).
Now you know every step of crafting a DIY birdhouse, feel free to customize, experiment, and build as many as you want. The birds in your hood will love you for years to come. And when friends ask where you got your awesome birdhouse, you can point right at it and say, “I made that.” Dang, that feels good, right?
If this DIY birdhouse tutorial helped ya out, let us know or share your pics — we’re always down for seeing cool new builds. Until next time, happy woodworking and happy birdwatching!


