
So, you’re scrolling through Pinterest again, eyeing all those dreamy, handcrafted bedroom setups. Suddenly, you get this rush: “Heck, am I really drooling over nightstands?” Yep, you’re not alone. But hold up, what if I told you that the next DIY wooden nightstand you see online could be the one you built with your own two hands? And, trust me, it’ll be miles more satisfying than any store-bought piece. In this deep dive, we’ll tackle everything from inspiration and planning, to building and styling your own DIY wooden nightstand. By the end, whether you’re a seasoned woodworker or you still don’t know your mitre from your miter, you’ll have all the steps and tips to crush this project.
Why Choose a DIY Wooden Nightstand?
Before we break out the measuring tape and power tools, let’s talk about why a DIY wooden nightstand could be the project that really ups your room’s game. First things first – personalization! When you build your own, you decide how tall, wide, chunky, or slender it’ll be. Wanna stash your novels and that stash of midnight snacks? Add a drawer. Need it to double as a charging station? Go wild and drill some handy cable holes.
- Budget-Friendly: Buying furniture gets pricey fast. DIY wooden nightstand builds use affordable materials and basic tools, saving you major cash.
- Custom Look: Love the rustic vibe or prefer modern lines? Handpick stains, finishes, and wood species to nail your style.
- New Skills: Building a DIY wooden nightstand is a killer way to rack up skills you’ll use all over your home.
- Satisfaction: There’s nothing like seeing your own handiwork next to your bed – that high never gets old.
Finding Your Inspiration: Nightstand Styles and Ideas
Let’s be real: “nightstand” sounds basic, but there’s loads of design direction you can go. Take a scroll through your social feed or flip through a few home design mags and you’ll see:
- Mid-Century Modern: Clean lines, tapered legs, low profile, and that smooth wood grain.
- Rustic/Farmhouse: Chunky wood, maybe some distressed paint, a sliding barn-door detail, or even a crate look.
- Industrial: Mix wood with black steel or pipe legs for warehouse cool.
- Minimalist: Straightforward, less-is-more design. Often just a slim drawer and open shelf, maybe floating off the wall.
- Boho-Chic: Playful carving, inlaid wood, or even rattan toppers.
But, hey, it’s your DIY wooden nightstand, so mash up those vibes as you see fit. The only rule? Make it yours.

Planning Your DIY Wooden Nightstand Project
Listen, no one wants a wobbly, janky nightstand that’s an accident waiting to happen. Planning is where the magic starts. Let’s run through what you gotta figure out before you even think about buying wood or busting out the saw.
Step 1: Measuring Your Space
Grab a tape measure and check how much space you have on either side of your bed. The standard height for a nightstand is about even with the top of your mattress (usually 24″-28″ tall), but no one’s judging if you go taller or shorter. Think width, too. Will it squeeze next to your bed, or do you want something wider to hold a lamp, phone, and the ever-growing To-Be-Read book stack?

Step 2: Draw Up Your Design
Don’t skip this, not even for a hot second. A rough sketch—yep, a napkin’s fine—lets you visualize shelves, drawers, handles, and finishes. There are loads of free nightstand plans online, but customizing is half the fun. Factor in:
- Leg style: Tapered, straight, hairpin, or chunky block.
- Shelves and drawers: How much storage do you want/need?
- Hardware: Simple wooden pulls or funky vintage knobs.
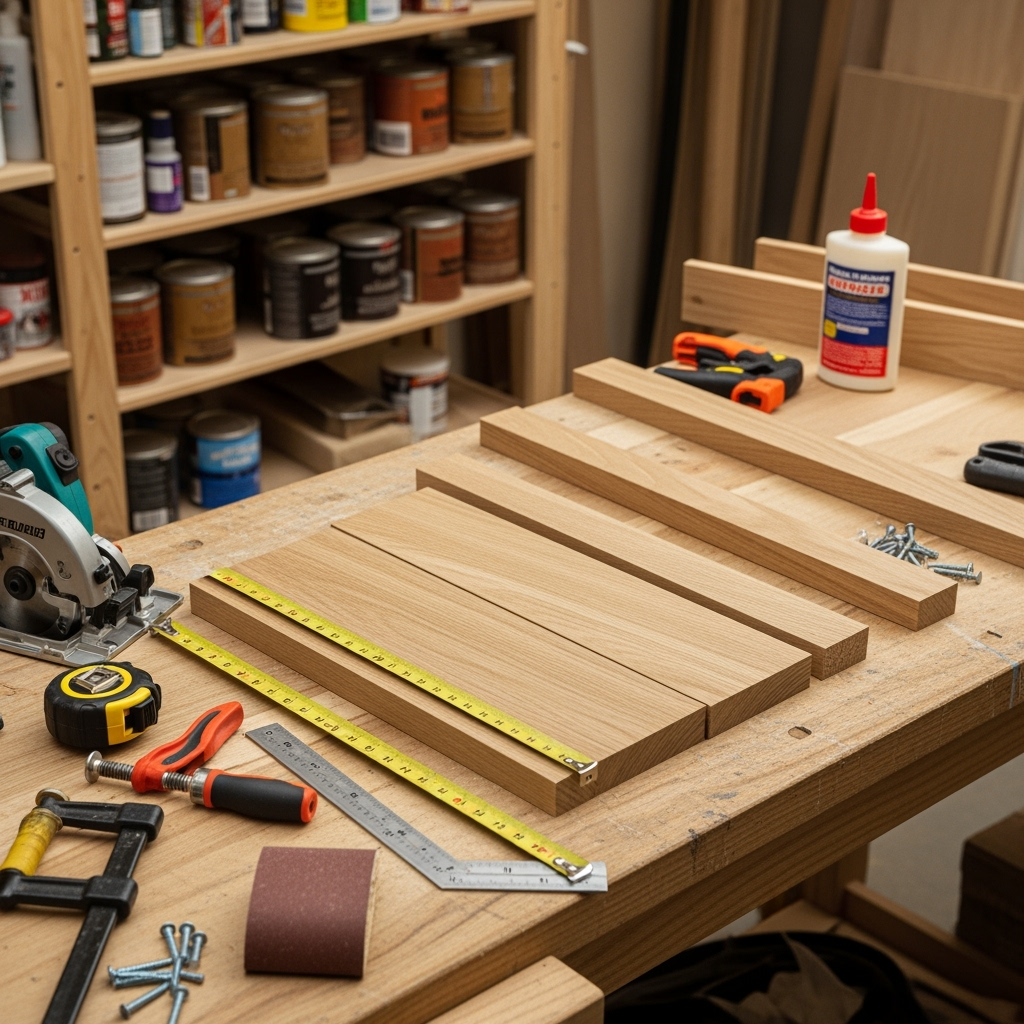
Step 3: Choosing Materials
This is huge for your DIY wooden nightstand—go for what’s in your budget and fits your vibe. Here are some common choices:
- Pine: Cheap and easy to work with, but soft (dents scratch easily).
- Poplar: A little pricier, but still easy for beginners.
- Oak and Maple: Heavier, harder, gorgeous grain. Costs more, but 100% worth it if you want to keep it forever (or even pass it down!).
- Plywood: Great for the frame and flat panels—just cover those edges with trim or edge banding for a pro look.
Double-check you’ve got all your hardware, screws, nails, glue, hinges, and sandpaper, plus your choice of stain or paint.
Gathering Your Tools
No need to drop hundreds on fancy tools for your DIY wooden nightstand. Most folks can pull this off with a good starter kit:
- Power drill/driver
- Circular saw or handsaw (miter saw rocks, but not required)
- Measuring tape & square
- Clamps (for nice, tight glue-ups)
- Orbital sander or simple sanding block (for lazy folks like me)
- Screwdriver and hammer
- Wood glue and wood filler
Pro tip: Always wear safety goggles and ear plugs, especially if you’ve got curious kiddos or pets zipping around.

Step-by-Step: Building Your DIY Wooden Nightstand
Prep Time: Cutting Pieces to Size
Alright, materials assembled, tools ready – let’s make some sawdust! First, lay out your boards or plywood and mark your measurements. Triple check before cutting! Miss by a quarter inch, and you’ll be cursing later.
- Cut top panel
- Cut sides and back panel
- Trim drawer front(s)/shelf panel(s) to fit
- Legs come last – perfect opportunity to try different styles before attaching
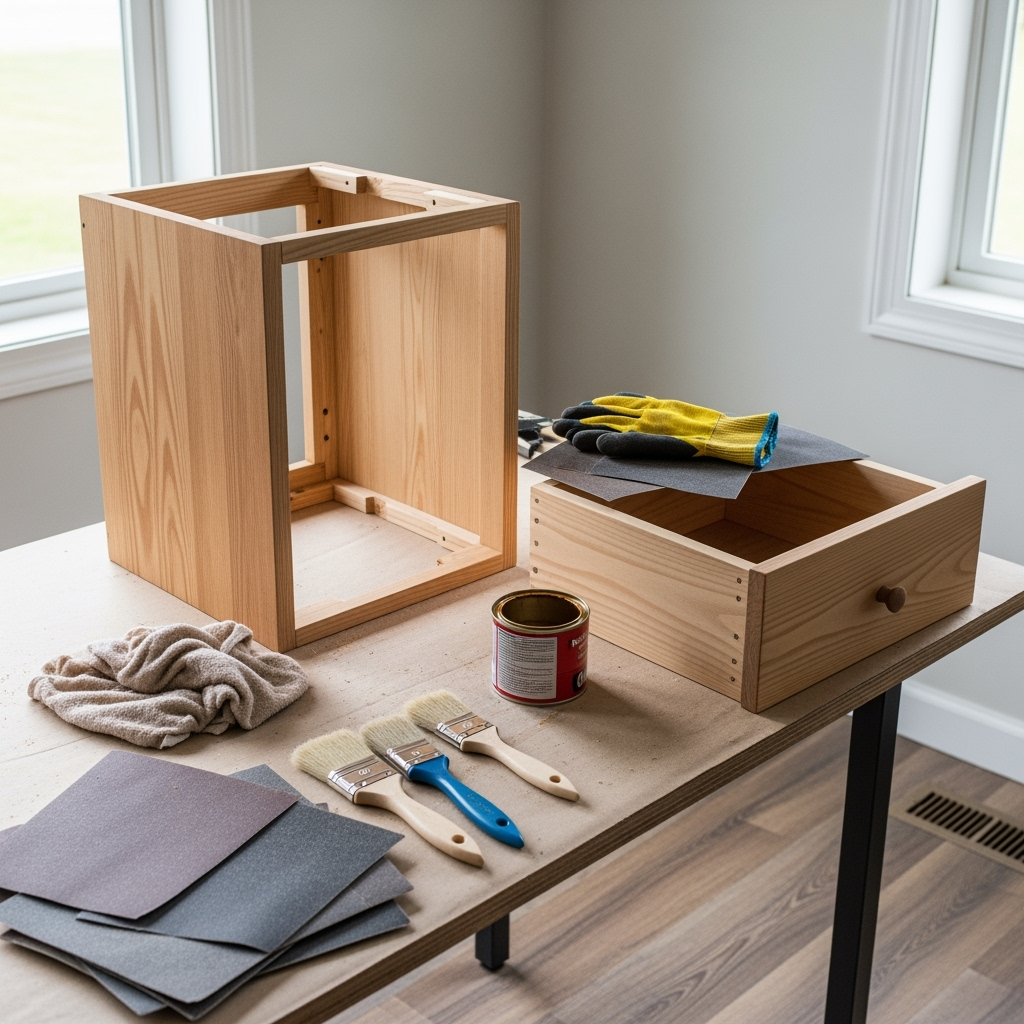
Sanding: The Secret Behind Every Great Finish
It’s ugly work, but a smooth finish is the sign of a solid DIY wooden nightstand. Sand every piece before assembly with 120 grit, then 180 or 220 for final smoothness.
- Pay special attention to edges and corners
- Use wood filler if you’ve got knot holes or tiny gaps
- Quickly wipe each piece with a barely damp cloth to catch dust
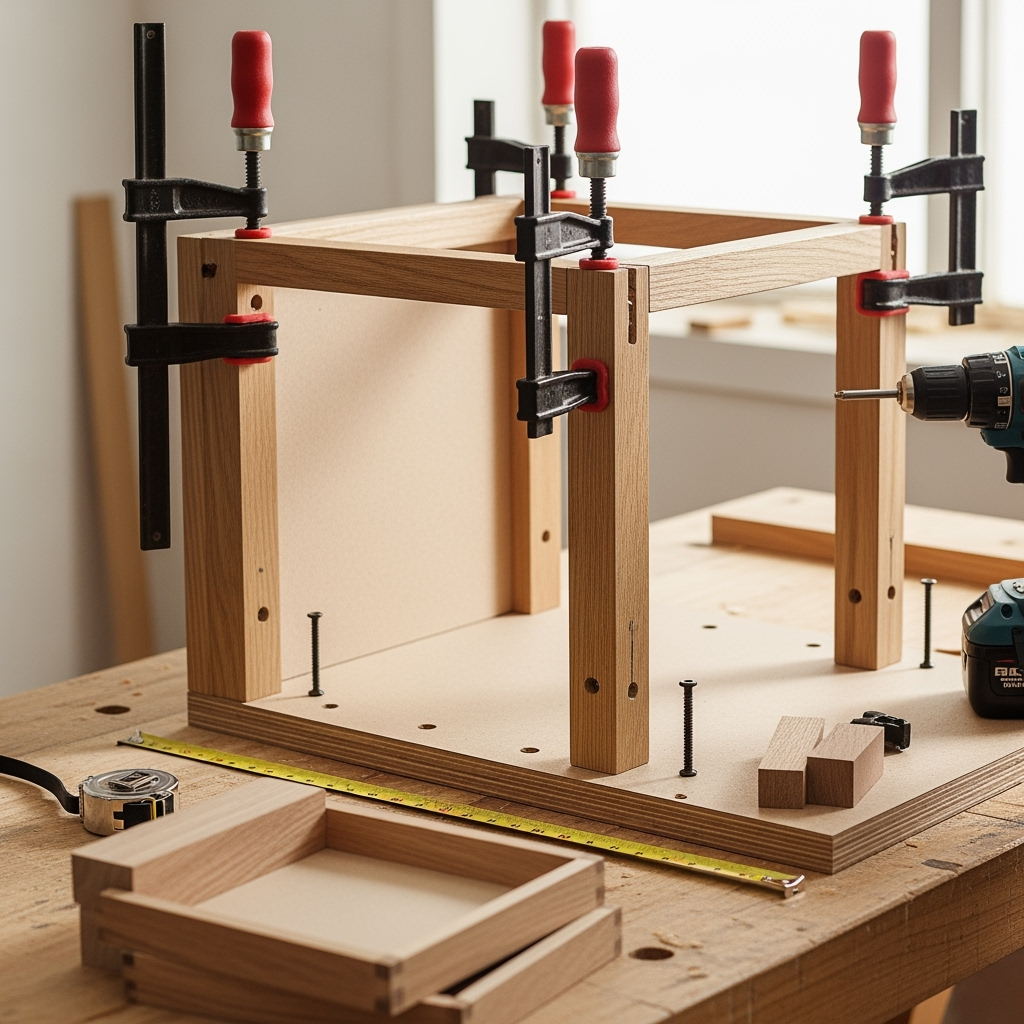
Assembly: Where It All Comes Together
This is legit the most satisfying part. Lay out your panels on a flat surface and start putting together the frame. Use wood glue and screws, being careful to square up each corner.

- Attach back and side panels to the top
- Use clamps to hold everything in line while drying
- If adding shelves or drawers, measure before attaching rails
- Attach legs – pilot holes keep the wood from splitting
Let the glue set up for a few hours, then double-check for wobbles and tighten any loose screws.
Building and Installing the Drawer
Add a cute little drawer for hidden storage—or skip if you’re blessed with tidiness:
- Build a simple box to fit your nightstand’s measurements
- Attach the bottom panel with glue and screws
- Install drawer slides inside the frame
- Pop on the drawer front, making sure it sits flush
Test the movement, and make tiny adjustments as needed.
Adding the Finishing Touches: Sand, Stain or Paint
- Sand again – yes, really! Focus where pieces join up
- Apply your chosen stain, using a rag for even coverage (wipe off excess)
- If painting, use a brush or roller for smooth coats. Lightly sand between coats for pro results
- Seal with clear polyurethane or wax for maximum durability
Let sit for a day or two to fully cure and air out – you don’t want the chemical stink right by your pillow.
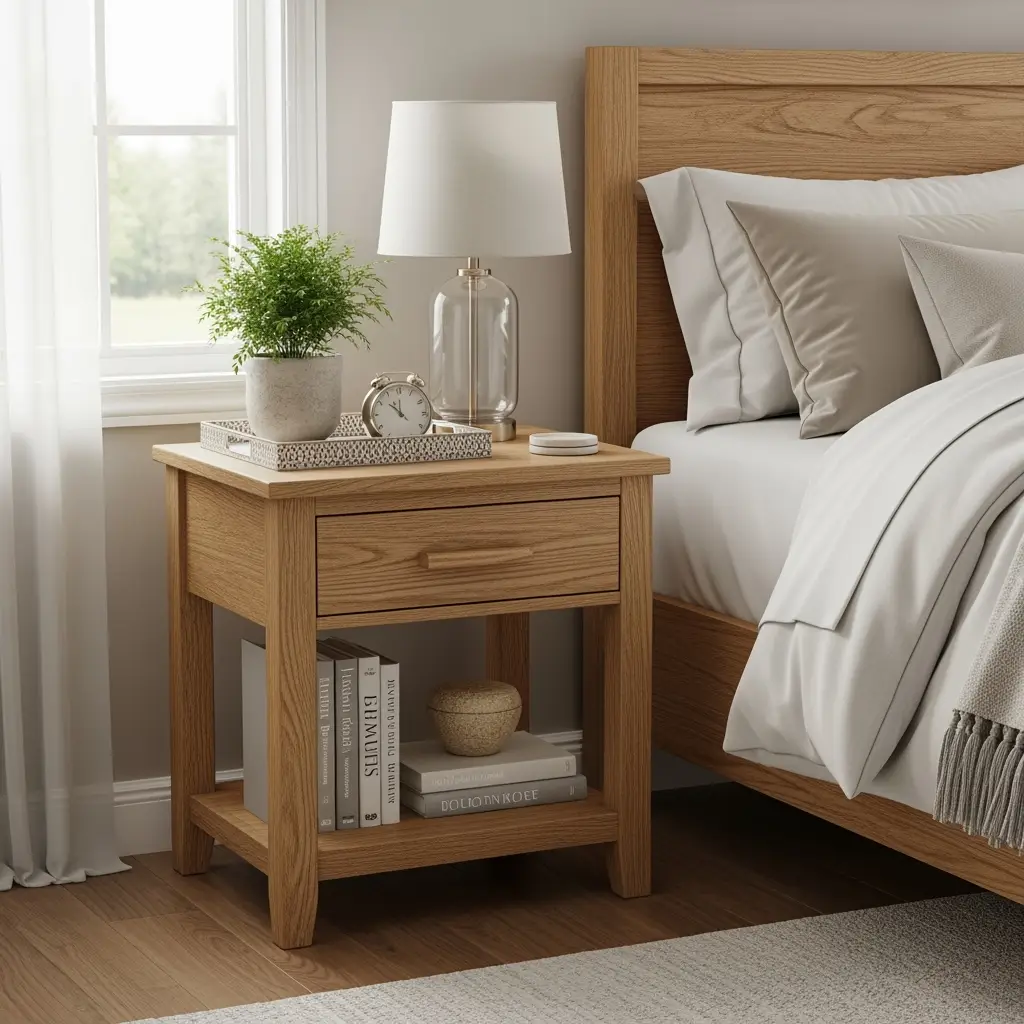
Styling and Customizing Your Finished Nightstand
The build is done, but don’t sleep on making your DIY wooden nightstand pop. Consider these ideas:
- Swap out the knobs or pulls for a unique statement
- Add a charging station for phones, tablets, or watches
- Stencil or hand-paint a pattern on the front or top
- Line the inside with felt, wallpaper scraps, or drawer liners
- Style the top with a lamp, plant, cute tray, or stack of books
Common Mistakes and How to Avoid Them
Even seasoned DIYers mess up. Learn from my failings (and from the bajillion stories on r/DIY):
- Don’t rush measurements – always measure twice, cut ONCE.
- Pre-drill screw holes to stop wood from splitting (especially on legs)
- Test fit boards before gluing or screwing down
- Don’t skip sanding between stain or paint coats – makes a world of difference
- Seal the piece if you’re using it near windows, bathrooms, or anywhere with moisture
Budget Breakdown: What Does a DIY Wooden Nightstand Cost?
Let’s talk $$$. A basic DIY wooden nightstand with pine can easily cost under $50 (yup, even with inflation). Go for oak, custom hardware, or premium finishes and it might hit $100 or more. Still, compare that to fancy store prices and you’re getting massive value. Plus, it’ll last longer and mean more to you.
DIY Wooden Nightstand: Troubleshooting and FAQs
What if my nightstand is wobbly?
Usually, it’s an uneven surface or one leg shorter. Check with a level, then sand or trim as needed. Add pads to the bottom of legs for a quick fix.
How do I attach hardware straight?
Measure in from each side and use masking tape as a guide. Start pilot holes with an awl for precision.
Can I make it without power tools?
Totally! You’ll just need a handsaw and some patience, but it’s doable. Your arms might curse you though.
Is it hard to add a second drawer?
Nope! Just repeat the drawer box process, but make sure the faces stack straight and slides align perfectly. Take your time, and celebrate with a snack when it’s done.
Level Up: Upcycling or Repurposing for Your Nightstand
Don’t wanna start totally from scratch? Score a thrift-store end table or small dresser, and hack it! Check out these upcycled home decor projects for inspiration. Cut down the height, sand back the finish, and slap on new legs or a fresh coat of paint. Voila: DIY wooden nightstand, minus the hard work. It’s sustainable, too – that’s a bonus in my book.
Share Your Project: Join the DIY Wooden Nightstand Movement
Finished your build? Awesome! Snap a pic, slap that #diywoodennightstand tag on social, and join a rad community of folks doing the same thing. Or brag to your friends, dog, anyone who’ll listen! You DID THAT.
Final Thoughts: Why a DIY Wooden Nightstand is Worth the Effort
No matter your room or skill, a DIY wooden nightstand project packs real punch. You get full bragging rights, custom style, serious savings, and a piece that’ll actually mean something to you. Maybe you’ll catch the woodworking bug, or hey – maybe you’re just done. Either way, rest easy knowing you built more than furniture; you built a story. Now, get building!


